Example: Using Azure Actions to Configure an Automatic Customer Response
Consider the following scenario:
A shipping company wants to detect a customer complaint about damaged packaging, and then automate the following actions in response:
Add and Configure an Office 365 Trigger to Get a New Customer Email
To use the Office 365 trigger in your workflow, create a new event for the Office 365 trigger. To create a new event, do the following:
1. Place the pointer on the start icon  , and then click
  or double-click . A list of triggers appears.
, and then click or double-click . A list of triggers appears.2. Select the Office 365 trigger, and then create a new event. The Office 365 trigger configuration window opens.
• If a trigger is already created, select an existing trigger, and then click SAVE. • To create a new trigger, click Create a new event for Office 365, and then proceed with the steps further. |
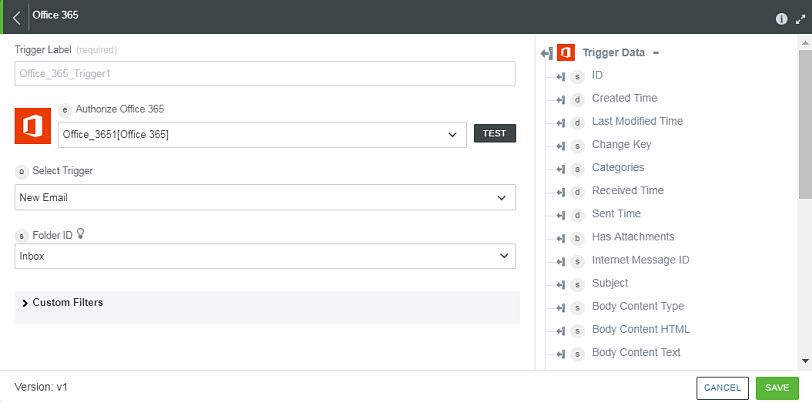
3. Edit the Trigger Label, if needed.
4. To add a new authorization, refer to Authorize Office 365.
If you previously added an authorization for Office 365, select an authorization from the list. |
5. In the Select Trigger list, select New Email.
6. In the Folder ID field, select Inbox.
7. Click SAVE.
Use LUIS Prediction to Verify Whether the Email is a Complaint about Damaged Packaging
Complete the following steps to use the LUIS Prediction action in your workflow:
1. Drag the LUIS Prediction action under the Azure connector to the canvas, place the pointer on the action, and then click or double-click the action.
or double-click the action.The LUIS Prediction window opens.
2. Edit the Label, if needed. By default, the label name is same as the action name.
3. To add a new authorization, refer to Authorize Azure.
If you previously added an authorization for Azure, select an authorization from the list.
4. In the LUIS Application ID list, select Specify.
5. In the Application ID field, enter the application ID of your LUIS application.
6. In the Resource Group list, select the appropriate resource group defined under your Azure subscription.
7. In the LUIS Account list, select the LUIS account defined in your resource group.
8. In the Query field, map the Subject from the previous action, as shown in the following figure:
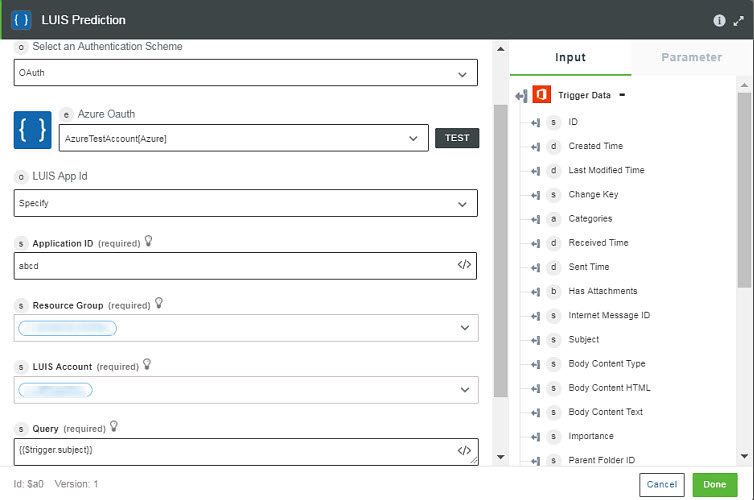
9. Click Done.
Use Text Analytics to Detect Sentiment of the Email
Complete the following steps to use the Text Analytics action in your workflow:
1. Drag the Text Analytics action under the Azure connector to the canvas, place the pointer on the action, and then click or double-click the action.
or double-click the action.The Text Analytics window opens.
2. Edit the Label, if needed. By default, the label name is same as the action name.
3. To add a new authorization, refer to Authorize Azure.
If you previously added an authorization for Azure, select an authorization from the list. |
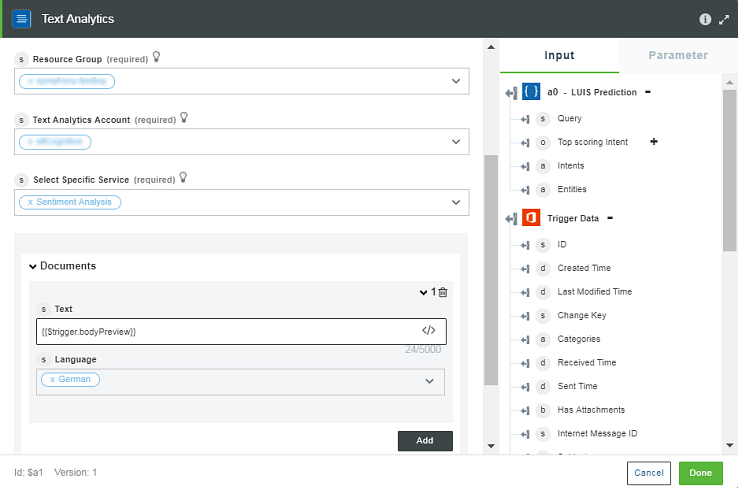
4. Select a Resource Group defined in the subscription.
5. Select the Text Analytics Account from the list.
6. In the Select Specific Service list, select Sentiment Analysis.
7. In the Documents section, click Add to enter the following details:
◦ Text — Map the Body Content Text from the Office 365 Trigger output schema, as shown in the figure above.
◦ Language — Select the appropriate language.
8. Click Done.
Add Conditions
ThingWorx Flow allows you to set conditions between two actions of your workflow. Using this functionality, you can define one or more custom conditions between two actions. The workflow proceeds to the next action only if the conditions are met.
1. To define conditions between the two actions, click the line that connects the two actions, and then click .
.The Condition window opens.

2. Click + Condition, and then enter the following details:
a. Map the Input from the output of the previous action.
b. Select the Condition operator that you want to apply on the specified input data.
c. Specify the Expected output value that you want to check against the specified input.
3. Click AND to specify a number of interrelated conditions. When all the conditions specified with the AND operator return true, the flow continues execution.
If any of the conditions return false, the flow execution stops immediately.
4. Click Done.
Execute Various Actions Using Execute Logic App in Response to the Customer Complaint
Complete the following steps to use the Execute Logic App action in your workflow:
1. Drag the Execute Logic App action under the Azure connector to the canvas, place the pointer on the action, and then click or double-click the action.
or double-click the action.The Execute Logic App action window opens.
2. Edit the Label, if needed. By default, the label name is same as the action name.
3. To add a new authorization, refer to Authorize Azure.
If you previously added an authorization for Azure, select an authorization from the list. |
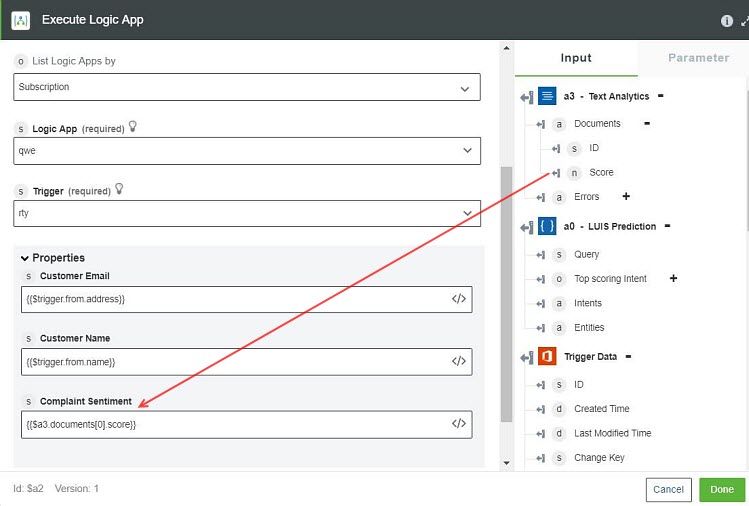
4. In the List Logic Apps by list, select Subscription.
5. Select the appropriate Logic App defined in your subscription and the Trigger present in the logic app.
6. Click Show additional fields.
7. In the Properties field, map the outputs to the following fields:
◦ Customer Email — From Email of Trigger Data
◦ Customer Name — From Name of Trigger Data
◦ Complaint Sentiment — Score of Text Analytics action
8. Click Done.
