Steam Sensor Example for the .NET SDK
The .NET SDK installation includes a 64-bit binary file for the Steam Sensor example that you can run "out-of-the-box". The Steam Sensor example is designed as a multi-target project, enabling compilation for both the legacy .NET Framework 4.8.1 and the modern .NET 8.0 platforms. This example provides properties that are updated by the VirtualThing as well as properties that are updated from the ThingWorx Platform. There are services and an event example as well.
|
|
For users whose systems are compatible only with the .NET Framework, the original Steam Sensor project has been renamed as LegacySteamSensor and relocated to the legacy directory within the install path.
|
The steps for using this example are covered in the following sections.
Initial Setup in ThingWorx Composer
Before you can run the example, you need to create the entities for the Steam Sensor example in ThingWorx Platform by importing the Entities_SteamSensor.xml file stored in the C:\Program Files (x86)\tw-dotnet-sdk-v.v.v\SteamSensor\import\ subdirectory of the .NET SDK installation. To import the entities file, complete the following steps:
1. Log in to ThingWorx Composer.
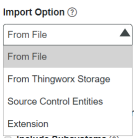
2. In the leftmost navigation bar of Composer, click Import/Export , and select Import to display the Import window:
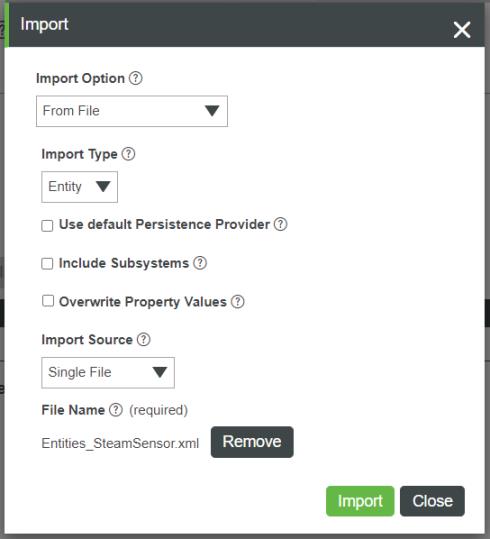
3. In the Import window, select From File from the Import Option dropdown list.
4. Select Entity from the Import Type dropdown list.
5. Skip the check boxes, and under Import Source, select Single File.
6. Click Browse, and navigate to the import subdirectory in C:\Program Files (x86)\tw-dotnet-sdk\SteamSensor\Import, and select the Entities_SteamSensor.xml file.
7. After selecting the file, click Open, and then click Import in the Import window.
8. When the import completes, click Close, and select > . The new Things for this example appear at the top of the list.
Running the SteamSensor Example
The SteamSensor project and source code are installed in C:\Program Files (x86)\tw-dotnet-sdk\SteamSensor. To run this example, you need to copy the .NET SDK libraries into this directory first. You may need Administrator privilege to copy into this directory. To run the example, follow these steps:
1. Open a Command Prompt.
2. Navigate to C:\Program Files (x86)\tw-dotnet-sdk\SteamSensor.
3. At the prompt, enter
SteamSensorConsole -h <hostname> -p <port> -k <application_key>
where:
◦ <hostname> is the IP or URL of the ThingWorx Platform host.
◦ <port> is the port number on the ThingWorx Platform host.
◦ <application_key> is the application key for authentication and authorization with the ThingWorx Platform. An application key needs to be created, using ThingWorx Composer, and is a string of characters separated by hyphens, in the following format:
xxxxxxxx-xxxx-xxxx-xxxx-xxxxxxxxxxxx
For example, to connect to a platform that is running on the local machine, using port 8443 (using SSL/TLS), and an application key, "aaaaaaaa-bbbb-cccc-dddd-eeeeeeee", at the command prompt, enter
SteamSensorConsole -h localhost -p 8443 -k aaaaaaaa-bbbb-cccc-dddd-eeeeeeee
You can configure other settings using command line options. To see the options, run the SteamSensorConsole application with a -u argument from the command line:
SteamSensorConsole -u
Managing Bindings in ThingWorx Composer
After starting Steam Sensor, you can manage the bindings for the properties, services, and events using ThingWox Composer:
1. Log in to ThingWorx Composer.
2. Navigate to the SteamSensor1 Thing.
3. Go to the Properties page.
4. Refresh the properties to verify that the isConnected property is true.
5. Click Edit.
6. Click Manage Bindings to browse for the remote properties.
7. In the Manage Property Bindings page, click the Remote tab to view the remote properties.
8. Click Add All Above Properties to add all of the properties.
9. Click Done.
10. Click Save.
11. Refresh the properties and verify that they are changing.
12. Go to the Services page.
13. Click Browse Remote Services.
14. Click Add All Above Services to add the services.
15. Click Done.
16. Click Save.
17. Next to the AddNumbers service, click Test and verify the service is working.
18. Go to the Events page.
19. Click Browse Remote Events.
20. Click Add All Above Events.
21. If the SteamSensor.Fault Data Shape has not been created already, click Create.
22. Click Save.
23. Go to the Subscriptions page.
24. Click Add My Subscriptions.
25. From the Select an Event menu, select SteamSensorFault.
26. Select the Enabled check box.
27. Enter the following for the Script text that will write an event when there is a steam sensor fault:
logger.error("Steam Sensor 1 Fault: " + eventData.message);
As of .NET SDK 5.8.0 , the logging library is log4net. If you upgraded to this version, you need to modify your application to use the new library. The following examples are taken from the SteamSensorClient.cs file in the Steam Sensor example included with the SDK: a. Replace the existing logging library by removing the existing statement and adding the following: using log4net; b. Start with getting the logging library: namespace SteamSensorConsole { public class SteamSensorClient : ConnectedThingClient { private static ILog LOG = LogManager.GetLogger(typeof(SteamSensorClient)); |
28. Click Done.
29. Click Save.
Source Files
The source files for this binary are in the SteamSensor subdirectory of the installation:
• SteamSensor.csproj—The project file for the Steam Sensor Console example. The project file has been revamped to align with modern project structure and now targets .NET Framework 4.8.1 and .NET 8.0.
• SteamThing.cs—This file sets up all the property, service, and event definitions for this example.
• SteamSensorClient.cs—This file contains the user interface for the console. It configures the client based on user input (using the ClientConfigurator class), instantiates the client (ConnectedThingClient class), and starts it. As long as the connection is successful, it collects values from the steam sensors.
Modifying the SSL/TLS Configuration
Depending on your use of SSL/TLS with this example, you can use command line options to change whether self-signed certificates are allowed and to disable certificate validation. In addition, you need to make some changes in the SteamSensorClient.cs file. For convenience during development, the SteamSensor example provides ways to disable security features. The rest of this section explains how.
WARNING: Allowing self-signed certificates, or disabling certificate validation, bypasses vital security features and should never be done in a production environment. These options are for development only, and should be completely disabled in production.
If you are connecting over HTTPS and using a self-signed certificate, the client configuration (ClientConfigurator) must be set up to allow self-signed certificates. When you run the SteamSensorConsole, you can use command line options to enable self-signed certificates or to disable certificate validation entirely, as follows:
• To enable self-signed certificates, enter the following at the command prompt:
SteamSensorConsole -h <hostname> -p <port> -k <application_key> -s
The -s option enables self-signed certificates.
• To disable certificate validation entirely, enter the following at the command prompt:
SteamSensorConsole -h <hostname> -p <port> -k <application_key> -c
The -c option disables certificate validation entirely.
If you must use an insecure (non-SSL/TLS) connection, you need to call the disableEncryption() method on the ConnectedThingClient after instantiating the client but before calling connect on it. Locate the following lines in SteamSensorClient.cs:
/***** WARNING: For Development purposes only. *****/
/***** Do not use these settings in a production environment. *****/
// To connect to an insecure (non-SSL) server
// ConnectedThingClient.disableEncryption();
/***** WARNING *****/
/***** Do not use these settings in a production environment. *****/
// To connect to an insecure (non-SSL) server
// ConnectedThingClient.disableEncryption();
/***** WARNING *****/
Remove the comment characters (//) from the beginning of the line that contains the disableEncryption() method. It should now look like this:
/***** WARNING: For Development purposes only. *****/
/***** Do not use these settings in a production environment. *****/
// To connect to an insecure (non-SSL) server
ConnectedThingClient.disableEncryption();
/***** WARNING *****/
/***** Do not use these settings in a production environment. *****/
// To connect to an insecure (non-SSL) server
ConnectedThingClient.disableEncryption();
/***** WARNING *****/
Save the SteamSensorClient.cs file, and run the project with the correct command line options, as described above.
It is strongly recommended that you use SSL/TLS with a valid server certificate for connections between your devices and the ThingWorx Platform. Use self-signed certificates for development purposes only. Never use them in a production environment. |
Operation
The only property in the Steam Sensor example that does not update is the TemperatureLimit property. This property defines the limit for the fault of the steam sensor. The fault occurs when the value of this property is greater than zero and the temperature exceeds the limit defined by this property. If the value of this property is 0 or less, the fault does not occur.
Name | Function | Description |
|---|---|---|
Temperature | Ranges from 400-440. | Temperature of the steam sensor. |
Pressure | Ranges from 18-23. | Pressure of the steam sensor. |
TotalFlow | Starts at 0 and increments by 0-1 every scan rate. | Total flow through the steam sensor. |
InletValve | Usually true, set to false on 15– second intervals. | Inlet valve of the steam sensor. |
TemperatureLimit | If this value is greater than zero and the value of Temperature rises above this value, a fault is generated in the steam sensor. | The temperature value that, when reached, causes a fault in the steam sensor. |
FaultStatus | True when a fault occurs, false otherwise. Determine what can cause a fault above. | Indicates that a fault occurred in the steam sensor. |
Name | Function |
|---|---|
AddNumbers (NUMBER a, NUMBER b) | Returns the sum of two double precision numbers. |
GetBigString | Returns a large string value of all zeros. |
GetSteamSensorReadings | Returns an InfoTable that contains several readings from the steam sensor. |
Name | Function |
|---|---|
SteamSensorFault | Occurs when the value of TemperatureLimit is greater than zero and the value of Temperature is greater than TemperatureLimit. The event data is defined by the SteamSensor. Fault Data Shape and contains only a single STRING field that is named message. When a fault occurs, the content of message is sent in the event data. |