Digitally Signing Packages
To ensure that every possible safeguard is in place to prevent malicious code from being downloaded and executed on Edge devices, it is possible to sign the content of deployment packages digitally. This feature provides the following capabilities:
• By embedding the digital signature within the archive itself, the archive will pass through the ThingWorx Platform SCM deployment process unmodified as well as guarantee the integrity of the package while it was stored within a platform File Repository.
• The content for a package can be signed before the package and deployment are created. The Edge devices will read the digital signature and execute the content only if the signature is validated. Note that there is another requirement for the Edge devices to execute the content, and that is the interpreter on the device must be whitelisted.
• If the signature is missing or does not match the expected value, the Edge device is prevented from executing the content.
• Warnings and/or alerts are raised when a digital signature cannot be validated.
• Only users with visibility and permissions have access to the certificate that is used for validation. To have the proper visibility and permissions, the user must be specified in the whitelist.
The following sections first explain how to create a package with signed content and then provide additional information about digital signing works:
How Do You Create a Package with Signed Content?
The ThingWorx SCM Edge Extension for the C SDK provides a Java-based console application that accepts a private key in PKCS12 format to apply to a compressed package (ZIP or TGZ). This Package Digital Signature application can be found in the examples directory of the SCM Edge Extension installation, along with the other SCM example applications. Source for this application is provided.
The distribution bundle of the SCM Edge Extension also includes a tool (makekeys) that you can run to generate a private key file (PFX) and either a public key file (PEM) or a public certificate file with an embedded public key (CRT). The CRT file is an RSA digital signature embedded in an X.509 wrapper. If you do not already have these files to use with the Package Digital Signature tool, run this tool before using the signing tool.
|
|
Why use a PEM versus a CRT file? Here are reasons to consider:
• Depending on what you have on hand from your certificate issuer, you may find it useful to have both files.
• A CRT file will work with X.509 CN field validation.
|
Running this application requires a Java Runtime version 8 or later to be installed on the computer where you want to run it.
|
|
The package archive file must exist on your local machine for you to run this application. When you create a package, you upload an archive to the platform. If you have an existing package that you want to sign, as long as it has not been published, you can navigate to the "Edit Package" screen and use the download button to download the package's raw archive to sign locally. You would then upload the newly signed archive and update the package to use it. Here is the 'Edit Package" screen, with the download button circled in red: 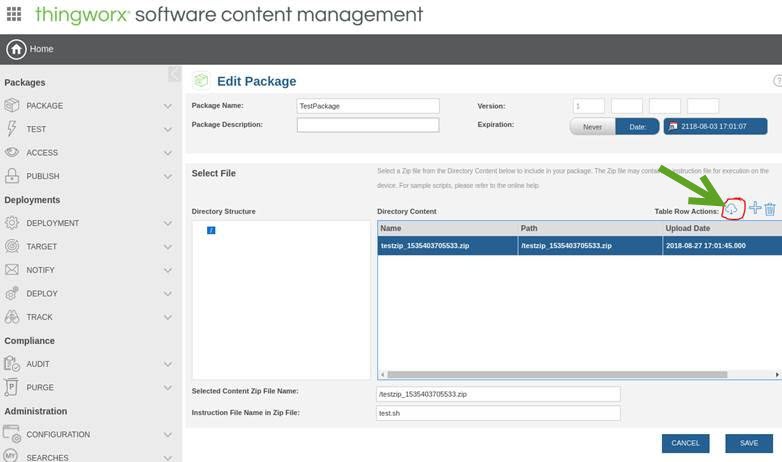 |
To generate a private key file (optional) and then add a digital signature to a package archive (ZIP or TGZ), follow these steps:
1. Open a shell (Linux) or Command Prompt (Windows), and navigate to the directory where this application is stored.
2. If you already have a certificate file that you want to use for digital signing, continue to the next step. If you do not have a certificate file already, you can use the makekeys tool provided in the SCM Edge Extension distribution to generate a private key file and either a public key file or a public certificate file with an embedded public key, as follows
:
a. Make sure that the OpenSSL toolkit (v.1.1.1j or later) is installed on your computer AND that it is in your system PATH.
b. From a shell or Command Prompt, navigate to the tools/pksigner/bin subdirectory of the SCM Edge Extension installation.
c. To run the script, type makekeys at the command or shell prompt. For example, from a Linux shell, you might type
./makekeys.sh test_key cert
Where
▪ text_key provides the name of the private key file to create.
▪ cert specifies that you want to generate a CRT file that contains a certificate with the public key embedded . If you do NOT specify cert, the tool generates a PEM file with only the embedded public key.
d. Provide appropriate responses to the questions when prompted. Note that if you choose a password for the private key, enter that same password for all the questions that prompt for a password.
When complete, the script will have generated the appropriate file for the public key (CRT if you specified cert or PEM for just the public key). That is, if you did not specify cert, only the PEM file is generated. This script also generates the PFX file for the private key. Finally, it puts all of the validation settings into a TXT file, called validation_settings.txt. You can specify this file when running the digital signing application.
e. Move the generated files to a location where your SCM client can access them.
3. To run the Package Digital Signature application open a command or shell prompt, and navigate to the bin subdirectory of your distribution. Depending on the operation system type one of the following commands:
◦ Linux:
./pkgsigner.sh <package_file_> <certificate_file> [certificate password]
◦ Windows:
pkgsigner.bat <package_file_> <certificate_file> [certificate password]
where:
◦ <package_file> is the path to the archive to be downloaded.
◦ <certificate_file> is the path to a PKCS-12 encoded (.PFX or P12) certificate file. If you generated a .PFX private key file using the makekeys tool, enter the path to that file. makekeys adds the name of public key file (either a PEM or CRT file) as the value of the pathToPublicKeyFile= parameter in the validation_settings.txt file. Note that it adds only the name of this file.
|
|
If you want to put the file in a different location, add the path to the CRT or PEM file to the pathToPublicKeyFile= setting in the validation_settings.txt file.
|
◦ [certificate_password] is the password that you may have used for the certificate or private key file.
This application generates a hash for each file within the archive and stores the hashes in the required META-INF/MANIFEST.MF file. It also generates the META-INF/MANIFEST.RSA file, which contains the digital signature for the archive with the keys provided. Finally, it copies the archive as a new archive, using the format of the existing archive, and adding the two manifest files to the META-INF directory in the archive. For example, if the name of the archive is scmext.zip, the new, digitally signed archive is scmext_signed.zip. Similarly, if the name of the archive is scmext.tgz, the new, digitally signed archive is scmext_signed.tgz. After the new archive has been generated, you are ready to upload it to the SCM Platform Extension mashup, and create (if you have not already) and deploy the package.
|
|
When you are building an executable on Windows (for example, the scm_client sample application or the scm_service sample application, you must include the following so that the CRT or PEM file can be read from disk: #include "applink.c".
|
How Is a Signed Package Validated?
When a package has exited the downloaded state, it enters a waiting period before it is executed. No validation is performed after download is completed. The compressed package waits until execution is requested.
When execution is requested, the client checks its configuration. If it has been provided a public key and validation is enabled, it will assume that all packages it receives must be signed. The SCM Edge Extension performs this validation.
Package inflation will then be performed and the entire package structure will exist on the device. Next, the MANIFEST.MF will be validated using the MANIFEST.RSA file. If this validation fails, the deployment is aborted, and the inflated file system and its package are immediately deleted from the device.
As long as validation succeeds, the manifest is read in. The text of the manifest (MANIFEST.MF) should look something like this:
Manifest-Version: 1.0
Name: example_package/scripts/program.py
SHA-256-Digest: <base64 encoded hash>
Name: example_package/scripts/update.py
SHA-256-Digest: <base64 encoded hash>
Name: example_package/scripts/install.py
SHA-256-Digest: <base64 encoded hash>
Name: example_package/resources/strings.bin
SHA-256-Digest: <base64 encoded hash>
Name: example_package/resources/images/image.jpg
SHA-256-Digest: <base64 encoded hash>
Name: example_package/resources/images/banner.jpg
SHA-256-Digest: <base64 encoded hash>
This file is read into memory and then the files are rehashed and the results compared to the digests above. Any differences cause the package to abort.
Next, the inflated directory is scanned and compared to the in-memory manifest. Any files present that were not called out in the manifest cause the package execution to be aborted.
Aborting package execution causes the original package archive and its extracted file system to be deleted from the device.
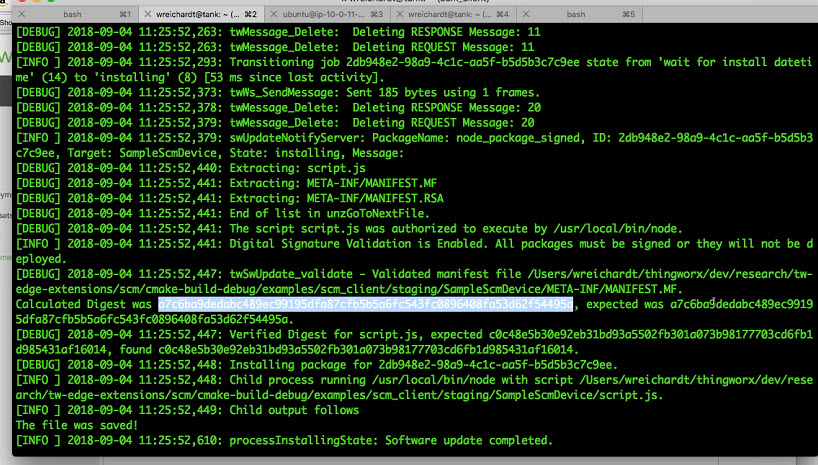
As long as the validation succeeds, the package is executed. Here is an example of the console output for a successfully deployed package that has a digital signature:
How Does Digital Signing Work?
The digital signature method hashes the files and builds a manifest text file (MANIFEST.MF), containing all the file paths and hashes. Then, this text file is hashed and encrypted with a private key that only the packager controls. This process is shown in the following diagram:
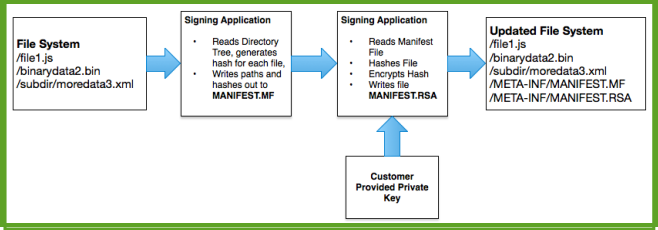
When you require the MANIFEST.MF be signed, you will know it has not changed and must be from the holder of your private key. You will know if it has changed because you have read its signature from MANIFEST.RSA, you have then decrypted the public key on the SCM client, so you know its required hash. You have then rehashed MANIFEST.MF and the two hashes match.
If you know MANIFEST.MF is valid, you can then read in and use this file to read in the paths and hashes of all the valid files called out in the manifest. If any file is missing from the manifest, the validation operation fails. and the whole process is aborted as soon as the first missing file is found.
What is left is guaranteed to be what the original user deploying the package intended. This method holds true even if you proceed to compress the file system in question. Bottom line, if the archive is modified, the deployment will fail.
But What If ...
The following table maps scenarios to how they will be handled:
Scenario | Result |
|---|---|
Files are added to the package. | The SCM extension will abort the deployment if the archive contains files that were not present in the signature. |
Existing package file changes. | After package inflation step on the client, the MANIFEST.MF recorded hash for this file would be compared to the recalculated hash. If the hashes do not match, the deployment would abort. |
The MANIFEST.MF file is modified. | After package inflation, the first validation step would be to read in MANIFEST.RSA. The public key would decrypt it, and the resulting hash would be compared to a recalculated hash of MANIFEST.MF. If the hashes do not match, the deployment would abort. |
The MANIFEST.RSA and MANIFEST.MF are modified. | Creating a MANIFEST.RSA is not trivial. it is very unlikely that an alternate MANIFEST.MF would ever be accepted for these reasons: • The SCM client holds a public key used for validation. • Creating an acceptable MANIFEST.RSA to go with the alternate MANIFEST.MF is statistically unlikely, unless you posses the private key that is a match for the public key. This package would abort. |