Setting Up SCM
To set up a ThingWorx C SDK edge application to support the SCM Extension for ThingWorx Platform, you need to add the ThingWorx SCM Edge Extension to your application. The steps to set up your environment for SCM follow:
1. If you are currently using ThingWorx Utilities and have not read the 8.5.0 release notes, refer to the ThingWorx Utilities Packaging Notice. Otherwise, continue to the next step.
2. Check that your environment meets the Requirements.
3. Import the Extensions to support SCM.
ThingWorx Utilities Packaging Notice
Starting with release 8.3.0, ThingWorx Utilities was repackaged and made available partly in ThingWorx Apps and partly as separate extensions::
• ThingWorx Utilities Core
|
|
This extension bundle is a pre-requisite for the other extensions and must be installed first.
For release 8.4.0 and 8.5.0, ThingWorx Asset Manager and ThingWorx Alert Manager have been improved and migrated to ThingWorx Asset Advisor. For release 8.3.0 of the Utilities, however, the ThingWorx Utilities Core bundle includes both of them.
|
• ThingWorx Audit Manager
• ThingWorx Software Content Management (SCM) — Available as a separate extension for use with both ThingWorx Apps and ThingWorx Utilities.
• For ThingWorx Platform 8.5, ThingWorx Workflow Builder and ThingWorx Workflow Management are no longer distributed for the Utilities. They have been replaced by ThingWorx Flow.
• For ThingWorx Platform 8.4, the Remote Access and Control was replaced by the ThingWorx Remote Access Extension and the Remote Access Client. It is no longer part of the Utilities.
Requirements
This topic assumes you have the following set up.
• A ThingWorx Platform instance (v. 8.3.0 or later) is installed and running.
• The version of the C SDK required for your version of the SCM Edge Extensions is installed on your machine. The signature of the TWSHA256_sha256_file and decryptSignatureRsaFile function changed in v.2.2.8 of the C SDK, so version 1.0.0 of the SCM Edge Extension is compatible with C SDK v.2.2.7 but not v.2.2.8
The requirements are described in the following table:
|
SCM Edge Extension Version
|
SDK Version
|
|---|---|
|
1.0.0.872
|
C SDK 2.1.3 through 2.2.7
|
|
1.0.2
|
C SDK 2.2.11, 2.2.12, 3.0.0
|
|
|
If you installed the C SDK to /opt/thingworx, you will need to specify the path when building the SCM edge extension, as follows:
DCMAKE_INCLUDE_PATH=/opt/thingworx/include:/opt/thingworx/lib
|
• The following supporting software installed on your machine:
◦ CMake 3.4.1 or later (https://cmake.org/download/).
◦ C/C++ Compiler.
◦ Microsoft Visual Studio (Windows) 2017.
◦ GCC (Linux) 4.x or later. Check your distribution's package manager.
◦ Curl.
|
|
For Windows users, be sure that any necessary build tools have been added to your PATH.
|
Import the Extensions
|
|
The ThingWorx Platform requires that the Administrator modify settings in the platform-settings.json configuration file for the platform and restart it before any extensions can be imported. Refer to the following topics in the ThingWorx Platform Help Center for details:
|
After you download the appropriate extension zip packages, complete the following steps to import each extension that you want to use into ThingWorx Platform:
1. Log into ThingWorx Composer as an administrator.
2. In the toolbar at the top, click the Import/Export menu and select Import, as shown here:

The Import dialog box opens.
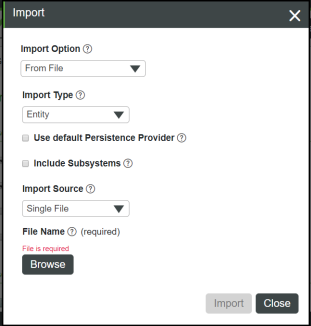
3. In the Import Option list, select Extension.
4. After the screen refreshes, click Browse and navigate to the extension zip file, and click Open.
5. Once the name of the extension is shown in the Import dialog, click Import.
The extension file is imported and the Installation Results are displayed.
If any import failure messages are displayed, use the information provided in the message to resolve the error before proceeding. |
6. Once the import process is complete, click Close.
7. When prompted to refresh your browser, click Yes.
8. To verify that the import was successful, click the Import/Export menu and select Manage Extensions. Ensure that the imported components appear in the Installed Extension Packages table.
Verify the Import
To verify that the extension has been successfully imported, complete the following steps:
1. In ThingWorx Composer, search for and select the PTC.ConvergeConsole mashup.
2. Click View Mashup.
3. On the ThingWorx Utilities Console, click the tile and verify that it loads the mashup for the extension package that you have installed.
Setting Up Things to Use SCM
For you to be able to monitor and interact with your devices in the user interface of Asset Advisor for SCM, the Things that represent your devices on the ThingWorx Platform need to be configured as follows:
1. Log in to ThingWorx Composer as a user who can edit the Things for your devices.
2. Navigate to a Thing, and on the General Information page, select TW.RSM.Template.AssetWithTunnelsAndFileTransfer as the Thing Template that the Thing implements.
3. Add the following Implemented Shapes PTC.Asset.ManagedAsset, TW.RSM.SFW.ThingShape.Updateable, and PTC.Resource.Asset.SCMResourceThingShape.
4. Add PTC:AssetType to Tags.
5. Click Save.
6. Repeat these steps for each Thing to which you want to be able to send file-based packages.
Also in ThingWorx Composer, make sure you grant visibility and permissions for the Things and add users to user groups and grant them the permissions and visibility needed for SCM. Refer to Entity Permissions in the ThingWorx Help Center on the PTC Support site.
If you plan to use ThingWorx Asset Advisor with the ThingWorx SCM Extension for a user interface, make sure that you follow the instructions in ThingWorx Apps 8.5 Help Center to set up Asset Advisor to display the SCM tile and to grant visibility and permissions to users.
Although it is deprecated, you can use ThingWorx Utilities v.8.4 with the ThingWorx SCM Extension user interface. Be sure to follow the instructions in the "Visibility Support for ThingWorx Utilities", in the ThingWorx Utilities Installation Guide to grant visibility and permissions for SCM to end users. For users, refer to Adding User Groups to the TW.RSM.RemoteServices Group in the ThingWorx Utilities Help Center.
Build the SCM Extension
Building works the same way as building your C SDK application. Extract the tw-edge-extensions zip file. After extracting the zip file, the source directory would be something like c:\path\to\scmext-1.x.x and the build directory would be c:\path\to\scmext-1.x.x\bin.
Linux & Mac
cd /path/to/scmext-1.x.x
mkdir bin
cd bin
cmake ../
make
It is recommended that you use the default installation directory when building the SCM edge extension, as shown in this example. However, if you used the CMAKE_INSTALL_PREFIX when you set up the C SDK, you need to enter the CMAKE_INCLUDE_PATH definition with cmake and provide the path to the C SDK. for example: cmake ../ -DCMAKE_INCLUDE_PATH=/opt/thingworx/include;/opt/ thingworx/lib |
Example 3. Windows
1. Use CMake to generate the SCM solution file for Visual Studio 2017 (use the \path\to\scmext-1.x.x directory within the extracted directory tree from the zip file as the CMake project root for the "where is the source code" CMake field).
2. Click Generate to generate the solution file.
3. Open the solution file in Visual Studio 2017.
4. Select a build configuration (Release/Debug) that matches that of your installed C SDK. If you followed the C SDK installation guide, this should be "Debug".
◦ If you cannot load the SCM extension even though the TWXLIB path appears to be correct, the build configuration is likely the cause of the issue.
◦ If you encounter heap space memory corruption errors and/or crashing during or after loading the SCM extension, the build configuration is likely the cause of the issue
5. Select > the solution with the "ALL_BUILD" project selected as the active project to compile the entire solution.
If you are building an executable on Windows (for example, the scm_client sample application or the scm_service sample application, you must include the following for the cert or pem file can be read from disk: #include "applink.c". |
Set the TWXLIB Environment Variable for Extension Library Loading
The C SDK allows extension libraries to be loaded from a specified directory only. This directory can be provided through the TWXLIB environment variable. If this variable is not set the scm_client example will automatically set it in such a way that allows the user to run the application from C:\path\to\scmext\bin\examples\scm_client, which is also where Visual Studio runs the application. If you wish to run the application from a different directory you will need to set TWXLIB accordingly
The directory in which your scmext library is generated depends on your build platform.
• For Linux, the scmext library is generated at /path/to/scmext-1.x.x/bin/libscmext.so.
• For Windows, the scmext library is generated at C:\path\to\scmext-1.x.x\bin\Debug\scmext.dll or C:\path\to\scmext-1.x.x\bin\Release\scmext.dll , depending on your build configuration.
If the TWXLIB environment variable is not set, the scm_client example application will set it automatically, as appropriate for your platform:
• Linux - the environment variable should be set to /path/to/scmext-1.x.x/bin.
• Windows - The environment variable should be set to C:\path\to\scmext-1.x.x\bin\<Release|Debug>.
• Because the example application's default TWXLIB value is a relative path, you will need to adjust your TWXLIB variable if you want to execute from a path different from the ones listed above:
◦ Linux - use set TWXLIB=/path/to/directory/containing/scmext.
◦ Windows - use set TWXLIB C:\path\to\director\containing\scmext.
Make sure that you refresh your environment after setting the variable and before trying to run the application again.
Run the Examples
Run the SCM Examples, following the instructions in the following topics:
Troubleshoot Common Issues
The extension library failed to load.
This error is common if you are trying to run the example from an unusual directory. If the TWXLIB environment variable is not set, the application will try to load the scmext library from ../../ on a Linux device and from ../../<Release/Debug> on a Windows device. If these relative paths do not line up with the directory where you are running the example, set the TWXLIB environment variable to the proper directory containing the scmext library by opening a shell (Linux) or a Command Prompt (Windows) and running the command for your operating system:
# Windows (Open a new command prompt window to reload your environment variables afterwards)
setx TWXLIB "/path/to/directory/containing/my/scmext/library"
# Linux
set TWXLIB="/path/to/directory/containing/my/scmext/library"
On a Windows computer, close the Command Prompt window and open a new one to reload the environment variables after running the command.
If TWXLIB appears to be set properly, but the C SDK does not appear to load it anyway, make sure that your installed C SDK build configuration (Release/Debug) matches that of the SCM project.
If you encounter heap space memory corruption and/or crash during or after loading the SCM extension, make sure that your installed C SDK build configuration (Release/Debug) matches that of the SCM project.