Example: Manipulating 2D Geometry
How to manipulate various 2D geometric entities is shown in the following examples:
• Point—Select and drag the point to a new location.
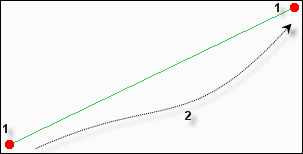
• Line—Select and drag endpoint 1 (shown in the next figure) to modify the length and orientation. The selected endpoint follows the pointer while the opposite endpoint remains fixed.
If you select and drag anywhere along 2, the entire line moves with its original length and the orientation is maintained during the move.
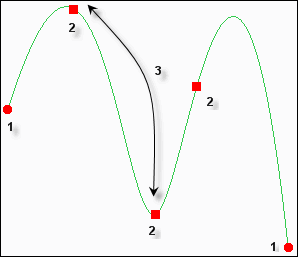
• Spline—Select and drag endpoint 1 (shown in the next figure) to modify the length and orientation of the spline. The selected endpoint follows the pointer while the opposite end point remains fixed.
The points 2 represent manipulation handles on the spline that are being dragged. 3 represents one of the drag directions for the manipulation handles. Drag the manipulation handles to a new location. The curve rubberbands with the point movement to show how the shape changes with movement.
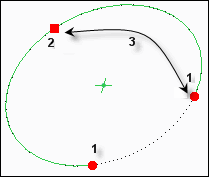
• Arc—An arc appears with a track along with the endpoints and manipulation handles. A track is a dotted line that completes the arc to form a full circle. When you drag the manipulation handle 2 in the direction 3 (shown in the next figure), the radius of the arc changes retaining both the location of the center and the radial directions from center to the endpoints fixed. However, the position of the endpoints does not remain fixed.
When you drag endpoint 1 along the dotted line, the angle that the arc subtends about the center changes, while the center, radius, and the opposite endpoint remain fixed.
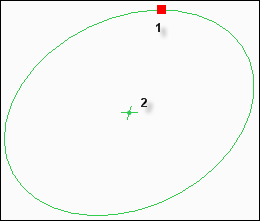
• Circle—Select and drag the manipulation handle 1 (shown in the next figure) to change the radius while keeping center point 2 fixed.
You can also drag center point 2 to translate the circle.