Using the Options Toolbar and Floating Dashboard
An Options Toolbar and a Floating Dashboard contain all the options and controls for a particular tool. An Options Toolbar opens:
• When you click a command on the ribbon and then select a geometric entity in the graphics window or,
• When you click a command on the Live Toolbar.
The Options Toolbar shows the most relevant options for the selected command. You can perform most operations using the options on the Options Toolbar.
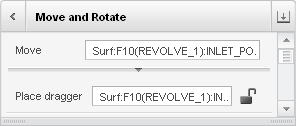
You can expand the Options Toolbar to open the Floating Dashboard, which has a header, panels, and a footer. A sample Options Toolbar follows:
Options Toolbar (Collapsed Floating Dashboard) for Move command
You can collapse a Floating Dashboard to get an Options Toolbar. By default, an expanded Floating Dashboard shows all the available panels. Example of expanded Floating Dashboard is shown:
Expanded Floating Dashboard
Header
The tool name and any collector prompts appear on the header. An arrow next to the tool name expands to the following elements:
• A gallery of user-defined and default templates for the tool. Perform one or more of these operations depending on your modeling context and requirements:
◦ Select a template to change the configuration of the active dashboard.
◦ Set a template as the default by right-clicking it and clicking Set as Default Template.
◦ Remove a user-defined template by right-clicking it and clicking Remove Template.
• A (+) button that opens the Add Tool Template dialog box for adding user-defined templates. In the dialog box, type a name that does not include the characters \, /, :, *, ?, “, <, >, or |.
If you have collapsed the Floating Dashboard, the header appears as an Options Toolbar. The Options Toolbar only has the available most-used options for an operation. Click

on the Options Toolbar to expand the Floating Dashboard. Click

on the header to collapse the Floating Dashboard.
Panels
Depending on the input required for a tool, one or more panels with check boxes, collectors, radio buttons, or lists appear on the Floating Dashboard. You can expand or collapse a panel. In some cases a panel switch button

appears next to an option. Click this button to activate the option.
A small notch below any of the panels indicates that there are additional options on the Floating Dashboard.
Footer
By default, only the available options for a tool appear on the Floating Dashboard. A small notch on the footer indicates that there are additional options on the Floating Dashboard. Drag the footer to view or hide them.
Customizing the Floating Dashboard
You can customize the Floating Dashboard for a tool. To do so, use the
Creo Direct Options dialog box that opens when you click
File >
 Options
.