To scale a part or assembly means to change its size. With Creo Elements/Direct Modeling, you can increase or decrease the size of a part or assembly isotropically or anisotropically. Creo Elements/Direct Modeling displays the scaling axes Px, Py, and Pz during the scaling operation to let you specify the direction of scaling and the center about which the scaling takes place.
You can specify whether to scale whole bodies or user-defined features such as strengthening ribs. It is also possible to scale whole bodies and exclude user-defined cylindrical and conical faces. The selected cylinders/cones keep their radii and their axes direction, but are moved according to the scaling of their supporting faces. Existing blends can also be specified to be kept.
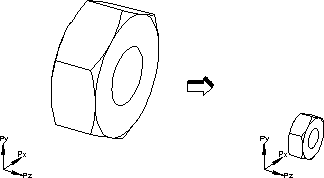
Scaling a part: isotropic
Isotropic scaling changes the volume of a part and its position relative to the global coordinate origin. A scaling value larger than 1 will increase the volume and the distance between the part and the global coordinate origin. A value larger than 0 and smaller than 1 will decrease the part's volume and the distance towards the global coordinate origin.
If the scaled parts become corrupt while the part checker is turned on, the checker automatically adapts the resolution and then re-checks the part. If the part checker determines the parts to be valid, the user must either confirm or view the details of the resolution change.
The values -0.5 and +2.0 will double the size of a part, while +0.5 and -2.0 will reduce it to 50% of its original size.
Scaling a part: anisotropic
Anisotropic scaling simulates the shrinkage of molded plastic parts (plastic shrinks anisotropically as it cools down). With Creo Elements/Direct Modeling, you can specify scaling factors in XYZ directions to compensate for this shrinkage.
Scale the part or face by using values in the range 0 to 1. The value 0.9, scales the part or face by 10%.
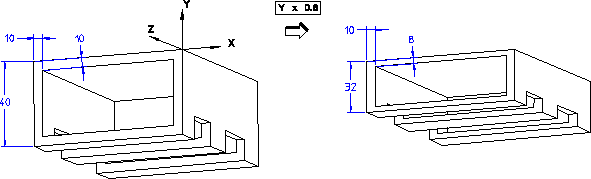
The following example shows the effect of scaling a part by a factor of 0.8 in the Y-direction only. Notice how the X-direction wall thickness (10) remains the same, but the Y-direction wall thickness (8) is also reduced by the scaling-factor. Scaling a part by the same value in all directions is the same as isotropic scaling.
To scale a part or assembly,
1. Click Modeling and then, in the Modify 3D group, click More.
2. Click Scale in the Modify section. The Scale dialog box opens.
3. Choose what you want to scale:
◦ Click Parts to scale a part or assembly.
◦ Click Faces to scale specific faces.
4. With the Parts option selected, specify the part using one of the following ways:
◦ Click the part.
◦ Click the part or assembly in the browser.
◦ Use the Select tool to specify multiple parts or assemblies.
5. With Faces option selected, use the Select tool to select the faces to be scaled.
6. If necessary, click Redo Blends and specify the blends to be recalculated after the scaling to their original blend radius (unless the Scale Blends by Average option is used - see below). Otherwise the blends are scaled along with the faces or parts.
7. Click Scale Blends by Average on to scale the blends selected with Redo Blends by the average value of the X, Y and Z scaling factors (that is, the original blend radii are not kept). The blend scaling value used with this option is (X+Y+Z) / 3.
8. If necessary, click Exclude to exclude conical or cylindrical faces from the scaling operation. The Scale Blends by Average option does not work in conjunction with the Exclude option, which causes cylinders not to be scaled but only to be moved within their supporting face.
9. If necessary, click Part Origin and identify a new origin for scaling.
10. By default, you must enter scaling factors manually (see below). However, if you have customized predefined scaling factors, you can select these from the Default Vals list (User Def is the default, manual option). Whichever set of values you choose, the system automatically determines if it refers to Isotropic or Anisotropic scaling, and the Scale menu will reflect this and display the scale values.
You can customize sets of scaling factors in a customization file found in the Creo Elements/Direct Modeling installation directory:
where x is your Creo Elements/Direct Modeling version number.
11. Now you can click one of the following:
◦ Click Isotropic and enter a single scaling factor in Scale to scale the part isotropically (default). (For example, 2 doubles the size of the part, 0.5 halves the size of the part.)
◦ Click Anisotropic to scale the part anisotropically.
1. Enter a value in the Scaling Factors fields. (For example, .9 in the Y-Scale field reduces the Y-direction by 10%.) The allowable scaling factors are between 0.5 and 2.0 and between -2.0 and -0.5.
2. If necessary, change the scaling direction in Part XYZ-Directions.
12. Click Keep Blend Attributes on to scale the entire part without redoing blends, so that the blend circular behavior is tweaked towards an elliptical behavior, but at the same time keeping the blend information. Note that this option is only possible when the scaling values differ relatively by less than 10%.
13. At this stage, you have two choices:
◦ Click Next to scale the part without closing the dialog. Creo Elements/Direct Modeling will re-use the information (scaling factor) that you used in the first scaling operation. You can specify different parts or change the scale factor.
◦ Click OK to complete the operation.
Limitations of the scale operation
There are several situations which corrupt the model:
• If a face is adjacent to a blended face, and is excluded, then the blended face has to be processed by the Keep Blend option.
• Selecting a face for scaling that is tangentially adjacent to a face that is not to be scaled, will corrupt the model. (If the excluded face is a blended face, the Redo Blend option should be used.)
• If you select the Redo Blend option, the system will attempt to recreate the blend with the same blending options. However, in some situations that may not be possible. If the blend was created with the RollAtSharp or RollAtSmooth options, the blend may be recreated without those options.
 Scale in the Modify section. The Scale dialog box opens.
 to complete the operation.