Creo Elements/Direct Modeling allows you to copy specified faces or recognized features from a part.
Copy assigns the specified faces or recognized features to a new part, leaving the original part unchanged. This new face part can then be positioned, modified and copied as usual.
The copied material is not restricted only to the original object's geometry; as much information as possible is copied, including labels, colors, and blends. In particular, blends can be kept when pasting the tool part onto another surface.
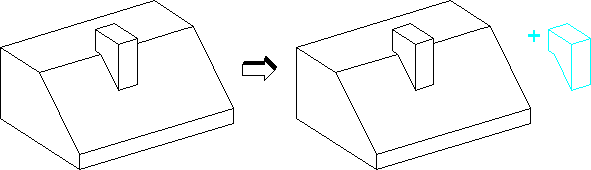
The graphic below shows an example of copying a boss (1). (Please note that the boss is not a recognized feature.)
To copy a face or recognized feature,
1. Click Modeling and then, in the Modify 3D group, click Copy. The Copy Faces dialog box opens.
2. Select the face(s) or feature(s) to copy:
◦ Click Faces, then click on the face to copy. Hold the Shift key to select multiple faces.
◦ Click Rec Feat, then select the feature in the Viewport. Hold the Shift key to select multiple features. You can select from the following options:
▪ Feat Select allows you to choose from the type of feature to select.
▪ Allow Face Splitting automatically splits faces if necessary to select the entire feature.
▪ Automatic selects the boss/pocket, rib, or slot with the smallest number of faces.
3. Select Geometry only if you want only the geometry copied and not labels, colors, or blends.
4. Select an option from Position and follow the directions in the prompt bar.
5. Click to complete the operation.
Limitations
• The generated tool part must be new or must have been previously empty.
• Copying features depends upon the recognition of the feature by the system or by the user defining it. However, unlike cutting, copying a feature does not result in a change to underlying features.
 Copy. The Copy Faces dialog box opens.
 to complete the operation.