Example: Creating a profile loft with a smooth surface
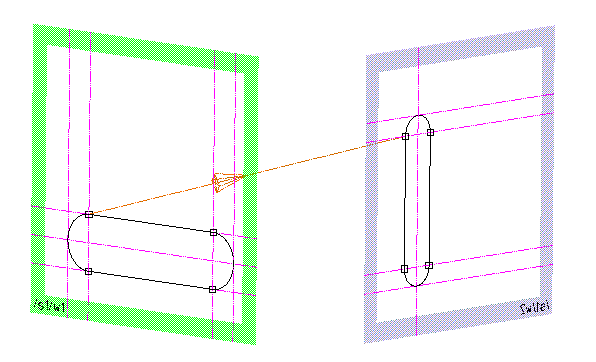
In this example, you will create a loft (loft1) with a smooth surface from profiles composed of smooth, tangentially connected 2D geometry. The workplanes are perpendicular to each other, offset from each other, and belong to the workplane set /s1.
Example: Creating the Workplanes and Profiles for the Loft Operation
After creating the workplanes and profiles:
1. Click Modeling and then, in the Model group, click More.
2. Create a matchline:
a. Click Create ML in Basic Loft section.
b. Click the vertex shown in workplane /s1/w1, then the vertex in workplane /s1/w2.
c. Click OK when the two profiles are connected by the matchline as shown.
3. Prepare the loft:
a. Click Modeling and then, in the Model group, click More.
b. Click Add in Basic Loft section. The Loft Add dialog box opens.
c. Specify the part to create. Click Part, and enter /loft1 in the data entry field next to Part.
d. Specify the workplane set for the loft. Click WP Set, and click the matchline in the workplane set.
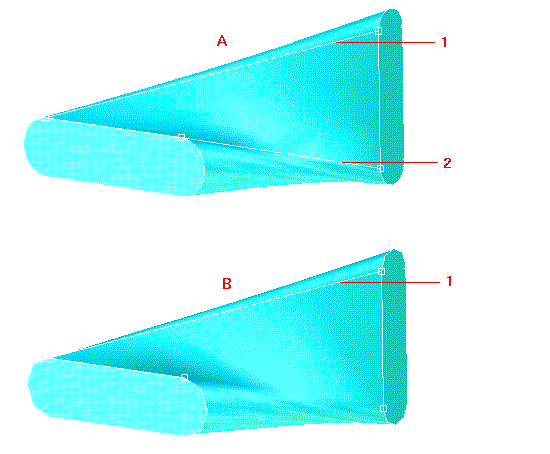
e. To create a loft with a smooth surface, click Smooth on. Figure shows a comparison of the parts you can expect to receive with the smooth option switched off (default) (A) and with smooth switched on (B).
f. Make sure Check Part is clicked on.
g. To preview the loft, click Preview.
4. To complete the operation, click .
Example: Result of the Loft Operation With and Without Smooth
Without the smooth option (part A) the vertices of the loft profiles are connected by edges (1 and 2) which become part of the loft surface. With the smooth option active (part B), edges are not created on the loft surface when tangential transitions exist between adjacent faces.
It is important to note that an edge is always created along the match line (1), regardless of the setting of the Smooth option if no tangential transitions exist between adjacent faces.
 Create ML in Basic Loft section.
 Add in Basic Loft section. The Loft Add dialog box opens.
 .
.