1. Click Modeling and then, in the Model group, click More.
2. Click Create ML in Basic Loft section.
3. Click a vertex on one of the end profiles.
4. Click the corresponding vertices on the other profiles.
5. When all the profiles are connected by the matchline, click .
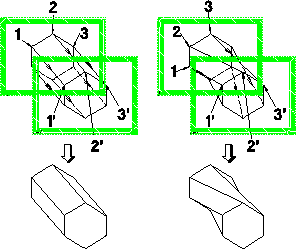
In the following figure, vertex 1 in the one profile is joined to vertex 1' in the other profile, producing a matchline. The part will have a different shape depending on which vertices are joined, as shown below.
You now have the minimum information for a loft. You can create the loft or add tangent conditions. If you have more than one profile for each workplane, you must connect each of the profiles.
All profiles must have the same number of vertices. You can use the Split operation in the Create 2D menu to add vertices to a profile.
Creo Elements/Direct Modeling uses the matchline to automatically create a workplane set containing the workplanes joined by the matchline. You can manipulate this workplane set.
 Create ML in Basic Loft section.
 .
.