Example: Creating a profile loft
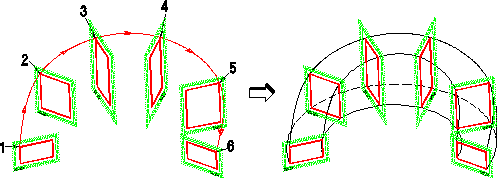
In this example, you will create a loft (loft1) using the workplanes and profiles shown.
Example: Creating a Profile Loft
After creating the workplanes and profiles:
1. Click Modeling and then, in the Model group, click More.
2. Create a matchline:
a. Click
 Create ML
 in
Basic Loft section.
b. Click vertex 1.
c. Click vertex 2. Creo Elements/Direct Modeling displays the first segment of the matchline.
d. Click vertices 3, 4, 5, and 6.
e. All the profiles are connected by the matchline, so click

.
3. Prepare the loft:
a. Click Modeling and then, in the Model group, click More.
b. Click
 Add
Add in
Basic Loft section. The
Loft Add dialog box opens.
c. Specify the part to create. Click Part, and enter /loft1 in the data entry field next to Part.
d. Specify the workplane set for the loft. Click WP Set, and click the matchline in the workplane set.
e. Click Closed off.
f. Make sure Check Part is clicked on.
g. To preview the loft, click Preview.
4. Click

to complete the operation.


 Create ML in Basic Loft section.
 .
. Add in Basic Loft section. The Loft Add dialog box opens.
 to complete the operation.