|
|
CMT is supported only for the applications mentioned in step 3.
|
|
|
CMT is supported only for the applications mentioned in step 3.
|
|
|
To quickly locate a CMT in the box,
a. Select any element in the viewport. The relevant CMT appears in the viewport.
b. Select Search in the box below the Application box. The CMT relevant to the geometry is selected in the box and the commands on the CMT appear in the list on the right (below the box).
For example, select a 2D line in the viewport and select Search in the box below the Application box. The Single/multiple 2D edges CMT, which is relevant to a 2D line, is selected in the box.
|
|
|
• The Details button is active only if you select an element in the viewport.
• The commands that are not contextual for the selected element do not appear on the CMT in the viewport but appear in the command list on the Options dialog box.
For example, if you select a 2D line as shown in the following image, ◦ The  (Create Anno) command is not required in this context. Creo Elements/Direct intelligently recognizes that an annotation or dimension is not required for an isolated edge and therefore does not display the command on the CMT in the viewport. (Create Anno) command is not required in this context. Creo Elements/Direct intelligently recognizes that an annotation or dimension is not required for an isolated edge and therefore does not display the command on the CMT in the viewport.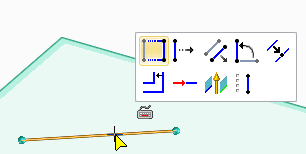 ◦ The Create Anno command appears dimmed in the command list on the Options dialog box.If you select a 2D line as shown in the following image, ◦ The (Create Anno) command is appropriate in this context and is therefore visible on the CMT. Here, the 2D edge is a part of a rectangle and therefore might need to have a dimension.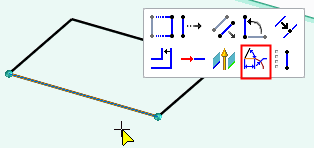 ◦ The Create Anno command appears clearly in the command list on the Options dialog box. |