1. Click Modeling and then, in the Modify 2D group, click  Move/Stretch. The Move / Stretch dialog box opens.
 Move/Stretch. The Move / Stretch dialog box opens.
 Move/Stretch. The Move / Stretch dialog box opens.
If you use Repeat in the Move / Stretch dialog box, the element is copied at equal values. Type the number of copies in Repeat if desired. |
• Click Incl connected Geo in the Move / Stretch dialog box to stretch any connected 2D geometry elements when you move an element. You can also press C to select or clear Incl connected Geo. By default, Incl connected Geo is selected. • Click Keep selected Geometry in the Move / Stretch dialog box to retain the original position of the element in addition to the moved element. Press K to select or clear Keep selected Geometry. By default, Keep selected Geometry is not selected. • If you move multiple 2D geometry elements, you can select one snap element from the selected elements. Click Snap Elem in the Move / Stretch dialog box and select the element from the viewport. The selected element then snaps to other static 2D geometry elements in the viewport. |
You can press SPACEBAR or the assigned key to open the Option Mini Toolbar (OMT) and click  (Keep selected Geometry) or (Keep selected Geometry) or  (Incl connected Geo) on the OMT. (Incl connected Geo) on the OMT. |
Depending on the
2D CoPilot settings, the visual feedback shows the Cartesian coordinates, polar coordinates, or the cursor text as you move the cursor in the viewport. To change the feedback, • Click  on the status bar to show Cartesian Coordinates. You can: on the status bar to show Cartesian Coordinates. You can:1. Press TAB, type the Cartesian u coordinate, and press ENTER to set the u coordinate. 2. Type the Cartesian v coordinate and press ENTER to specify the final location of the geometrical element. • Click  on the status bar to show the polar coordinates. You can: on the status bar to show the polar coordinates. You can:1. Press TAB, type the distance (between the original and current position), and press ENTER. 2. Type the angle and press ENTER to specify the final location of the geometrical element. • Change the display settings in
2D CoPilot settings. |
 to complete the operation.
You can also invoke the Move/Stretch command using the following alternative methods: In Preselection mode, select one or more 2D geometry elements such as lines, arcs, circles, or splines and: • Drag the elements in the desired direction. • Right-click and choose Move 2D or Stretch 2D from the context menu. |
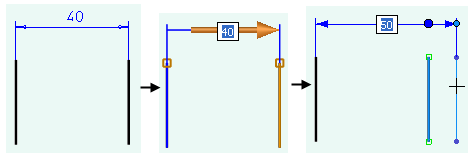
You can select a dimension that is connected to a 2D geometrical element and then drag the 2D CoPilot to move the element.  |