Creo Elements/Direct Annotation provides a list of special characters that you can include with text. You can display a character in the text editor by its Creo Elements/Direct Annotation code or by a metaname tag. For example, <Diameter> and the code \014\049\015 both represent the Ø symbol.
The special character metanames are used by default. Only switch to codes before you start adding characters to a block of text; do not mix codes and metanames. Creo Elements/Direct Annotation looks only for codes when they are present and will not recognize coexisting metanames.
To add special characters,
1. Click Annotation and then, in the Annotate group, click the arrow next to Text.
2. Click Text New. The Create Text dialog box opens along with the Text Editor window.
3. Click the Spec Chars button at the top of the Text Editor window.
The Special Characters table appears. Pin the window open to add multiple characters.
4. Click a special character in the list.
5. Click Apply. (You can also double-click a character to select it.)
6. Continue adding characters, or click Close to complete the operation.
The character metanames appear in your text.
The Metaname column data can be edited in the browser, as follows: Click twice slowly on the entry to edit.
An edit field appears in the browser in which you can make your changes.
The Metaname column header in the Special Characters window displays a context menu when you right-click the column header. It presents commands that allow you to filter the data in the column. Also, if you click the right mouse button in the window, a popup menu is displayed. The popup and drop-down menus work the same as with the Structure Browser.
Example: Add a block of text with special characters
The following example shows how to add a block of text to a view by entering it in the Text Editor window. Also in this example, you include some special characters.
1. Click Annotation and then, in the Annotate group, click the arrow next to Text.
2. Click Text New. The Create Text dialog box opens along with the Text Editor window.
3. Specify a view to be the text owner.
4. Click Text.
The Text Editor window appears.
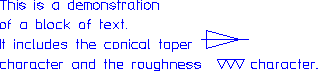
5. Enter the following block of text in the editing window, pressing ENTER after the first two lines but not the last.
This is a demonstration of a block of text. It includes the conical taper
6. Click Spec Chars at the top of the Text Editor window.
The Special Characters table appears.
7. Pin the window open.
8. Double-click the character named ConicalTaper.
The Text Editor now displays the metaname <ConicalTaper>.
9. Press ENTER in the text editor, and enter the following line of text:
character and the roughness
10. Double-click the character named Roughness3 in the Special Characters table.
11. Finish the block of text by following the <Roughness3> metaname with:
character.
12. Click (Apply) in the Text Editor to close both windows.
13. Click the location for the text in the drawing.
 Text.
Text. (Apply) in the Text Editor to close both windows.
 to complete the operation.