
Enhancements in this tutorial include:
Please complete these tutorials in the sequence shown.

1. Set Working Directory to the ARX folder.
2. File > Open ![]() render-test.asm.
render-test.asm.
3. Select Saved View List ![]() and choose RENDER.
and choose RENDER.
4. Enable the Render toolbar. Right-Click on any toolbar icon, and select "Render"
 The toolbar will dock at the top.

5. Toggle Realtime Rendering ![]() .
.
6. Display the Room Editor ![]() .
.
|
|
There are new icons displayed next to the Ceiling and Floor size. |

7. Select Floor Alignment ![]() and you will see the floor snap to the bottom of the assembly! That was EASY.
and you will see the floor snap to the bottom of the assembly! That was EASY.
8. Click the Close button to exit the Room Editor.
This is a quick and EASY way to get a preview of your rendering.
1. Select Render Region ![]() from the Render toolbar.
from the Render toolbar.
2. Click two points, to define a window "region" to render.

|
|
A region render makes previewing a snap! |
3. Wait a couple of seconds for it to render. You're done!

|
|
You can also render the whole window, and then re-render a small region to easily compare your changes. This is a GREAT way to quickly perfect your material appearances and lighting! |
|
|
New enhancements include the new "Sky" type of light, properties for color temperature, light intensity settings with units, and Environment lighting. |
1. Select Lights ![]() from the Render toolbar.
from the Render toolbar.
|
|
In the Lights Editor, there is a new type of light called "Sky." This generates a dome of lights equally spaced around the object to simulate an even distribution of light and shadows. |
5. Select Add new skylight ![]()

6. At the bottom, in the light Properties, browse the choices for Color Temperature.

7. Close the Light Editor.
Example: Color temperature set to "Daylight"

Example: Color temperature "Low Pressure Sodium"

8. Window > Close ![]() .
.
1. File > Open ![]() dynamic_watch-bezel.prt.
dynamic_watch-bezel.prt.
2. Select the Saved View ![]() "RIGHT"
"RIGHT"
3. Select Color and Appearance ![]() from the Render toolbar.
from the Render toolbar.
4. Load the appearance file. In the Appearance Editor, select File > Open.

5. Select watch-appearance.dmt.
6. Select the "watch-brush" material in the Appearance Editor.

7. Apply the appearance to the model.
8. In the Appearance Editor, select the Map tab, Bump image.

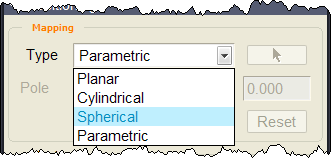
9. Set the Mapping Type to Spherical.
10. Select the Saved View ![]() "ISO"
"ISO"
11. Drag the handles around dynamically on the model. EASY!

These handles can scale and stretch or rotate the image dynamically.
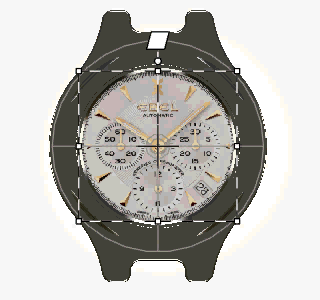
Example: Dynamic decal applied using the "watch-face" appearance -
|
|
Here is an example render of the watch bezel... |

12. Window > Close ![]() .
.
1. File > Open ![]() hdri_render-test.asm.
hdri_render-test.asm.
2. Select Saved View ![]() "RENDER".
"RENDER".
3. Open the Scene Palette ![]() from the Render toolbar.
from the Render toolbar.
4. Choose the scene called "environment-studio" (Double-click to apply it).

|
|
Scenes were introduced in Pro/ENGINEER Wildfire 3.0 as a way of quickly reusing saved room size, shape, appearance, effects and lighting. All in one! |
5. Select Light Editor ![]() from the Render toolbar.
from the Render toolbar.
6. Toggle on the Environment light by clicking it's ![]() icon. (CTRL+T).
icon. (CTRL+T).

|
|
This new type of light uses HDRI or EXR images. HDRI is "High Dynamic Range Image." EXR is also supported, which is another high dynamic-range (HDR) image file format developed by Industrial Light & Magic for use in computer imaging applications. |
7. Select the image at the bottom for Environment Lighting and choose Studio-1.hdr.

|
|
HDRI images contain information to calculate lighting, reflections and backgrounds. All in one file! AND, the result can be more like a real photo. |
8. Here is an example rendering...

9. Click Close button to exit the Light Editor.
10. Turn off the Render Toolbar. (RMB on any toolbar area > uncheck Render)
11. Window > Close ![]()