Creating a Document
The New Document action allows you to add a single document to Windchill, including secondary content as attachments.
You can add a new document in various places throughout Windchill:
• Click the new document icon  on the Folder Contents table toolbar or select > from the table Actions menu.
• Select > from the right-click actions menu in the Folder Contents, Products, and Libraries tables.
• Select > from the Actions menu on the Details page for a product or library.
For information on other actions for adding documents, see Creating Windchill Documents.
You can create Windchill documents by dragging and dropping one or more files over the Folder Contents table. However, the New Multiple Documents window opens even when you drop a single file. You cannot add attachments from the New Multiple Documents window. For more information, see Creating Multiple Documents. |
1. From the Type menu, select the type of document you are adding. The options available are specific to your site.
If an organization identifier field appears, select an organization identifier, such as a CAGE code or DUNS number, with which you will associate the documents. |
2. If you are creating a document from a template, select a document from the Template drop-down menu. A template provides a standard format for certain documents. Primary content and attributes from the template are applied to the new document. For more information, see Creating a Document from a Template.
3. Select one of the following options from the Primary Content Source drop-down menu:
Primary Content Source | Description | ||
|---|---|---|---|
No Content | A document without content (for example, a placeholder for future documentation).
| ||
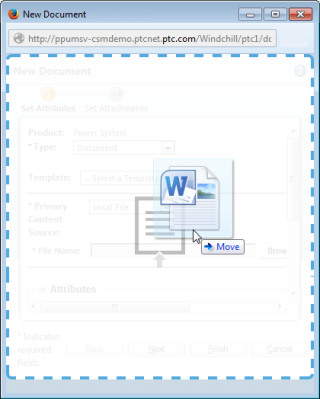
Local File | A file uploaded from your local machine. Click Browse to select a file on your local machine. You can also drag and drop a file to upload it: a. Open a folder browser or resize the Windchill windows so that you can view your desktop. Select the file you want to upload. b. Click and drag the file to the Windchill action window and then release:  For more information, see About Drag-and-Drop.
| ||
URL Link | A link to an external website. URL—The full URL of the website to which you are linking. URL Label—A shortened name to identify the link. | ||
External Storage | Content that cannot be attached as a local file or as a URL link. For example, physical objects, places, or highly sensitive information. External Storage Location—Depending on the nature of the content, you can use this field to provide a description of the object, an address, file cabinet number, and so on. External Storage Label—A unique name to identify the content. |
4. Specify the remaining document attributes in the following fields:
Attribute | Description | ||
|---|---|---|---|
Name | This field is pre-populated based on the information provided under the Primary Content Source field. If necessary, you can edit the name. Enter a name for the document up to 150 characters long.
| ||
Description | Enter a description for the document up to 4000 characters. | ||
Location | Autoselect Folder—Accept the folder location of the document according to the object initialization rules for the context. Select Folder—Navigate to a specific folder location for the document. Click the folder location icon |
Depending on the settings placed by your site administrators, you might also see the following attribute options:
◦ Life Cycle Template—Select the life cycle template you want to use for this document.
◦ Team Template—Select the life cycle team template you want to use for this document.
◦ Classification—Select the classification node you want to use to classify this document.
If your site has defined additional attributes for a document, fields and default values for those attributes appear under the Business field. Classification attributes section will appearonly if Windchill Partslink is installed and classification binding attributes are set on theobject type. |
5. Select Keep checked out after checkin to lock the document for editing after you have created it. For example, if you want other users to be able to view the document but plan on making additional changes. Click Next.
6. Under the Set Attachments step, you can use the Attachments table to add secondary content to the document.
Attachments can include content similar to documents, but are not considered standalone objects and therefore have limited functionality. Once a document is created, you can later add and remove attachments. For more information, see Attachments.
7. If your site has security labels enabled, you might see the Set Security Labels step. For more information about setting security labels, see Setting Security Labels while Creating an Object.
8. Click Finish to create the new document.