Mapping Attributes and Parameters
In order to set up parameters so that they are published in the
Autodesk Inventor user interface, the administrator maps them in
Type and Attribute Management.
For more information, see Working with the Type and Attribute Management Utility.The following list details information about case-sensitivity when setting up authoring application parameters that need to be recognized in Windchill:
• Windchill is case-sensitive in its handling of attributes; but not all authoring applications are.
• If the authoring application does not support case-sensitive attribute names, then they should be handled as the value in all upper case characters, regardless of how they are shown in the authoring application.
• the Windchill soft attribute Name is case-sensitive; therefore, when creating an soft attribute to map to a Autodesk Inventor parameter that does not support case-sensitive attributes, then the name must be in all uppercase characters or the administrator must explicitly map the name of the soft attribute to the name of the CAD parameter.
• Your authoring application does not support case-sensitive parameters; however, it does support mixed-case parameters. This means that the user cannot create a parameter named Cost or COST, but the user can type either COST, Cost, or cost.
The administrator sets up an attribute on the Autodesk Inventor side in the Properties window. Then, in Windchill, under > > , the administrator maps this attribute. Use the following process to map attributes and parameters:
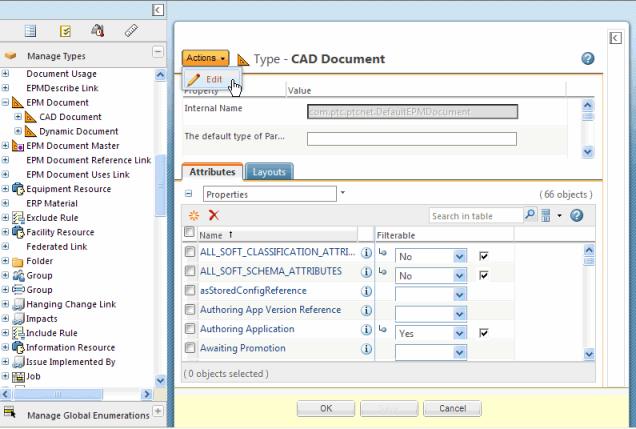
1. Check out CAD Document soft type using the next steps.
a. From Manage Types, expand the EPM Document soft type.
b. Select CAD Document.
c. From the Actions drop-down list, select the Edit icon. The CAD Document soft type is ready to be modified as shown in the next graphic.
2. You can choose to create a new attribute at this point. Use the next steps to create a new attribute.
3. Click the new attribute icon

on the
Attributes tab.
4. The New Attribute window is comprised of three steps:
a. Define Attributes
b. Choose Global Attribute
c. Set Properties
Enter the information on each step, and click Next. When finished, click OK to create the new attribute. You are returned to the Manage Types window, with the information page for the attribute displaying in the right pane.
Define Attributes
1. Specify an Internal Name for the object. This is a required field.
2. Select the attribute Type. Not every type of attribute can be created on every type. Only those attribute types that can be created on the type are displayed.
◦ Global—Global attributes can have zero or more values for an attribute. In previous releases, global attributes were known as instance-based attributes. The global attribute set is created using the Manage Global Attributes window.
◦ Alias—Alias attributes are an alias for a attribute on a related object. They can have zero to many values.
◦ Calculated—Calculated attributes are derived from the values of other attributes using formulas. They can have zero to many values.
Choose Global Attribute
For global attribute types, select from the Global Attributes table the global attribute upon which you want to base the new attribute. The global attribute set is made up of the attributes defined in the Manage Global Attributes window. The data type for global attribute types is determined by the data type of the selected global attribute.
Set Properties
Enter the property values for the attribute. The available properties can differ depending on the combination of attribute type and data type, or on the global attribute definition. Certain properties are required and must be specified before the attribute can be created. Most properties on an attribute can be specified or edited after the attribute is created, on the attribute information page.
Setting the Attribute in Windchill
To map the attribute in Windchill complete the following.
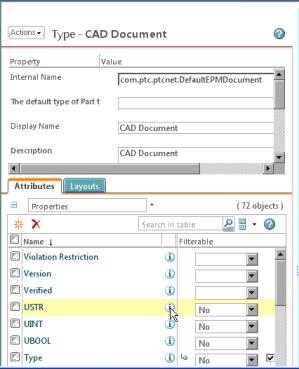
1. Click the information icon next to the attribute you want mapped.
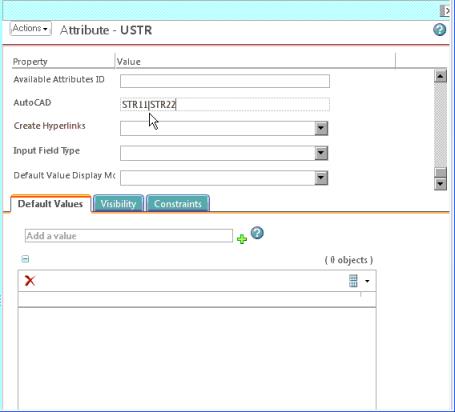
2. Enter the desired value next to the authoring application you want the attribute mapped against.
| Multiple mappings can be set by using the pipe (|) key to separate the mappings. |
3. Save your updates.
Setting the Attribute in Autodesk Inventor
To complete mapping this parameter use the following procedure.
1. Open Autodesk Inventor and navigate to > .
2. Create a parameter with the exact same name as the one you created in Windchill.
3. Select Add. The Add Custom Property window opens.
4. Type in the exact same name as you did in Windchill, and give it the same value.
5. Select OK.
6. The parameter and its corresponding value is added.
This attribute is now recognized in Windchill, with the Windchill attribute name when you upload or check in a CAD part or drawing.