Check In
When you finish making changes to a Creo Schematics design and are ready to publish those changes to the shared area on the server, you must check the object into Windchill.
The Check In action accomplishes the following.
• Checks the current object from your local workspace into the Windchill server.
• Creates a new object iteration on the server.
• Releases the lock on the object so that others can access it.
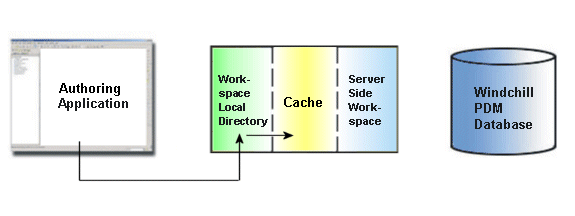
The following figure illustrates the check in workflow.
| Check In is not an available action if there is no primary server or primary workspace. You must register a server using the menu option > in Windchill Workgroup Manager, and activate a workspace. |
To access the Check In actions from Creo Schematics:
• Do one of the following:
◦ From the
Windchill ribbon, select
Check In
.
The object is checked in using the defaults that you or your administrator have set up and creates a new object iteration on the Windchill server.
◦ From the
Windchill ribbon, select
Custom Check In.
The object is checked in with custom settings and you can specify certain options that are applied to the object as it is checked into the Windchill server. For more information, see Custom Check In Options
You can access the Check In actions from Windchill by doing one of the following:
• From the active workspace, click
Check In in the
Object List table ribbon.
• From the active workspace, select > . For more information, see Custom Check In Options
Custom Check In Options
When you select Custom Check In, you are led through the following pages where you can choose custom options that are applied to the object being checked in.
1. Collect Objects
The Collect Objects page enables you to select the objects that you want to check in. You check the boxes next to the objects that you don't want to be visible to others on the Windchill server. Go to Edit menu and select Set For Check in to deselect the selected items for check in. Select Next.
On the File menu, select Check Out Now. The object can be checked out using the Check in option.
On the Edit menu you can select Set Location, Keep Check out, or Set For Check in.
| During check in you have the option of picking a folder location, or browsing to a product ASPS location. You can also provide an optional check in comment. |
2. Set Options
The Set Options page enables you to specify certain options for the objects that you are checking in. Select the check box next to the options that you want to set. You can choose to do the following.
◦ Create a baseline.
◦ Undo check out of unmodified objects.
◦ Remove objects from the workspace.
◦ Auto-resolve incomplete objects, either:
◦ Update with objects on the server, then ignore.
◦ Always ignore.
3. Select Finish to check the object in with the selected options.
For information about
Check In, see
Checking in Objects to Windchill.