Conflict Involving a PDM Event
PDM events may cause conflicts with the database that need to be resolved. The Event Management utility provides a way for you to check and act on log messages generated in your authoring application or Windchill sessions.
It can be accessed in the following ways:
• Select Event Management from the Quick Links menu at the top of a Windchill page.
• In Creo Elements/Direct Modeling, choose > >
|
|
From the authoring application, only information about transactions with the primary server is available. In the authoring application's message area, a graphical status indicator provides status information.
|
• From a workspace, select Event Management from the workspace actions drop-down list.
• From Windchill Workgroup Manager, select the console status icon in the status bar.
• In Windchill Workgroup Manager, select > .
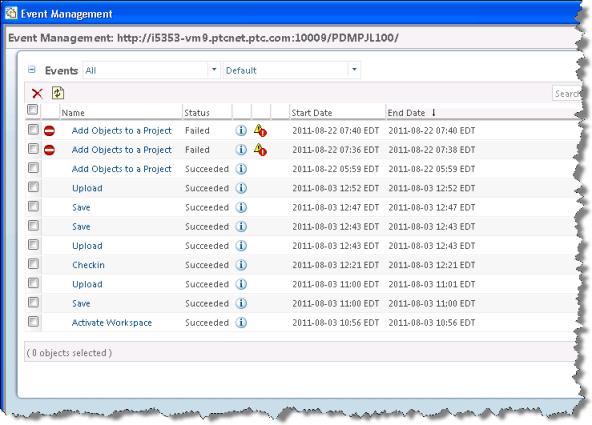
In the Event Management utility you can see the PDM events for the named server listed chronologically in the Events table. You can access detailed information about a particular event by clicking in the event's Actions column, and access the Conflict Management page by clicking icons displayed in the Actions column for viewing or resolving conflicts.
The following figure shows warnings on the Event Management page.
The event type icons used by the Event Management utility are described in the following table.
Event Management Icons
Icon | Description |
| Overridable type conflict |
| Non-overridable type conflict (Failed) |
| Warning |
| In Progress |
| Pending |
| Retried |
| On Hold |
The icons for actions that may be available in the Actions columns are described in the following table.
Actions Column Icons
Icon | Description |
| View event information |
| View Warnings/Conflicts |
| Resolve Conflicts |
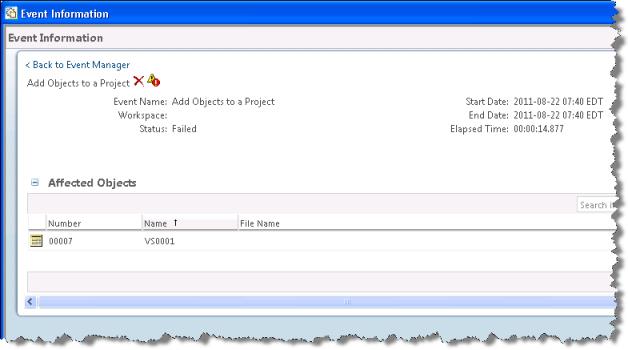
The
Event Information page is accessed from the
Event Management utility by clicking the information icon

in the
Actions column for the event in the
Event List, or by selecting the hyperlink in the event name. The
Event Information page lists the objects that have been processed for a given event. At the top of the page is a hyperlink that returns you to the
Event List. Below the hyperlink is the event title. Next to the event title are icons for the Delete action and, if warnings or conflicts occurred, one of the following actions, as applicable to the type of event:
• View Warning

-- If the event type is a warning
• View Conflicts
-- If the event type is a non-overridable conflict
• Resolve Conflicts

-- If the event type is an overridable conflict
The following figure shows the Event Information page indicating that the upload action succeeded with warnings. To view the warnings, select the view conflicts icon.
The area immediately below the event title lists the event attributes, as follows:
• Event Name – The name of the event.
• Workspace – The workspace from which the event originated.
• Status – The status of the event, if completed, or a progress bar indicating how close the event is to completion.
• Start Date – The date and time the event began.
• End Date – The date and time the event was completed.
• Elapsed Time – The total time required to complete the event (if completed).
Below the attributes area is a table listing the Affected Objects in the event.
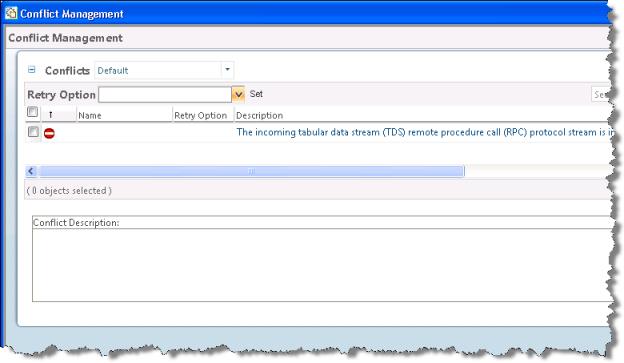
The
Conflict Management assists you in viewing and resolving conflicts that arise from database events. It is accessed from the
Event Management utility or the
Event Information page by clicking the view conflicts icon or the resolve conflicts icon
.
The following figure shows theConflict Management page.
Objects that experienced one or more conflicts during an event are listed in the Conflicts table. The default columns that are displayed are described in the following table.
Conflicts Table Columns
Column | Description |
(Selection) | Select check boxes to select or deselect rows. Clicking the header check box selects/deselects all rows. |
(Conflict type) | Displays an icon identifying the type of conflict. |
Name | Displays the name of the affected object, if applicable. |
Retry Option | Displays the default or currently applied user-selected retry option for the conflict, if one is available. |
Description | Displays an explanation of the conflict. | If the explanation exceeds character limits for the column, an ellipsis (...) followed by a link "view full text below..." appears at the end of the truncated description. Clicking the link displays the full text of the description in theDescription field below the Conflicts table. |
|
Number | Displays the number of the affected object, if applicable. |
File Name | Displays the file name of the affected object, if applicable. |
| You can customize your view of the Conflicts table; however, setting (row) filters is not allowed for this table. For more information, see the help available from the Customize View List page, which appears when you select Customize from the current view drop-down list. |
In the toolbar of the Conflicts table is a drop-down menu that lists any Retry Options common to all of the selected conflicts.
To resolve an overridable conflict:
1. Select one or more rows containing an overridable conflict.
2. Select an option from the Retry Options drop-down list in the table tool bar.
3. Select Set. The Conflicts table refreshes to display the new value in the Retry Option column for the selected row(s).
4. Select Retry. The action is retried and a new entry is created in the Event List. The original event's status changes to Retried. Further access to the original event in the Conflicts Management page is read-only.