Check In
When you are finished making changes to a CAD object and are ready to publish those changes to the shared area on the server, you must check the object in. The Check In action transfers data for the selected object from the server-side workspace to the Windchill commonspace. If you check in an object directly from the CAD application, the object data is transferred from CATIA V5 to the server-side workspace, and then to the Windchill commonspace. The data flow is illustrated in the following figure.
The Check In action accomplishes the following:
• Transfers data from the working copy of the selected object in your workspace to the commonspace.
• Creates a new iteration of the checked-out object in the commonspace.
• Releases the lock on the object in the commonspace if this object was checked out by you, so that others can access it.
You can check in files from either CATIA V5 or Windchill by:
• selecting > in CATIA V5.
• right-clicking the product node in the CATIA V5 specification tree, and selecting > .
• selecting > from the Windchill workspace.
• clicking the check in icon

on the workspace
Object List table toolbar, or in the workspace
Actions column.
When you initiate a Check In, you can select from three options:
• Check In All-in-One CATPart—

This option generates and checks in an All-In-One CATPart, a CATPart which is the entire CATProduct that the action was performed on. Note that this does not check in the active document. Refer to
All-In-One CATPart Support for more details.
• Auto Check In—

When you select Auto Check In, your object is copied directly to the commonspace. The check-in process follows the defaults that you or your administrator have set up as the changes in modified objects are checked in. Checked-out objects are not checked in if you have not made any modifications to them.
• Custom Check In—

When you select Custom Check In, you check in objects with changed settings using the Windchill Workgroup Manager embedded browser. Selecting Custom shows you two pages where you can specify options that are applied to the objects that you are checking in.
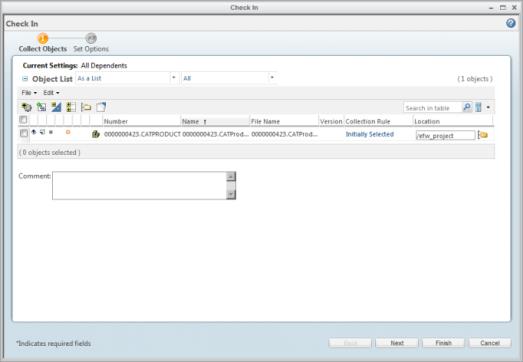
1. The Collect Objects page allows you to select the objects you want to check in:
Select the checkboxes next to the objects you don't want to be visible to others on the Windchill server. Select > to deselect the selected objects for check in. Select Next.
Select > . The object can be checked in using the Check In option.
On the Edit menu, you can select Set Location, Keep Checked Out, or Set for Check In.
Optionally, when checking in from
Windchill, you can set build options for a single-level or multi-level build. For details, see
Checking In Objects to Windchill.
2. The Check In Options page allows you to select certain options for the objects you are checking in. You can select from the following:
▪ Create a baseline
▪ Auto associate parts to CAD documents
▪ Undo checkout of unmodified objects
▪ Remove objects from the workspace
▪ Auto-resolve incomplete object
▪ Update with objects on the server, then ignore
▪ Always ignore
| For information about customizing auto associate, enabling support for custom parts, customizing the parameters in the download service, or customizing the HTML client object selection page, see Customizations for PDM. |
Check In is not available if no primary server and primary workspace are set. You must register a server using > in Windchill Workgroup Manager, and activate a workspace.
The check in process checks in all checked-out dependents of a saved CAD document, even if the dependents have not been modified and saved.
As a best practice, copying the catalog and its dependents to the workspace local directory before performing a check in reduces the time it takes to complete a check in action.