Managing CATIA V5 Catalogs
A catalog is a CATIA V5 document that keeps a list of references to other CATIA parts and features. A typical CATIA document is a generic family table with specific instances within a library context, with a <server>/<workspace>/<CAD-specific folder>file structure. In practice, catalogs behave like large assemblies.
Use catalogs to insert their parts and features into other CATIA V5 documents. Catalogs provide the ability to manage and access their part standards in a centralized location, such as Windchill. Catalogs are tightly integrated with most of the CATIA V5 workbenches, including but not limited to assembly design, electrical design, electrical harness, and piping design. You can add catalog members that are managed by Windchill to a product by using the catalog browser in a Windchill Workgroup Manager enabled instance of CATIA V5. In effect, Windchill uses catalogs to synchronize CATIA V5 documents with CATIA V5 documents that are not in Windchill.
When you insert or instantiate a component from a catalog in the catalog browser, the Windchill Workgroup Manager checks if the component (using the CATIA V5 file as a checking mechanism) exists in Windchill. If the component with same file name exists in Windchill, then that component is downloaded and opened to your local workspace. If the component does not share the same file name, then that component is created as a new one in your workspace, and checked in with other new and modified designs.
Shared Workspace Setup
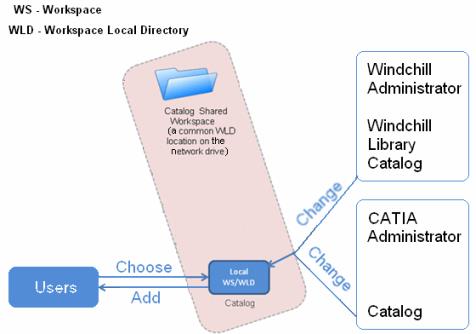
Catalogs must be set up in a shared workspace to work properly. Administrators first set up a catalog in their local workspace directory in a shared location, and then users add the administered catalog in the shared local workspace directory to their list of favorites, as shown in the following diagram.
The workflow is as follows:
1. An administrator checks in the catalog with the catalog members.
2. A user modifies the catalog members by accessing the catalog, adding a catalog part to the workspace, or inserting an instance from the catalog that does not iterate.
3. A user changes the catalog by changing an attribute or revision of a catalog member, which puts the user and administrator workspaces out of sync.
4. An administrator manually or automatically updates the catalog.
An administrator can modify the shared location of the local workspace for the catalog by setting the Windows environment variable PTC_WLD_ROOT to a common location on the network, and replicate it by either a shared master location or a configuration of the shared workspace for local users. More than one shared location is possible.
To update a catalog, administrators can do one of the following:
• Automatic — ensure that the shared workspace of the catalog is the same as the local workspace on the workspace local directory of the administrator’s client machine. See the Automatic Update section below for details.
• Manual — make changes to and check in the catalog and its members within the shared workspace directory
If a catalog component is opened and changed outside a shared workspace directory, then > must also be performed in Windchill for the catalogs to synchronize in the different directories.
To control access, administrators can define where the shared workspace is located on the network as follows:
1. Determine the location of the workspace local directory by setting PTC_WLD_ROOT on the computer that is importing the catalog into Windchill.
2. Open the catalog using a Windchill Workgroup Manager enhanced session of CATIA V5.
3. Check in the catalog to the desired location in Windchill.
After the catalog and its dependents have been imported into Windchill, you can set up access to the workspace in which the catalog was imported.
For example, if the environment variable is set to the following parameter: PTC_WLD_ROOT=c:\WLD, then the folder that is to be shared across the network would be: C:\WLD\.ws\<Server Path>\<Workspace Name.CATIAV5>. The permissions on this folder must be set up so that users have enough access to add this catalog to their favorites in CATIA.
End User Setup
After an administrator has created the shared workspace, you can add the shared catalog to your list of favorites as follows:
1. Select > > > > . The following window displays:
2. Click

.
3. Navigate to the shared location, and then select the catalog file.
4. Close and then restart CATIA V5 to confirm the change.
5. After the restart, use the catalog browser to navigate to the managed catalog.
Checkin
An administrator is responsible for checking in catalogs. Checking in a catalog is initiated through the Windchill menu of a Windchill Workgroup Manager enabled instance of CATIA V5. Upon checkin, any family table CATParts contained in the catalog have instances resolved to a file. Metadata is not stored on CATIA V5 catalogs, and thus attributes are not associated with catalogs.
Catalogs with both normal and family table CATParts are supported. If a catalog contains any part families, the families have their instances resolved and the generic and instances are checked into Windchill. In Windchill, the catalog has a reference link to the generic table of the family.
Catalogs are stored in Windchill as a life cycle-managed document. Any members contained in the catalog are stored in Windchill as an EPMDocument, and are considered a required dependent. Relationships between the catalog and its members are managed in Windchill by a reference link between the EPMDocument of the catalog, and the EPMDocument catalog member. Keywords used by CATIA V5 catalogs are not managed in Windchill. You can externally reference catalogs by a managed copy of CATIA V5, and check them in as a design reference.
Since catalogs contain large amounts of parts and families, you can expect the checkin to take a substantial amount of time. However, copying the catalog and its dependents to the workspace local directory before performing the checkin can reduce the time.
Checkout
An administrator must initiate a checkout through the Windchill Workgroup Manager client, the Windchill Workgroup Manager embedded browser, or a Windchill Workgroup Manager enabled instance of CATIA V5. Checking out a catalog or adding a catalog to the workspace adds the entire catalog to the shared workspace.Catalogs generally contain many CAD documents, and checkouts take longer than many similarly sized assemblies.
Since catalogs are very large sets of data, PTC recommends that you do not remove a catalog and its members from the shared workspace.If catalog members are changed in Windchill, update from either CATIA V5 or the Windchill Workgroup Manager client.
Automatic Update
An administrator should initiate an update from the client on the shared workspace if members of a catalog have been changed in Windchill. Updating refreshes the workspace with the latest version of any of the documents in that workspace.
You can automatically download any updates of a catalog and its members in Windchill to a workspace by setting up a script that initiates automatic synchronization between Windchill and the shared catalog folder. Follow these steps:
1. Manually run the Windchill Workgroup Manager after adding the following arguments in the command: -catalog_xml_file -username <username>-password <password>.
The catalog.xml file is generated in the directory of Windchill Workgroup Manager client (for example, C:\Program Files\PTC\wgm), and the password is encrypted.
The XML file looks this:
<catalog_data.xml>
Please specify server name
<server_name value="vm91m040upgrade"/>
Please specify server URL
<server_url value="http://vm91m040upgrade.i-cubed.com/Windchill>
Please specify workspace name
<workspace_name value="mtb-upgrade1"/>
Please specify workspace context
<workspace_context value="Save As/Rename FT Project"/>
This is the encrypted username
<username value="egD+FRtdURLg6JhNeSmxL5EM3bPI/JPhNj4ywJlYyGO3
+DglXgxKEHozDXllAj/ghqyOyvMBSeANkkUkO1rUWd14SIaB5Qj0FUCtZNbf
684EbW6t7sPY1aJVeQNMTrf4QqJcT8QA5d5dWnl/
xnwQRbhZZsShLZjq7/MZHe3fcTQ="/>
This is the encrypted password
<password value="bi3nh2kxHRIVRGZZvfY6yHrYv1WCf1XT/mBdxoT0P4Rxbx9S8
gbitV0mtwOk9gptkDEjcu63qGPw7BVCu87Te42BKsMIqu/lxQZeuOg0UtYd02WBsRqH2x3a
QspVW2ea8U9iPPQgZF2EPfJ+e306IaWh2J7TjWkO59luh58IHNY="/>
Please specify the catalog(s) name(s) used
<catalogs>
<catalog value="300-Catalog-xls-Catalog.catalog"/>
</catalogs>
</catalog_data.xml>
2. Modify the XML file as follows by filling in values for the following XML elements (value=””):
*server_name – Server name, as it appears in the server registry window
*server_url – Server URL as it appears in the server registry window
*workspace_name – Workspace name, as it appears in the server registry window
*workspace_context – Context name in which the workspace is created if needed
*catalog– Name of the catalog object that needs to be added to the shared workspace. Duplicate this tag to specify additional catalogs if needed in the same shared workspace. For example, change an empty generated line <server_name value="" /> to <server_name value="myservername"/>
3. Set up the scheduled task. When specifying the command to run to the scheduler, provide the standard run command for the Windchill Workgroup Manager client with additional argument: -catalog_update.
Best Practices
If you are an administrator:
1. Make changes and check in the catalog and its members within the shared workspace directory. The catalog is updated without having to update out-of-sync components.
2. Synchronize the catalog, either manually or automatically.
3. Retrieve the catalog in the CAD tool.
4. Manually or automatically update the content from the CAD tool to the shared workspace for the catalog.
5. Copy the catalog and its dependents to the workspace local directory before performing a check in to reduce the time it takes to complete a checkin.
If you are a user:
1. Do not use more than one catalog inside a workspace.
2. Insert or instantiate a catalog member.
◦ If the component has the same file name in Windchill, then the catalog member is downloaded and opened from the local workspace.
◦ If the component does not have the same file name in Windchill, then the catalog member is created and opened as new in the local workspace.
3. Check in the modified catalog members to Windchill.