Customization Points
Introducing New Values for Use in the Disposition Types
Out-of-the-box (OOTB) inventory disposition attribute values are fixed lists of values. If you want to customize an available OOTB disposition type by adding a new entry you must define an entry in the InventoryDispositionRB.rbinfo file.
The
InventoryDispositionRB.rbinfo file contains a fixed set of master lists of inventory disposition values. To add an entry in the
InventoryDispositionRB.rbinfo file, use the
enumCustomize tool to edit the file. See
The Enumerated Type Customization Utility for more information.
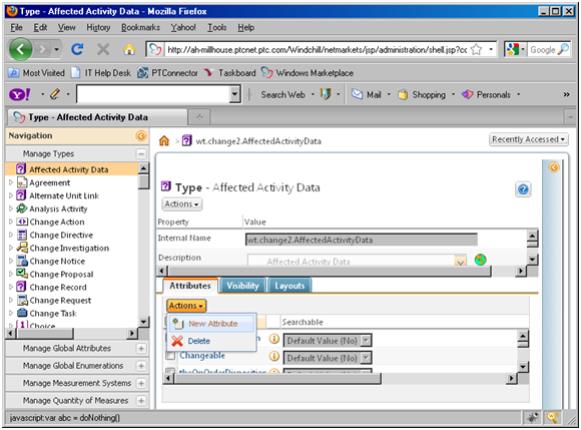
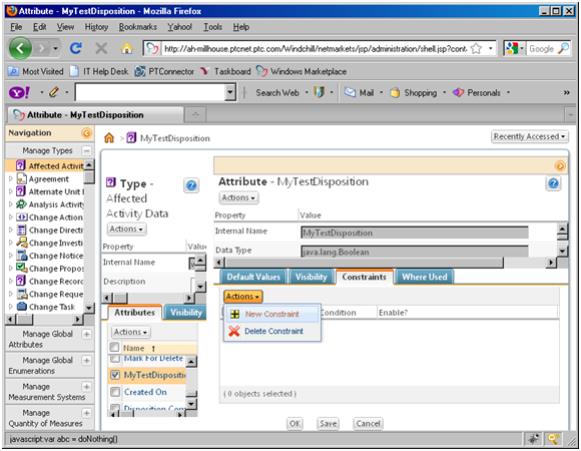
After you have customized the disposition type, use the Type and Attribute Management utility. On the affected Activity Data Type, select the disposition attribute and edit the Enumerated Value List from the Constraints tab
Specifying a Default Value for Disposition
Use
enumCustomize tool to select a default disposition value. See
The Enumerated Type Customization Utility for more information.
If the default disposition value is not added to the constraint set of an inventory disposition type, a blank shall be shown as the preselected value in the inventory disposition UI drop down
Adding New Disposition Types
Inventory disposition types are enumerated columns that are added to the AffectedActivityData Link. There are inventory dispositions types that are added OOTB; customizers can add more inventory disposition types as global attributes on the AffectedActivityData Link to meet their business needs by using the Type Manager. Here are the steps to follow
1. Extend AffectedItemsTableBuilder and Override getDispositionComponentIds API to account for your new inventory disposition types. Also, if you decide to extend ChangeTaskAffectedItemsTableViews as opposed to just changing it, then you will need to override buildConfigurationTable to return your new table views.
@ComponentBuilder("changeTask.affectedItemsTable")
public class YourNewTableBuilder extends AffectedItemsTableBuilder {
/**
* Returns the list of supported disposition types.
*/@Override
public List <String> getDispositionComponentIds() {
}
/**
* Returns the configurable table.
*/@Override
public ConfigurableTable buildConfigurableTable(String id) throws WTException {
}
}
2. Register your builder.
The builder will be discovered dynamically by the MVC framework. In order for the framework to find your builder, you will need to register either the base package location of the builder or the builder class in the xml configuration file under the mvc package in the src_web variant. Here is an example for AffectedItemsTableBuilder as registered in ChangeManagement-configs.xml.
◦ To register the base builder package. Add this to the xml configuration file:
<mvc:builder-scan base-package="com.ptc.windchill.enterprise.change2.mvc.builders"/>
◦ Or register the builder class. Add this to the xml configuration file:
<bean class=" com.ptc.windchill.enterprise.change2.mvc.builders.tables.AffectedItemsTableBuilder "/>
3. The @ComponentBuilder annotation connects the builder with other components in the system such as JSP’s. The string you put in the @ComponentBuilder(“changeTask.affectedItemsTable “) annotation in the builder must be the same builder ID you include in the JSP. For example affectedItemsTable.jsp has the following to request the change task affected item component.
<jsp:include
page="${mvc:getComponentURL('changeTask.affectedItemsTable')}"/>
4. Extend ChangeTaskAffectedItemsTableViews to add your new inventory disposition types to the link
public class YourTableViews extends ChangeTaskAffectedItemsTableViews
{
/**
* Get the disposition columns
*/
@Override
public List <?> getSpecialTableColumnsAttrDefinition(Locale locale) {
}
}
5. Extend DefaultDispositionHandler to get/set the values of your new inventory disposition types. At a minimum, you will need to override the API’s given below:
public class YourNewDispositionHandler extends DefaultDispositionHandler {
/**
* Get disposition value for a given disposition type.
*/
@Override
public InventoryDisposition getDispositionValue(String componentId, BinaryLink link) {
}
/**
* Set the disposition value for a given disposition type. */
@Override
public boolean setDispositionValue(String componentId, BinaryLink link, InventoryDisposition disposition) throws WTException {
}
/**
* Get the default disposition value for a given disposition type
*/
@Override
public InventoryDisposition getDefaultInventoryDisposition( ChangeLinkAttributeBean linkBean, String component_id) {
}
/**
* Get the disposition value set of a given disposition type
*/
@Override
public ArrayList <InventoryDisposition> getInventoryDispositionSet (ChangeLinkAttributeBean linkBean, String component_id) {
}
}
6. Register your new disposition handler in the service properties file (ChangeManagement-service.properties.xconf). The selector attribute is your new inventory disposition type and the serviceClass is your new disposition handler.
<! -- Handler for processing the disposition types -->
<Service context="default" name="com.ptc.windchill.enterprise.change2. handler.DispositionHandler"><Option serviceClass="com.ptc. windchill.enterprise. change2.handler.YourNewDispositionHandler"
selector="YourNewDispositionType"
requestor="null"
cardinality="duplicate"/>
</Service>
7. Register your disposition types against DispositionDataUtility. You may also choose to extend DispositionDataUtility to meet your business need. The service property file to register the dispositions is ChangeManagement-components.dataUtilities.properties.xconf.
For example:
<Option serviceClass="com.ptc.windchill.enterprise.change2. dataUtilities.DispositionDataUtility"
requestor="java.lang.Object"
selector="YourNewDisposition"
cardinality="duplicate"/>
Customizing through the UI
1. As the site administrator, go to Type Manager and create a new global attribute for AffectedActivityData Link, this is the inventory disposition type
2. Constrain the attribute to the new disposition values you created in “Introducing New Values for Use in the Disposition Types” section.
3. Now that we have configured multiple disposition types and values, it is time to create an instance of multiple dispositions on the AffectedActivityData link.
◦ Create a change notice and update the default change task by going to “Select Affected/Resulting Objects” step
◦ Your new disposition type(s) should show as column(s) on the affected objects table
◦ The drop-down under your new disposition type (column) should show your new disposition values constrained to that type
◦ To change the disposition values for a disposition type, click Actions drop-down and select “Set Dispositions”