Setting Up the Creo Worker for HDIC Conversion
This section describes the steps necessary to set up the Creo Worker for HDIC Conversion.
|
|
The Creo Parametric worker and the CATIA V5 worker need to be configured in file synchronization-enabled mode. For information about how to enable file synchronization, see “Using a File Synchronization-Capable Worker” in the Windchill Help Center.
|
The reason for configuring the CATIA V5 in file synchronization-enabled mode can be summarized as follows:
• While the conversion itself is performed by the Creo Parametric worker, the job for a CATIA V5 to Creo Parametric conversion is initiated as a CATIA V5 job, since the source is a CATIA V5document.
• The conversion uses the processing specified by the publish.cadconvert.CATIAV5 entry in the wvs.properties file, which drives the behavior of the CATIA V5 worker.
• The CATIA V5 job is sent to the Creo Parametric worker first for conversion, and then to the CATIA V5 worker for publishing in a single job.
The license required for this activity is an ATB license for Creo (license required: INTF_for_CATIA _V5_ADV). Follow the instructions below for setup.
Heterogeneous Design in Context
The user defined for file synchronization in the auth.properties file will have the ownership of CATIA V5 data created during a Creo Parametric to CATIA V5 conversion. The reverse is also true (CATIA V5 to Creo Parametric conversion).
Two Windchill preferences allow you to identify an attribute, which will be used to flag if a CAD document should be converted (separate preferences exist for each direction of conversion):
• For Creo Parametric to CATIA V5 CAD conversion, use the “Creo Parametric to CATIA V5 CAD Conversion Attribute” preference
• For CATIA V5 to Creo Parametric CAD conversion, use the “CATIA V5 to Creo Parametric CAD Conversion Attribute” preference.
From the
WindchillSite or
Organization context, locate the
Visualization row in the
Preference Management utility, and expand it by clicking the

icon to display the Conversion Attribute preferences.
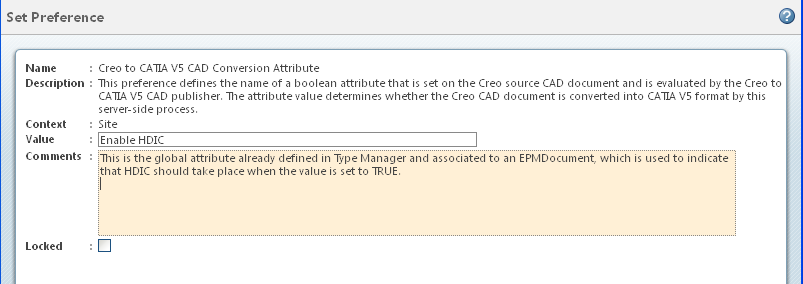
Right click on the preference you want to set and select Set Preference.
The Set Preference window allows you to define the name of a Boolean attribute that is set on the source CAD document. This attribute will be evaluated by the CAD publisher. The attribute value you enter determines whether the CATIA V5 CAD document is converted into Creo Parametric format (or vice versa) by this server-side process. Enter a Boolean attribute value and an optional comment and click OK to set the preference.
| The Boolean attribute defined for the preference “Creo Parametric to CATIA V5 CAD Conversion Attribute” will trigger a Creo Parametric to CATIA V5 data conversion if the source object contains the same attribute. Similarly, the Boolean attribute defined for the preference “CATIA V5 to Creo Parametric CAD Conversion Attribute” will trigger a CATIA V5 to Creo Parametric data conversion if the source object contains the same attribute. |
For more detailed information about heterogeneous design, refer to the Creo Parametric documentation.
| In order to avoid circular image creation, create and set different Boolean attributes for "CATIA V5 to Creo Parametric CAD Conversion Attribute" and "Creo Parametric to CATIA V5 CAD Conversion Attribute" preferences. |
Steps to Generate Conversion Output in CGR Format
If you want the conversion from Creo Parametric to CATIA V5 to convert the source document to CGR format (instead of to CATPart or CATProduct), new options must be set in the Creo Parametric Recipe Editor. The combination of entries below creates CGRs for a top-level assembly. You must add the "adapter/convToCGR=1" option to the recipe file in order to use the "adapter/convToFlatImportImage=1" option. Set the recipe options as follows:
• Keep the first option in the recipe file and add "adapter/convToFlatImportImage=1" to the recipe file.
• Add the entry "adapter/convToCGR=1" to the proe2pv.rcp file. This option creates a part level CGR.
• Add the entry "adapter/convQuiltAsDatum=0" to the proe2pv.rcp file. This option sets the behavior of the Adapter to not consider quilts as construction geometry.
Creo Parametric Design Context Publishing
To publish the Creo Parametric Design Context with Graphic Representation, add the recipe option of the Creo Worker:
adapter/promoteGraphicsRep=1
If you define the Design Context assembly in the master representation, then it will convert properly without the need of the above recipe option.
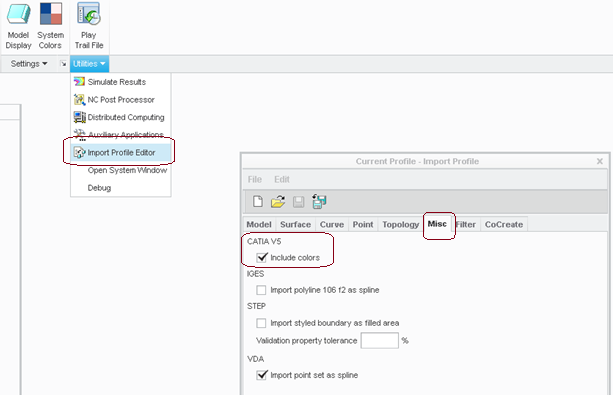
Generating Colored Creo Parametric Translated Image Models (TIMs) from CATIA V5 Source
In CATIA V5Interaction mode, navigate to > and select the Misc tab. Select Include colors under CATIA V5.
When performing server-side CATIA V5 to Creo CAD conversion, modify the Creo Parametric adapter profile file atb_profile.dip with C5ColorImport="1" (packaged at <adapter_install>/etc/proetools/atb_profile.dip). The worker must be restarted and reloaded to take effect.
| PTC does not recommend changing any other settings in the atb_profile.dip file. Contact PTC Technical Support for further information. |
| There is no special setting required for generating Colored CATIA V5 models from Creo Parametric CAD source data. |
Generating CATIA V5 CATPart TIMs with Secondary CGR Attachment
Create a config.pro file in the Creo Worker’s setup directory (if not already created) and add the following config.pro option:
hdic_export_v5_secondary_cgr = yes
This entry enables a CGR attachment as secondary content to the CATIA V5 TIM CATParts. These CGRs can be used for downstream usage by CATIA V5 users when working with the cache enabled in CATIA V5.
Attribute Exchange from Creo Parametric Source to CATIA V5 TIMs
Create a config.pro file in the Creo Worker’s setup directory (if not already created) and add the following config.pro option:
intf3d_out_parameters = <All/Designated/None>
• In the above option, the default value is All (if “all” is expected, there is no need to set the value); when set, all parameters will be transferred to CATIA V5 TIMs.
• If the value is set to Designated, only the designated parameters will be exchanged with CATIA V5 TIMs.
• If value is set to None, the attribute exchange will not take place.