Upgrading from Windchill PDM Essentials 11.0
Before upgrading, ensure that your target system is set up properly according to the
Windchill PDM Essentials prerequisites. For more information, see
Prerequisites.
|
|
During the upgrade process, the term “source system” refers to your existing installation of Windchill PDM Essentials and the term “target system” refers to the new installation of Windchill PDM Essentials that you are installing and upgrading to.
|
The Windchill PDM Essentials upgrade process can be done using one of the following two methods:
• Upgrading with source and target systems on same host machine (in-place upgrade)—This upgrade method takes place with the source and target systems on the same physical or virtual machine. It is useful if you are not changing hardware as part of your upgrade. Make sure to run a test upgrade on a clone of the production server before upgrading the production server itself.
• Upgrading with source and target systems on separate host machines—This upgrade method is best if you are upgrading to new hardware and allows for test upgrades to the target system before opening it to production.
Upgrading with Source and Target Systems on Same Host Machine (In-Place Upgrade)
This upgrade method takes place with the source and target systems on the same physical or virtual machine. This method is useful if you are not changing hardware as part of your upgrade. Make sure to run a test upgrade on a clone of the production server before upgrading the production server itself.
1. Shut down the Windchill server and backup the database, Windchill Directory Server, and file vaults before performing a test or production upgrade.
2. Download and install the latest WinDU and WinRU patches for the source system release level from the following URL:
http://www.ptc.com/support/windu.htm. The
Windchill Diagnostic Utility (WinDU) detects corruptions or issues that would cause upgrade failure or data corruption. The
Windchill Repair Utility (WinRU) is a tool that fixes various data integrity problems that are reported by WinDU. You can find documentation for the
Windchill Diagnostic Utility by clicking the link for the
Windchill Diagnostic Utility and downloading the latest documentation.
3. On the source system, make sure the Windchill server, Apache server, and LDAP are running, and then execute the WinDU.bat script from a Windchill shell to launch WinDU.
4. Run upgrade-mandatory
Windchill Diagnostic Utility (WinDU) tasks on the source system and resolve any reported issues. Ignore the ESI Schema Detector task. For more information, refer to the WinDU and WinRU guides available at the following URL:
http://www.ptc.com/support/windu.htm.
To help with entering the correct information in the upgrade manager, the pre-upgrade Windchill Diagnostic Utility (WinDU) task Upgrade Property Viewer is executed on the source system. This WinDU task gathers information about the source system and adds it to the autoUpgrade.properties or the ReviewedSourceUpgrade.properties file in the <Windchill>/Upgrade/ directory.
Windchill Repair Utility (WinRU) tasks are available to repair problems. Contact PTC technical support for help resolving issues. The PTC eSupport portal provides the resources and tools to support your
Windchill implementation:
https://www.ptc.com/appserver/cs/portal/
5. Shut down the Apache and Windchill servers.
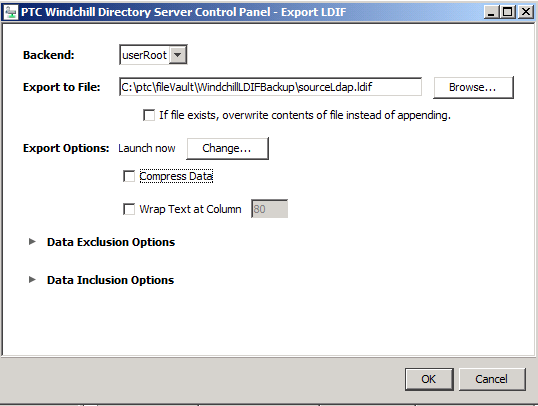
6. Backup the source database and export LDAP at the same time:
|
|
Windchill must be shut down before performing this step.
|
Use the LDAP export settings illustrated in the following image:
7. Launch the Windchill Installation Assistant for the Windchill PDM Essentials target release to which you are upgrading.
The Windchill Installation Assistant detects the existing installation of Windchill PDM Essentials and, on the Options page, auto-selects Installation for Upgrade under Install Options.
Specify all required information and complete the
Windchill Installation Assistant of the target release of
Windchill PDM Essentials. It is not necessary to execute the
Windchill Setup Assistant because the configuration information will be migrated from the source database. For more information, see
Installation and Configuration.
9. The upgraded SQL Server database instance must be configured to use ‘contained database authentication.’ Execute the following statement on the SQL Server database instance:
use master
GO
sp_configure 'contained database authentication', 1;
GO
RECONFIGURE
GO
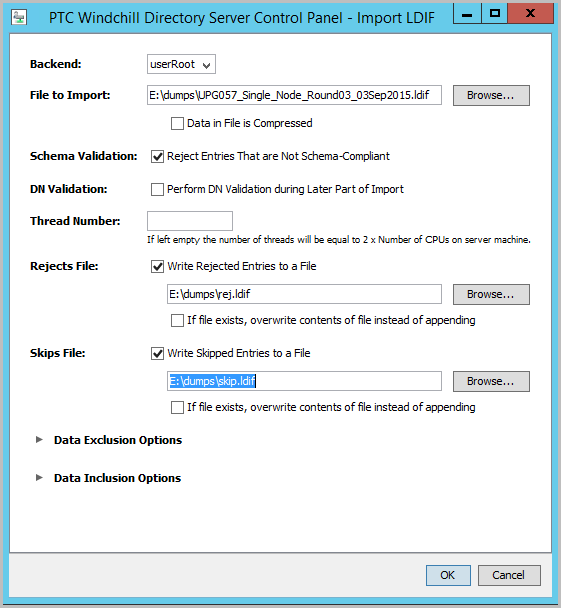
10. Import the source system’s LDAP data into the target system Windchill Directory Server. Windchill Directory Server is installed and running on the target system after performing the installation at <Windchill>\WindchillDS. Use the LDAP import settings illustrated in the following image.
11. Start the target system Windchill Apache.
12. Perform the following steps to use the file output by the Upgrade Property Viewer WinDU task:
a. On the target system, create the GatherUpgradeProperties folder in the following location: <Windchill>/Upgrade/UpgradePhases.
b. Copy the autoUpgrade.properties or the ReviewedSourceUpgrade.properties file from the source system to the following location on the target system: <Windchill>/Upgrade/UpgradePhases/GatherUpgradeProperties/.
c. Rename the autoUpgrade.properties or the ReviewedSourceUpgrade.properties file in the target location to upgradeUser.properties.
For more information about the Windchill Diagnostic Utility, refer to this
page.
13. Launch the Upgrade Manager by executing UpgradeManager.bat from a Windchill shell.
14. Execute the Upgrade Manager according to the steps in the
Upgrade section of the Help Center.
15. After validating the target system, use the ServiceTool utility to recreate Windows services for Apache, Windchill Directory Server, and Windchill:
a. Stop Apache, Windchill Directory Server, and Windchill servers.
b. In a Windows command prompt, navigate to the following location, where <Installation> is the Windchill PDM Essentials installer folder: <Installation>\Scripts
c. Execute the following command, where <Windchill> is the location of your new target Windchill PDM Essentials installation: ServiceTool <Windchill>\Windchill
Upgrading with Source and Target Systems on Separate Machines
Upgrading with the source and target systems on separate machines involves moving the source database backup to the SQL Server 2014 database on the target system. This upgrade method is best if you are upgrading to new hardware and allows for test upgrades to the target system before opening it to production.
The following is a high-level overview of the Windchill PDM Essentials upgrade process:
1. Shut down the Windchill server and backup the database, Windchill Directory Server, and file vaults before performing a test or production upgrade.
2. Download and install the latest WinDU and WinRU patches for the source system release level from the following URL:
http://www.ptc.com/support/windu.htm. The
Windchill Diagnostic Utility (WinDU) detects corruptions or issues that would cause upgrade failure or data corruption. The
Windchill Repair Utility (WinRU) is a tool that fixes various data integrity problems that are reported by WinDU. You can find documentation for the
Windchill Diagnostic Utility by clicking the link for the
Windchill Diagnostic Utility and downloading the latest documentation.
3. On the source system, make sure the Windchill server, Apache server, and LDAP are running, and then execute the WinDU.bat script from a Windchill shell to launch WinDU.
4. Run upgrade-mandatory
Windchill Diagnostic Utility (WinDU) tasks on the source system and resolve any reported issues. Ignore the ESI Schema Detector task. For more information, refer to the WinDU and WinRU guides available at the following URL:
http://www.ptc.com/support/windu.htm.
To help with entering the correct information in the upgrade manager, the pre-upgrade Windchill Diagnostic Utility (WinDU) task Upgrade Property Viewer is executed on the source system. This WinDU task gathers information about the source system and adds it to the autoUpgrade.properties or the ReviewedSourceUpgrade.properties file in the <Windchill>/Upgrade/ directory.
Windchill Repair Utility (WinRU) tasks are available to repair problems. Contact PTC technical support for help resolving issues. The PTC eSupport portal provides the resources and tools to support your
Windchill implementation:
https://www.ptc.com/appserver/cs/portal/ 5. Shut down the Apache and Windchill servers.
6. Backup the source database and export LDAP at the same time:
| Windchill must be shut down before performing this step. |
Use the LDAP export settings illustrated in the following image:
7. Install
Windchill PDM Essentials 11.1 on the target system. For detailed information, see
Installation and Configuration. It is not necessary to execute the
Windchill Setup Assistant because the configuration information will be migrated from the source system.
8. On the target server, restore the backup of the SQL Server 2008 R2 source server database to SQL Server 2014 server and reconfigure the user log-on according to the following procedure:
Restoring the SQL Server Database.
10. Import the source system’s LDAP data into the target system Windchill Directory Server. Windchill Directory Server is installed and running on the target system after performing the installation at <Windchill>\WindchillDS. Use the LDAP import settings illustrated in the following image.
11. Start the target system Windchill Apache.
12. Perform the following steps to use the file output by the Upgrade Property Viewer WinDU task:
a. On the target system, create the GatherUpgradeProperties folder in the following location: <Windchill>/Upgrade/UpgradePhases.
b. Copy the autoUpgrade.properties or the ReviewedSourceUpgrade.properties file from the source system to the following location on the target system: <Windchill>/Upgrade/UpgradePhases/GatherUpgradeProperties/.
c. Rename the autoUpgrade.properties or the ReviewedSourceUpgrade.properties file in the target location to upgradeUser.properties.
For more information about the Windchill Diagnostic Utility, refer to this
page.
13. Launch the Upgrade Manager on the target system by executing UpgradeManager.bat from a Windchill shell.
14. Perform the upgrade according to the steps in the
Upgrade section of the Help Center using the restored SQL Server 2014 instance on the target system.
15. For systems using a SQL Server database, after upgrade, the upgraded database must be configured to use contained database authentication. Execute the following script on the target system: <WT_HOME>\db\SqlServer\Convert_ToContainedDB.bat.
Execute this script for Windchill and Windchill Business Reporting databases.
| Windchill supports SQL Server contained database and contained database authentication. A contained database can authenticate users without requiring them to login at the Database Engine level. However, database level authentication has some restrictions compared to SQL Server login. Database authenticated users are only allowed to access and modify objects contained within the database, and restricted from performing database top-level tasks like backup, restore, modify, and shrink. Database top-level tasks must be performed by a database instance administrator (i.e. sa). For more information about SQL Server contained databases and the contained database authentication Server Configuration Option, see the Microsoft online documentation at the following URLs: |


