|
|
You cannot sort column data in DocStudio and in the Relationship View.
|
|
|
You cannot sort column data in DocStudio and in the Relationship View.
|
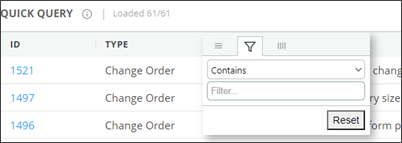
Filter Type | Field Type | Conditions |
Number: For columns that have only numeric values. | • Integer • Floating Point | • Equals • Not Equal • Less Than • Less Than or Equals • Greater Than • Greater Than or Equals |
Date: For date columns. | Date | • Equals • Not Equal |
Text: For columns that include both numbers and text as values. | All field types, except Integer, Floating Point, and Date. | • Contains • Not Contains • Equals • Not Equal • Starts With • Ends With |
• You can apply the column filters on the loaded data for all the columns. The filtered data matches the conditions applied in the filter. You can reset the conditions by clicking Reset in filter box. • You can apply the column filters on multiple columns. |
Icon/Action | Operation |
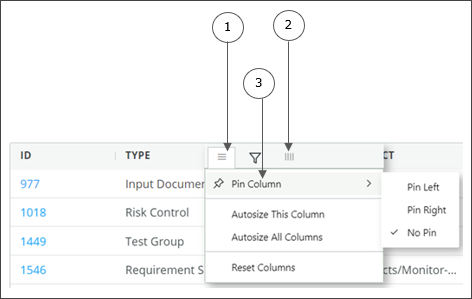
Click and select Autosize This Column or Autosize All Columns to change the size of the selected column or size of all columns respectively. | |
 : Show or Hide : Show or Hide | Click to show or hide columns in the Content pane. |
Change column location | To move a column, select a column header, press the left mouse button, and drag the column to the desired location. |
Click and select Pin Column to pin the selected columns to the left or the right PTC recommends that you do not pin more than 4 columns. If the pinned columns have large column width, you will not be able to access the other columns in the content pane. |