Working With Related Item Fields
You can work with related item fields in the Item view (create, copy, edit), the Items view (with inline editing enabled), the Relationships view, and the Document view.
Prerequisites
• In the Item view, related item fields may display on the Relationships tab, but may also display on any other tabs, depending on how your administrator has defined the item type.
• Related item fields can be restricted to only one related item, as defined by your administrator.
User Interface Components
Related item fields can display in table format or comma separated values format, as defined by your administrator.
|
Button
|
Action
|
|
Add a related item.
Type the ID of the item that you want to add as a related item, or click the browse button to select an item from an Items view or from a Find items to relate window.
If document versioning is enabled, you can also add related versioned items. To type the ID of a versioned item, use the format Live Item ID-major.minor, for example, 184-1.2.
In the Items view, the default query used to browse for items to add is the last query used, or the default set up by your administrator. For more information, see “Items View: Managing Items”. |
|
Remove a related item from the list.
|
|
Create a new related item.
Select the item type. The common fields to be copied appear in the Copy Fields list. You can add or remove fields in this list if required.
|
|
If your workflow allows only one item type when creating related items in a relationship field, Windchill RV&S pre-selects that item type when you choose Create Related Item.
|
|
|
Add or remove a relationship flag.
|
|
Move item up or down in the list.
|
Related Items Field in CSV Format
| If you are viewing related items for a historical item, only the create new item action is enabled. |
Find Items to Relate
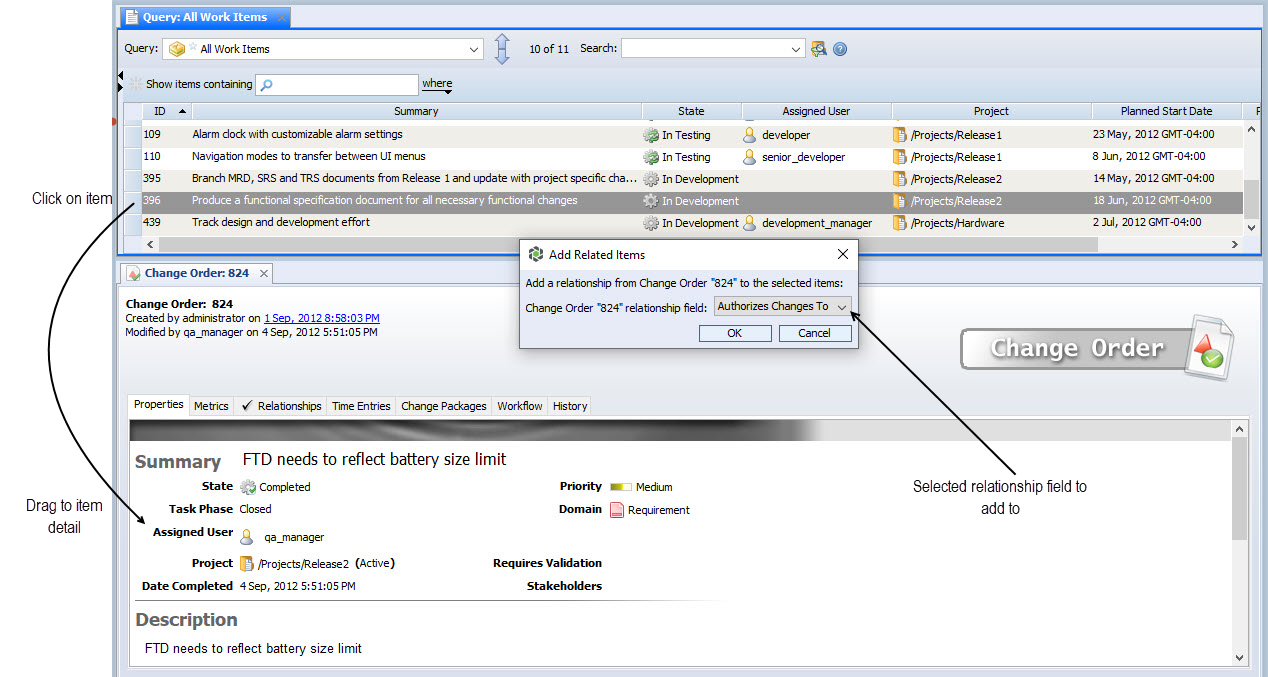
When you click the browse button in the Add Related Items window, the Find items to relate window appears, if the corresponding relationship field is configured with the Finder browsing style.
Depending on the configured Finder browsing style, items appear in the left panel and their relationships appear in the right panel. For the items selected in the left panel, the right panel shows a tree of relationships and associated content. You may select one or more items from the right pane to complete the browsing action.
At the top of the left pane, you can use the filter bar to filter the items in the left pane by visible text or fields.
Type the text that you want to filter by. The list of items is filtered when there is a pause in typing or when you finish typing. If you want to filter items by visible fields, you can use the where filter. To filter by a field, click where and select a field from the list.
Optionally, you can enter an item in the Item ID field in the lower left corner of the window, which disables the item selection in the right pane. The entered Item ID is added to the Item ID field of the Add Related Items window, after you click OK.
The Select... option next to the Item ID field in the lower left corner launches the Items View corresponding to the Quick query. Selecting any item from the Items View adds its ID in the Item ID field.
| The Find items to relate option is available only in the Windchill RV&S client. If you do not have sufficient privileges on the Finder query, filtering by fields using the filter bar at the top of the left pane may not work. For further assistance, contact your administrator. |
Editing Related Item Information
You can open related items and edit them, but the changes do not display in the related items field until you refresh the field by pressing F5.
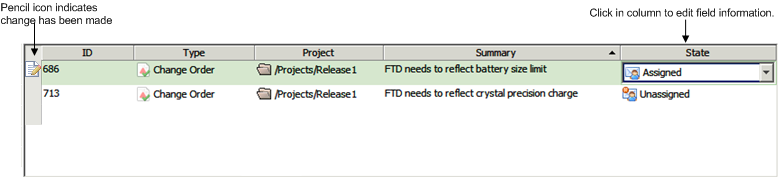
If inline editing is enabled in the Item view (GUI table format fields only), you can edit related item information directly in the field.
You can also perform inline edits to related item fields in the Document view through the embedded Edit Item Details view.
Note the following when using inline editing for related item fields:
• If all mandatory fields are complete, a

displays underneath the

.
• If mandatory fields are not complete a

displays underneath the
. If you try to save the changes, the mandatory fields are highlighted and one of the following happens:
◦ if the fields are visible, a pop-up message displays at the location of the incomplete mandatory fields
◦ if the fields are hidden, a message displays and when you click OK the Item Edit view displays.
• You cannot inline edit the following:
◦ system fields (for example, Type, Created By, Created Date)
◦ fields with an editability rule that prevents editing the field
◦ items with an editability rule that prevents editing the item
• If a row contains a related item field, you cannot inline edit the related item information in that field, but you can use the related item field buttons. If you select a related item field button, it is treated as a change to the row containing the field.
• Changes are saved when you move off the row you are editing, except in the following situations:
◦ you select a row in another relationship field
◦ you select another field on the same tab
◦ you select a menu option or toolbar button
• You can save or revert changes by right-clicking and selecting Save Item or Revert Item. If prompting is enabled, you can confirm or revert the change when prompted.
• The Apply button on the Item Edit view is not enabled when you only make changes to related item information.
Adding and Creating Related Items in the Items View
If your ViewSet contains both the Items view and the Item Detail view, you can add related item using drag and drop.
Add Related Item Through Drag and Drop
You can create a related item for an item by selecting it and then selecting Create Related (GUI) or Create Related Item (Web).
You can select multiple items in the Items view and create a related item that will be related to all of them. If you select items of different types, only relationship fields that are common to all types display in the Add Relationship to Field list.
Related Test Items
When you add a related item to the default
Tests field, a window displays, allowing you to select a test document, or select individual test cases from a test document. As of
Integrity Lifecycle Manager 12.0, you can also select versioned test cases and versioned test suites in the Finder window. For more information on selecting versioned test suites and versioned test cases, see
Adding a Planned Test.
You cannot edit a shared test step, but you can copy and replace it in the Shared Test Steps field. This enables you to use the contents of an existing test step but make modifications to it based on your test case.
To copy and replace a shared test step when editing an item, select the shared test step and click

beside the field.
After you save your changes, the new test step item replaces the copied test step item in the Shared Test Steps field.