Understanding the Advanced Assembly Editor Interface
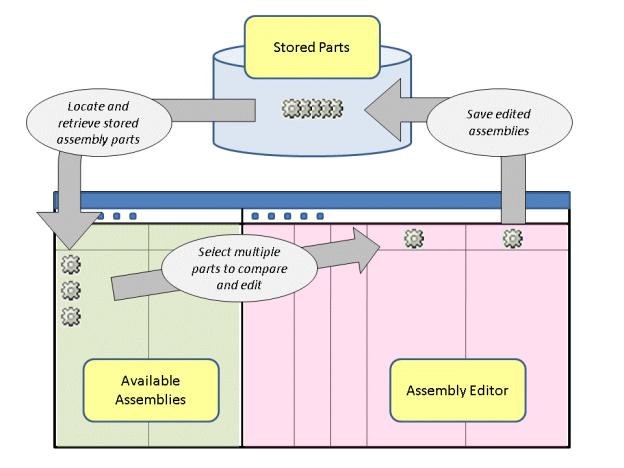
The Advanced Assembly Editor is most effective when the usage pattern is clearly understood. The Advanced Assembly Editor interface is divided into two panes separated by a sliding divider. The pane to the left of the divider is labeled Available Assemblies and contains the assembly parts that may be selected for editing. The pane to the right of the divider is labeled Assembly Editor and displays columns containing the parts and quantities for one or more assemblies that are being edited. Each pane also contains columns displaying additional attribute information and a bar across the top with icons for actions that may be performed.
Start an editing session by retrieving assembly parts you want to edit. Initially, the selected parts appear in both the Available Assemblies andAssembly Editor panes. You can choose to remove some of the parts from the Assembly Editor pane in order to simplify the editing process without removing them from the Available Assemblies pane. Edit the product structures by adding, deleting or changing the quantity of parts within the cells in the Assembly Editor pane. Shaded cells contain attribute information that cannot be changed by editing. The changes are shown as markups for your review. When all edits are complete, save your changes.
Launch the Advanced Assembly Editor from the following locations:
Launch Point | Usage Scenario |
The > action in the Actions menu at the top of a product or library folders page. | Use this action to open an empty Advanced Assembly Editor session in order to perform a search for a part to edit or paste a part from the clipboard. |
The > action in the Actions menu at the top of a Folder Contents table. | Select one or more parts in the folders table and use this action to open them in the Advanced Assembly Editor. When no parts are selected an empty session of the Advanced Assembly Editor will open. |
The > action on the right-click menu for a selected part in a Folder Contents table. | Start an editing session for a selected part in theFolder Contents table. |
The > action in the right–click menu for a part selected in a folder browser. | Start an editing session for a selected part in theFolder Contents table. |
The > action in the Actions drop-down menu on a part information page. | Use this launch point to open the product structure of a part from its information page. |

