Using Custom Task Form Templates
When a user is assigned a workflow task, they use the task information page to complete the task. As a workflow administrator, you can use a task form template to define what information and actions appear on the task information page.
By default, an HTML task form appears with multiple tabs.
In order to configure the tabs and information that appears, you can create and use native task form templates:
|
Native
|
The task form template is created in Windchill and renders in HTML. For more information, see Create a New Task Form Template.
|
To use custom templates using different file formats, you must set the > preference to Yes. When enabled, you can define a task form template using the following formats:
|
JSP
|
The task form template is a JSP file that renders in HTML.
Create a custom tag file and use the tags in the JSP file to retrieve page components.
For information on creating a JSP task template, see Implementing Customized Task Page JSP.
|
||
|
XDP(PDF)
|
The task form template is an XDP file that renders as a PDF. This requires Adobe Designer. For more information, see Creating Task Form Templates with Adobe Forms Software.
|
Task Form Templates Table
Use the Templates table to create and manage task form templates.
From here, you can modify templates, control template visibility, and import or export existing templates. For more information, see Task Form Templates Table Information.
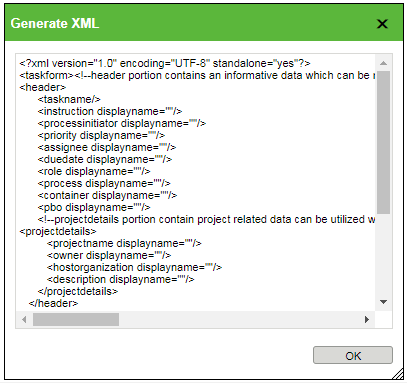
Generate XML for Custom Task Templates
If you are creating an XDP template or customizing the options available from a native template, you can generate the necessary XML input from the Activity in the workflow template editor.
1. In the Activity field, select the activity type.
2. In the Template Format field, select XDP(PDF) or Native.
3. Click Generate XML.
The Generate XML windows displays all the activity attributes in XML format:
For information about customizing a task form, see Customizing Workflow Task Pages.
Create a New Task Form Template
2. Click the new task form template icon  .
.
.3. From the New Task Form Template window, complete the following fields:
Template Name | A unique name to identify the template. | ||
Subject Class | The object type for which you want to create the task form template.
| ||
Task Type | The type of task that describes the activity for the template. The types available might be different depending on the object type and customizations made by your site administrators. For an overview of the default task types, see Activity Tab.
| ||
Description | Optionally, enter a description for the template. |
4. Under Customize Tabs, select one of the following options:
◦ Use a file of type JSP/XDP—Place the JSP/XDP file in the desired location in the codebase directory, and then specify the file path relative to the <WT_HOME>/codebase/ directory in the text box.
For example, specify taskFormTemplates/customJSPPage.jsp to map to <WT_HOME>/codebase/taskFormTemplates/customJSPPage.jsp.
For more information, see Customizing Workflow Administration.
◦ Configure in wizard—Select this option to create a native task form template:
1. Click the add icon  to create a tab in the task form. Double-click the tab name and enter a custom name.
to create a tab in the task form. Double-click the tab name and enter a custom name.To remove a tab, highlight the tab name and click the remove icon  .
.
.When entering a custom name for the tab, certain uses of the “&” character can cause issues: • If you include the “&” character in a query (for example, <marquee onstart='javascript:alert(1)'>^__^), the task form template will not be created and the error message “Index 1 out of bounds for length 1” will be displayed. • If you use one or more “&” characters without including them in a query (for example, “&”, “&&”, or “&&&”), the task form template will be created. However, the tables Tab and Actions on Subject will not appear on the information page of that task form template. |
2. Highlight a tab name to activate the Action on Subject and Tables/Attributes menus.
3. Click the edit icon  to select from a list of applicable actions and tables:
to select from a list of applicable actions and tables: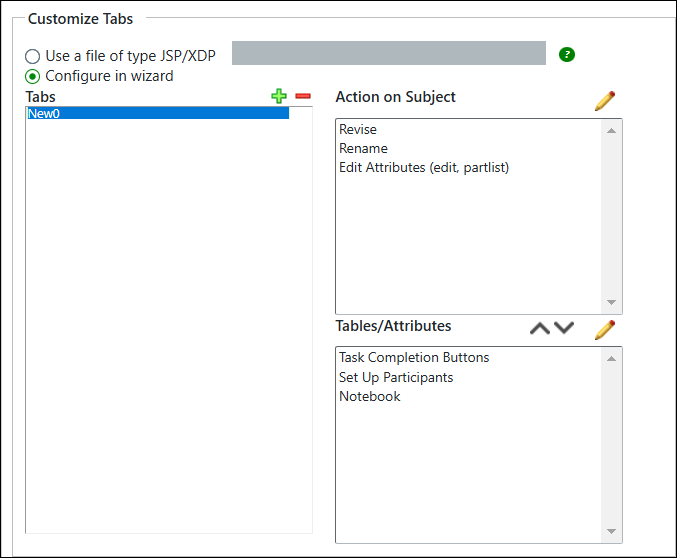
The options given under Customize Tabs do not appear when editing an existing task form template. |
Use the Information Page - Workflow Task Attributes layout to customize how the attribute information is displayed. This layout is available from the Type and Attribute Management utility. For more information, see Editing Attribute Layouts. |
When creating or editing task form templates in Quality context, avoid using the Task Completion option as it may create a duplicate comment box. |
5. Click OK to save your changes.