Use Case Example for Redline
A part, Engine-100, Rev. B.1, needs the following modifications: removing a child part, adding a new child part, and changing the quantity for a part. The time required to modify the part is:
• 2 weeks for changing the quantity
• 10 weeks for adding a new part and removing an existing part
You can perform these changes concurrently without committing to the resulting object version, allowing for parallel development. Refer the video to understand the concept and process of the redline with example. To open the video in a new tab, click the title on the player.
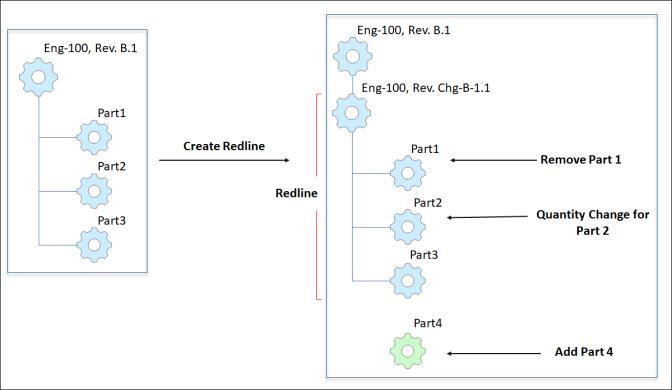
Create two different change notices for the same affected latest released object version. On each of these two change notices, create a redline, Engine-100, Rev. Chg-B-1.1, for the affected object version of Engine-100, Rev. B.1 to perform the planned changes. The following image shows the changes specified in the redline.

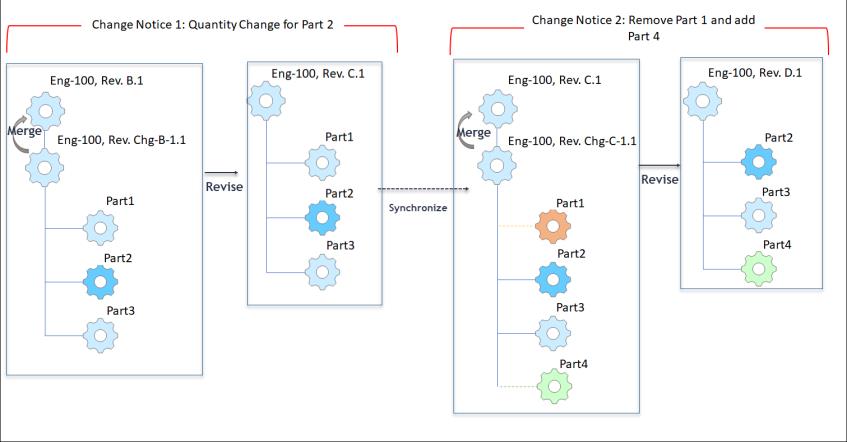
After 2 weeks, when planned work is complete for change notice 1, merge the latest iteration of the redline when creating next revision of affected object version as a revise process. This creates the resulting object version Engine-100, Rev. C.1 on change notice 1. Meanwhile, the changes on change notice 2 are still in progress.
When change notice 1 releases, the latest iterated redline of change notice 2 is synchronized with the changes of the latest released resulting object. The affected object version of change notice 2 changes to Engine-100, Rev. C.1 and the redline version changes to Engine-100, Rev. Chg-C-1.1.
After 10 weeks, when the planned work is complete for change notice 2, merge the latest iteration of the redline when creating next revision of affected object version as a revise process. This creates the next sequential version of the resulting object as Engine-100, Rev. D.1. This resulting object has all the changes of both change notice 1 and change notice 2.

In Windchill, follow these steps for the complete redline process:
1. Identify the affected object and analyze the types of changes. Follow these steps for the affected object:
The Object Release States mapping rule should be defined for Parts. For more information see Define Mapping Rules for Change Management. |
a. Add the Redline column to the Affected Objects table.
b. Create two change notices and add the latest released affected object in the Affected Objects table of each change notice. Specify the desired changes for each change notice: For change notice 1, change quantity for Part 2. For Change notice 2, remove Part 1 and add Part 4.
2. Complete the following steps for change notice 1:
a. On the Affected Objects table, in the Redline column, click Create to create redline. This action launches the redline structure browser page. For more information, see Redline Structure Browser.
b. Make the desired changes to the redline. For more information see the Modifying Redline section in Redline Process.
c. Check in the changes and merge the redline to the affected object version as a part of the revise action. For more information, see the Merging Redline with the Affected Object Version section in Redline Process.
3. Verify that the redline of change notice 2 is synchronized with the latest released resulting object of change notice 1 when it gets released. For more information, see the Synchronizing the Changes to Other Open Change Notices section in Redline Process.
4. Repeat steps 2 through 2c for change notice 2.
5. Verify that all planned changes are applied to the latest released resulting object. This latest released resulting object has changes from change notices 1 and 2.
Related Topics