Customizing Role-Based UI Functions - Action Visibility
Objective
You want to customize the set of UI components (actions or other UI elements) that the administrators of the site, organization or containers can manage using the role-based visibility feature.
Background
The role-based UI functionality enables administrators to optimize the number of actions presented to users, so as not to confuse users by seeing actions they don’t need or use for their role. Initially this support was just for container managers (in particular, project managers). It has been extended to a concept called profiles which sets action visibility at the site or organization level.
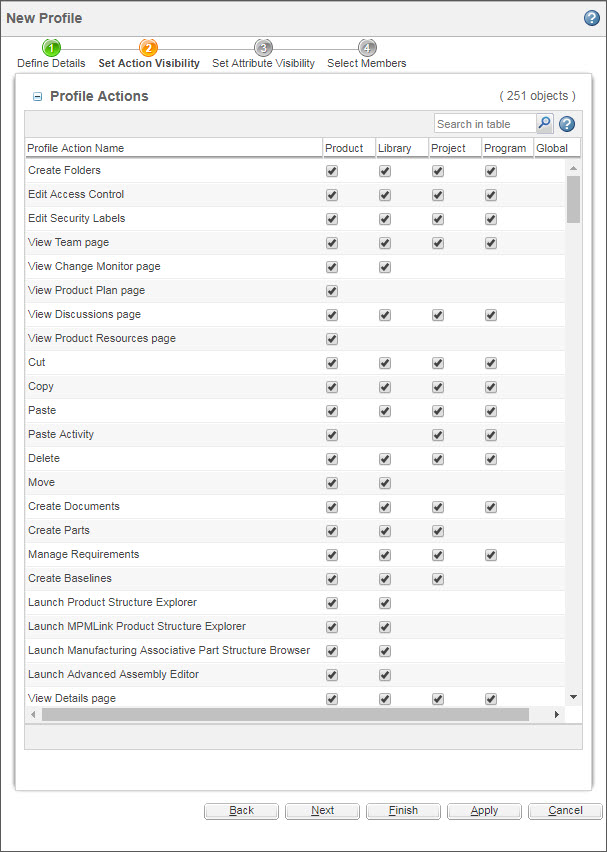
A site administrator, organization administrator or container administrator can specify which users have visibility to the actions defined. For site and organization administrators this can be done through profiles. Profiles can be created at Site->Profiles or Org->Profiles. The actions defined will be presented with their default settings, and the administrator can choose to hide those actions. The administrator can then specify which participants (users, groups, orgs) belong to the profile. All members of the profile will have that visibility. If a member is in multiple profiles, the greatest visibility is provided.
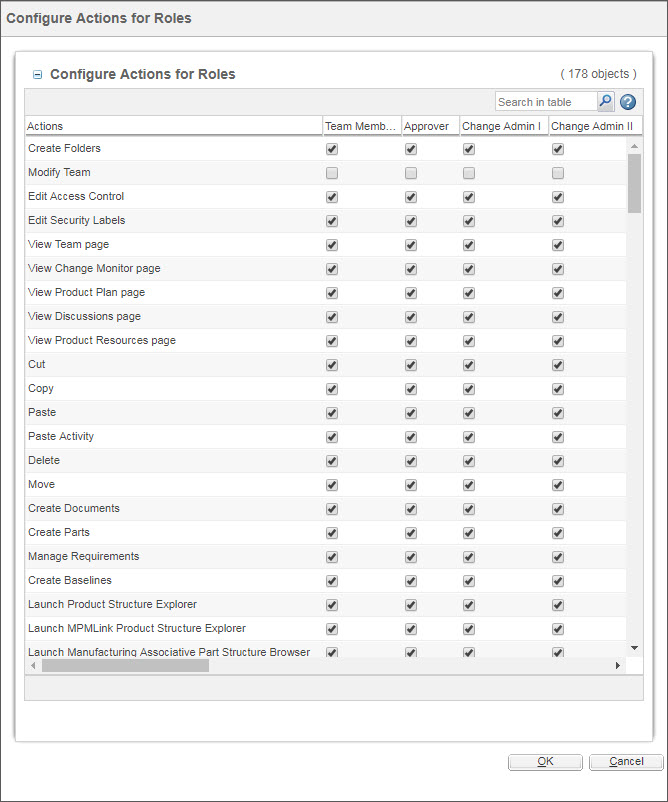
At the container level, the administrator can specify the visibility based on user roles. Anyone in those roles will have the visibility specified. Container-level role visibility will override any profile in which the member might be a participant.
See About Configuring Action Visibility by Role for more details about profile and role-based visibility administration.
Scope/Applicability/Assumptions
• The role-based visibility administration capability is turned on, that is, the preference com.ptc.netmarkets.roleAccess.enabled is set to true. The customization can be performed while the capability is turned off, but the results will not appear in the UI until the capability is turned on.
• The customizer can manage both OOTB UI components and customized UI components with this capability.
Intended Outcome
When configuring visibility by roles and configuring profiles, the administrator is presented with a list of UI components that can be managed. The administrator is unable to manage the visibility for any UI components that are not included in this list.
As a customizer, you have the ability to customize the list of UI components available to administrators. You can:
• add UI components to the list,
• remove UI components from the list,
• specify default visibility settings for UI components,
• change the order that UI components appear in the list, and
• change the labels for the UI components on the list.
At the site or organization level your intention is to manage the list presented when creating profiles:
At the container level, you are managing the equivalent list presented when configuring visibility by roles:
Solution
• Add your customizations to the file <customizationRootDirectory>/configurations/resources/customroleaccessprefs.xml. Create this file if it does not exist.
• Change the labels of the UI components using the Text Tailoring utility. For more information on the utility, see Text Tailoring Utility.
Prerequisite Knowledge
To achieve this objective, you need to have an understanding of the following:
• Behavior of user roles in Windchill
• Administration of ad hoc access control policies in Windchill
• Actions framework in the Windchill client architecture
• Navigation framework in the Windchill client architecture
• Management of XML file customizations
• Text Tailoring utility
Solution Elements
Element | Type | Description |
|---|---|---|
*actionModels.xml | XML | Files which define the models where actions are used. If an action is not already defined in a model, one will need to be created for the validation code to find the action and properly set visibility. actionmodels.xml is located in <customizationRootDirectory>/<module>/main/resources; other *actionmodels.xml files are generally in <customizationRootDirectory>/<module>/main/resources. |
*actions.xml | XML | Files where actions and other UI components are defined. Actions are optionally given a uicomponent value. To be located at <customizationRootDirectory>/<module>/main/resources. |
roleAccessResource | String organizer | Defines the labels to be displayed in the UI for actions or UI components. You can update the display values and their localized values using the Text Tailoring utility. For more information, see Text Tailoring Utility. |
customroleaccessprefs.xml | XML | Custom file to customize or override the default visibility of OOTB UI components. You can also add UI components or remove a UI component by setting the enabled parameter to false. To be located at <customizationRootDirectory>/configurations/resources. |
In actions.xml (and all *actions.xml files), an action can be assigned a uicomponent attribute value. The uicomponent attribute provides a name for a UI component that can be referenced from the OOTB roleaccessprefs.xml or customroleaccessprefs.xml file and the roleAccessResource string organizer. Multiple actions can use the same uicomponent value; this provides the ability to manage those actions as a single UI component. If an action does not have a uicomponent, then the action name can be used to reference it as a UI component instead. However, in this case it cannot be grouped with other actions into a single UI component.
The OOTB roleaccessprefs.xml and customroleaccessprefs.xml files consist of a <uic> element containing several elements (or sections) that correspond to the primary tabs in the Windchill user interface. For example, the <project> section corresponds to the Project tab. Each section contains zero or more <uic> elements, each representing a UI component whose visibility within that tab can be administered. Each UI component, specified with the name attribute of the <uic> element, can appear in one or more sections. This allows the default visibility settings for that UI component to be assigned independently for different tabs.
The OOTB roleaccessprefs.xml and customroleaccessprefs.xml files apply to the UI component lists for visibility administration based on both, profiles (at the site and organization levels) and roles (at the container level). However, the <global> section in the file applies only to visibility administration using profiles. If a UI component is not tied to a specific tab (such as is the case with the Search link in the Windchill UI header) or the UI component is a first-level tab itself, it should be listed in the <global> section.
Each UI component must have an entry in the roleAccessResource string organizer that provides a user-friendly label for that UI component. These labels are used for the UI components in the lists that are presented to the administrator when configuring visibility. The Key column in the roleAccessResource string organizer identifies the UI component; it must match either the uicomponent from the action definition or the action name if the action has no uicomponent. The Value column displays a user-friendly label for each UI component.
The OOTB UI components can be updated using the incremental attribute in the customroleaccessprefs.xml file.
Your UI component label should be a verb phrase. If your action/UI component name is not already a verb phrase, place ‘View’ in front, for example “View Team Page." |
Modular Structure for Customization
The following structure defines the location where the solution elements (identified in the table above) should be placed so that they are correctly deployed in the required location by the CCD utility.
customizationRootDirectory
├── acmeModule
│ ├── descriptor.xml
│ └── main
│ └── resources
│ └── acme
│ ├── acme-actionmodels.xml
│ └── acme-actions.xml
├── configurations
│ ├── resources
│ │ └── customroleaccessprefs.xml
│ └── xconf
│ └── custom.site.xconf
└── generated
└── BAC
└── textTailoringEnums.zip
├── acmeModule
│ ├── descriptor.xml
│ └── main
│ └── resources
│ └── acme
│ ├── acme-actionmodels.xml
│ └── acme-actions.xml
├── configurations
│ ├── resources
│ │ └── customroleaccessprefs.xml
│ └── xconf
│ └── custom.site.xconf
└── generated
└── BAC
└── textTailoringEnums.zip
For more information, see the section Modular Structure for Customization in Adding a Custom Action.
Customization Points
uic Element
Each UIC in roleaccessprefs.xml represents a UI component or action to be controlled.
Parameter | Default Value | Possible Values | Req? | Description | ||
|---|---|---|---|---|---|---|
name | n/a | string | Y | The name of the UI component. This must match the value of the uicomponent (or name) attribute on an action element in actions.xml. This must also match the value of a resource entry constant in the resource bundle. | ||
order | n/a | Integer | N | The position of this UI component in the wizard. UI components with lower numbers are placed before those with higher numbers. | ||
enabled | true | true | false | N | Whether or not this UI component will be shown in the wizard and utilized by the system. | ||
defaultAll | true | true | false | N | The default visibility value for All Members. | ||
defaultManager | true | true | false | N | The default visibility value for Project Managers.
| ||
defaultGuest | true | true | false | N | The default visibility value for people in the Guest role.
| ||
managerEnabled | true | true | false | N | Whether or not this UI component can affect the manager role. Do not change this value in out-of-the-box UICs. For customized UICs, you may choose your own setting. | ||
guestEnabled | true | true | false | N | Whether or not this UI component can affect the guest role. Do not change this value in out-of-the-box UICs. For customized UICs, you may choose your own setting. |
Procedure
Making an Action Available to Visibility Administration
In this example, you provide the administrator with the ability to manage the visibility of the Create Folder action in the Project, Program, Product, and Library tabs.
This example assumes that the Create Folder action is not already available for role-based visibility management; in the actual product, it is available out of the box. |
1. Add a new <uic> to the customroleaccessprefs.xml under the sections <project>, <program>, <product>, and <library>:
<product labelId="productLabel" incremental="">
<uic name="PROJECT_CREATE_FOLDERS" incremental="" order="00" enabled="true" defaultAll="true"
defaultManager="true" defaultGuest="false" managerEnabled="true" guestEnabled="false"/>
</product>
<uic name="PROJECT_CREATE_FOLDERS" incremental="" order="00" enabled="true" defaultAll="true"
defaultManager="true" defaultGuest="false" managerEnabled="true" guestEnabled="false"/>
</product>
The incremental attribute should be added within the product section and any other section where you want the new uic element to be merged with the existing list of uic elements. An error is displayed if the attribute is not used.
See the "uic element" section above for attribute descriptions. For actions that are valid for multiple tab types, add this entry under all the required sections. |
2. Using the Text Tailoring utility, add a new resource entry with the key PROJECT_CREATE_FOLDERS to the roleAccessResource string organizer.
3. Create a custom action definition file and add the uicomponent attribute as given:
<action name=" folder_create" checkaccess="true"
uicomponent="PROJECT_CREATE_ FOLDERS">
uicomponent="PROJECT_CREATE_ FOLDERS">
For more information, see Defining a New Custom Action. |
Steps 1 through 3 above can be performed in any order. Note that PROJECT_CREATE_FOLDERS is used as the uic name, resource entry key, and uicomponent in the action definition. It is necessary for all three of these items to share the same value in order to tie the customized behavior together.
Upon completion of this procedure, an administrator can configure the visibility for the Create Folder action under the Project, Program, Product, and Library tabs, based on profiles defined at the site or organization level, and based on roles at the container level.
Making a Customized Tab Available to Visibility Administration
Making a customized action available to visibility administration is essentially the same procedure as making an out-of-the-box action available. A tab, however, cannot be managed by container administrators (configuring role-based visibility). Therefore, you can only make a customized tab available to site and organization administrators for configuring visibility profiles. This means you can add a <uic> element for the tab only to the <global> section of customroleaccessprefs.xml. For example, assume that you have already created a customized tab, and have an associated <MyTab>actions.xml file. You can add the tab to the list for profile-based visibility administration as follows:
1. Add a new uic element to customroleaccessprefs.xml under the <global> section with a unique name, for example, CUSTOMIZED_TAB.
<global labelId="globalLabel" incremental="">
<uic name="CUSTOMIZED_TAB" order="190" enabled="true" defaultAll="true"/>
</global>
<uic name="CUSTOMIZED_TAB" order="190" enabled="true" defaultAll="true"/>
</global>
2. Associate the appropriate actions in action.xml with the uicomponent.
<action name="list2" uicomponent="CUSTOMIZED_TAB">
<command windowType="page"/>
</action>
<command windowType="page"/>
</action>
3. Using the Text Tailoring utility, add a new resource entry with the key CUSTOMIZED_TAB to the roleAccessResource string organizer.
Assigning One UI Component to Multiple Actions
If you want to tie one UI component to multiple actions, you need to specify the uicomponent attribute for each of those actions, using the same value. For example, the procedure described in the section "Procedure – Making an Action Available to Visibility Administration" creates a UI component called PROJECT_CREATE_FOLDERS associated with the folder_create action. You can assign the list_create_folder action to the same UI component by specifying the uicomponent attribute for that action in actions.xml as follows:
<action name="list_create_folder"
uicomponent="PROJECT_CREATE_FOLDERS" ajax="row">
uicomponent="PROJECT_CREATE_FOLDERS" ajax="row">
As a result, the “Create Folders" entry in the Configure Roles and Create Profile pages will affect the visibility for both folder_create and list_create_folder actions.
Changing the Labels for a UI Component
You can alter the label used for a UI component in the Configure Roles or Create Profile pages without making any other changes to that UI component. Using the Text Tailoring utility, change the resource entry value in the roleAccessResource string organizer.
Adding a New UI Component
1. Add a new uic element to customroleaccessprefs.xml with a unique name, for example, CREATE_ACME_PART.
<product labelId="productLabel" incremental="">
<uic name="CREATE_ACME_PART" order="01" enabled="true" defaultAll="true" defaultManager="true" defaultGuest="false" managerEnabled="true" guestEnabled="false"/>
</product>
<uic name="CREATE_ACME_PART" order="01" enabled="true" defaultAll="true" defaultManager="true" defaultGuest="false" managerEnabled="true" guestEnabled="false"/>
</product>
2. Using the Text Tailoring utility, add a new resource entry for the action display name with the key CREATE_ACME_PART to the roleAccessResource string organizer.
3. In <WT_HOME>/codebase/config/actions/actions.xml, add the Create Acme Part action by adding the attribute uicomponent="CREATE_ACME_PART"
<action name="Acme_create" checkaccess="true"
uicomponent="CREATE_ACME_PART">
uicomponent="CREATE_ACME_PART">
Removing an Existing UI Component
To remove a UI component, set the enabled attribute of an existing uic element to false by using the incremental attribute.
An example is shown below:
<product labelId="productLabel" incremental="">
<uic name="PROJECT_DETAILS" enabled="false" incremental="" />
</product>
<uic name="PROJECT_DETAILS" enabled="false" incremental="" />
</product>
Deploy Customization on Development Environment
For information on the CCD process for deployment, see Deploy Your Customizations on Your Development Environment.
Prepare CCD Package for Promotion
For information on the CCD process for promotion, see Deploying Code and Configuration Package.
Verify the customroleaccessprefs.xml File
An error is displayed if an attribute is incorrectly used in the customroleaccessprefs.xml file. It is recommended to verify the following points before deploying your customization.
• The section name, such as Product, Project, Library, matches the primary tabs in the Windchill UI.
• The labelId information matches the OOTB label ID and the incremental attribute is added next to it.
• The incremental attribute is added within the <uic> element where an OOTB UI component needs to be updated. This attribute is not used when adding a new UI component.
• Only valid attributes are added within a section. For example: name, order, enabled, defaultAll, defaultManager, defaultGuest.
Sample Code
Examples of Usage in OOTB Code
Example of multiple actions using the same UI component: The Team pages in Product/Project/Library share the same code, but each action is defined separately for each object. Each action has the same uicomponent of “PROJECT_TEAM". This allows the same resource (rbInfo) entry to be used, and helps to minimize the size of the action display table in the Create Profile page. PROJECT_TEAM still needs to be defined in customroleaccessprefs.xml for each tab type in which it is used, and different defaults can be set for each.