Analyzing the AI Parts Rationalization Jobs in the WVS Job Monitor
This topic is intended for the Windchill System Administrator.
This topic explains how to search for and view AI Parts Rationalization Jobs in the WVS Job Monitor.
• From Quick Links, click the WVS Job Monitor icon 
• On the information page of a Windchill object, create a New Tab and navigate to > > to display the Representations/Annotations table for the object.
• From the Representations/Annotations table
• From Navigator, select Utilities under a specific context, Organization, or Site, and then click WVS Job Monitor.
You can filter the jobs listed in the Job Summary using the - Pick a View - list. To view the AI Parts Rationalization jobs, apply the AI Parts Rationalization Jobs filter. This displays all jobs triggered for indexing purposes.
The WVS Job Monitor enables administrators to quickly analyze failed AI Parts Rationalization jobs and take corrective actions when needed. This helps maintain and stabilize the external service connected to Windchill.
This image displays the summary of the AI Parts Rationalization jobs and individual job details.
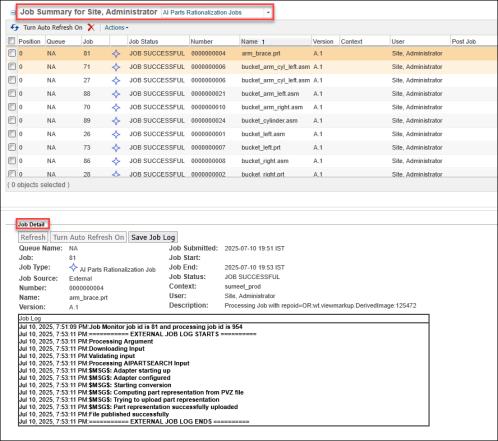
The WVS Job Monitor window is divided into two main panes:
• Job Summary (top pane)—Displays a sortable list of jobs with basic information. This list is read-only.
• Job Detail (bottom pane)—Displays the details of a particular job. To view the details of a job, click the state link of the job in the Job Summary pane.
When you select any job in the Job Summary pane, its corresponding details are displayed in the Job Detail pane below. This allows for a quick inspection and analysis of individual job records.
For example, you can see the job status (SUBMITTED) for Job 81 in the Job Summary at the top, and view its details in the Job Detail at the bottom, as shown in the image.
The key features of the WVS Job Monitor include:
• To update the job list automatically, click Turn Auto Refresh On. To update the list just once, click the Refresh All Jobs  icon.
icon.
icon.• To find failed indexing jobs, enter Failed in the Search in table field. Select a specific row of a failed job to view the details of the failure.
• To delete job records, select the checkbox next to a job and click the Delete  icon. This deletes only the job entry and does not affect the representation created by the job.
icon. This deletes only the job entry and does not affect the representation created by the job.For more information, see WVS Job Monitor.
To manage the storage efficiently, we recommend implementing a cleanup policy for failed jobs. For example, consider deleting the failed job data after 30 or 60 days. This prevents the accumulation of outdated job data in storage. |