Build the Landing Page
To enhance the navigation, you’ll add pop-ups in this section. Pop-ups will help structure the UI more effectively and provide a better user experience.
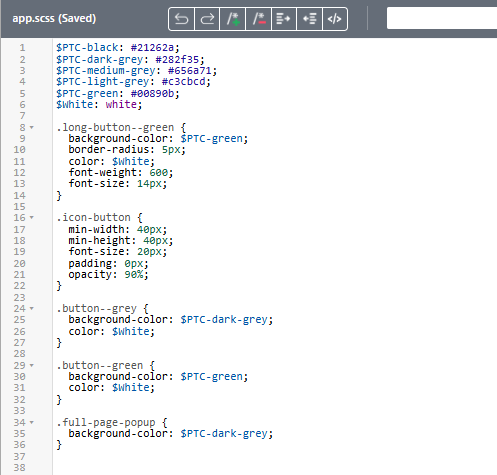
1. Define the following CSS for a full-page popup in > :
.full-page-popup {
  background-color: $PTC-dark-grey;
}
Your application styles should now look similar to the following:
2. Navigate to the Identification view.
3. Add a Popup widget to the canvas, and configure the following properties:
◦ Class—enter full-page-popup
◦ Width (px, %, vh, em)—enter 100%
◦ Height (px, %, vh, em)—enter 100%
◦ Visible—select the checkbox
◦ Studio ID—enter landingPagePopup
4. Create the following bindings:
◦ Select scan-1 in the project tree. Drag and drop the User Canceled event onto landingPagePopup in the project tree. Select Show Popup on the Select Binding Target window, and click Bind.
◦ Select Start Scanning button in the project tree. Drag and drop the Click event of the button onto landingPagePopup in the project tree. Select Hide Popup on the Select Binding Target window, and click Bind.
5. Next, add a Grid Layout widget to the Popup widget to give the layout more structure.
6. With the Grid Layout widget selected, select Rows Divide Available Height Evenly checkbox in the DETAILS pane.
7. Add two more rows to the grid by clicking Add Row twice (under GRID ACTIONS in the DETAILS pane).
8. Leave the first row empty.
9. Select the second row and complete the following:
◦ Flex Direction—select Column
◦ Justify Content—select Center
◦ Align Items—select Center
◦ Add a Label widget, and configure the following properties:
▪ Text—enter Welcome to the
▪ Class—enter simple-label title-label
▪ Studio ID—enter welcomeLabel
◦ Add a second Label widget, and configure the following properties:
▪ Text—enter Displaying Dynamic Assets 101 sample
▪ Class—enter simple-label sub-title-label
▪ Studio ID—enter experienceTitleLabel
10. Select the third row and complete the following:
◦ Set Flex Direction to Row
◦ Set Justify Content to Center
◦ Set Alight Items to End
◦ Set Padding (i.e. 10px 10px 20px 10px) to 20px
11. Next, move the Start scanning button into the third row, and update the following properties:
◦ Text—enter Scan the QR code
◦ Class—enter long-button--green
◦ Studio ID—enter startScanButton
12. Now that you have a landing page, you’ll add a product identification popup.