Area Target
|
|
Before you can use an Area Target widget in your experience, you must first create the Area Target.
|
What Does This Widget Do?
The Area Target widget allows you to use an Area Target as your tracking method. Area Targets bring Vuforia-powered environment tracking into your experiences enabling you to track and augment areas and spaces. Area Targets allow users to easily navigate to the appropriate content using spatial clues, ultimately improving operational efficiency and work safety.
When Should I Use This Widget?
Area Targets can be used when creating spatial instructions using the surroundings as interactive elements to be explored. For example, you can use an Area Target when you want to deliver augmentations to stationary objects in a scanned environment. For more information about Area Targets, see the Vuforia Developer Library. Or, for additional resources, see Area Target Troubleshooting and Additional Resources.
Are There Any Special Properties, Services, Events, or Actions?
To view a list of common widget properties, services, and events, see Common Widget Properties, Services, and Events.
The following table is a list of properties that are specific to this widget.
|
Canvas Tool
|
Description
|
|---|---|
|
|
If your experience includes an Area Target, the Area Navigation Mode will be enabled. This mode allows you to more easily navigate the area or space in your Area Target using the keys on your keyboard. For more information, see Navigate an Area Target on the 3D Canvas.
Also, you can double-click on a location to go directly there.
 |
|
Property
|
JavaScript
|
Type
|
Description
|
|---|---|---|---|
|
Data Set
|
dataset
|
resource url
|
Upload the <target_name>.zip that contains your Area Target files. This .zip should include the following files:
• <target_name>.dat
• <target_name>.xml
• <target_name>_authoring.glb
• <target_name>_navmesh.glb (optional for occlusion)
|
|
XML Data
|
xmlData
|
resource url
|
Once a data set has been uploaded, XML Data will be set to the value of the .xml file from the Area Target .zip.
|
|
Model URL
|
src
|
resource url
|
Once a data set has been uploaded, Model URL will be set to the value of the .dat file from the Area Target .zip.
|
|
Show Model In Preview
|
showRepresentation
|
boolean
|
If selected, the model will appear when you preview the experience in Vuforia Studio.
|
|
Occluder URL
|
occluder
|
resource url
|
If a data set has been uploaded and it contains a <target_name>_navmesh.glb file, Occluder URL will be set to the value of the <target_name>_navmesh.glb file from the Area Target .zip.
|
|
Apply Occlusion
|
applyOcclusion
|
boolean
|
If selected, occlusion is applied to the Area Target navigation mesh (if specified).
|
|
Guide Text
|
guideText
|
string
|
Text that will guide the user when using the Area Target.
|
|
Tracked
|
istracked
|
boolean
|
Is enabled when the camera recognizes the target.
|
|
Event
|
JavaScript
|
Description
|
|---|---|---|
|
Tracking Acquired
|
trackingacquired
|
Triggered when the area is recognized by the camera.
|
|
Tracking Lost
|
trackinglost
|
Triggered when the camera no longer recognizes the area.
|
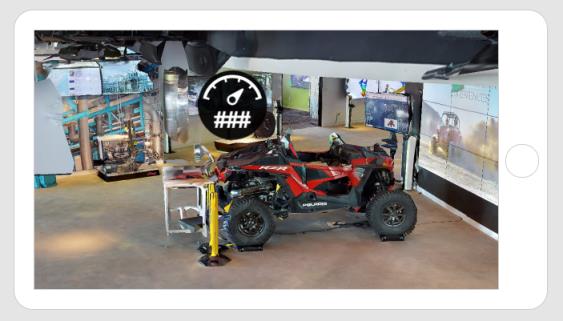
The Widget in Action
Here’s an example of what your widget might look like!
|
Minimum Steps Required for Use
|
What It Looks Like
|
||
|---|---|---|---|
1. Drag and drop an Area Target widget onto the canvas.
2. Click the + icon next to the Data Set field to upload the .zip file for your Area Target.
3. Add widgets to different places in your Area Target. For this example, we’ve added a 3D Gauge.
|
 |