Provisioning
Creating a Single Asset
|
|
Only administrators and authorized users can create assets in the ThingWorx Asset Management.
|
Complete the following steps to create an asset.
1. In the ThingWorx Asset Management, click Create Asset under Provisioning.
2. Select an asset type from the Asset Type drop-down menu.
|
|
Once the asset has been saved, this field cannot be edited.
|
3. Enter a unique name for the asset in the Asset Name field.
|
|
Once the asset has been saved, this field cannot be edited.
|
4. (Optional) Enter a description.
5. Select a resource provider from the
Resource Provider drop-down menu. For more information on resource providers, see
Resource Providers.
6. (Optional) Click the plus sign to select a thing shape.
7. Click Next.
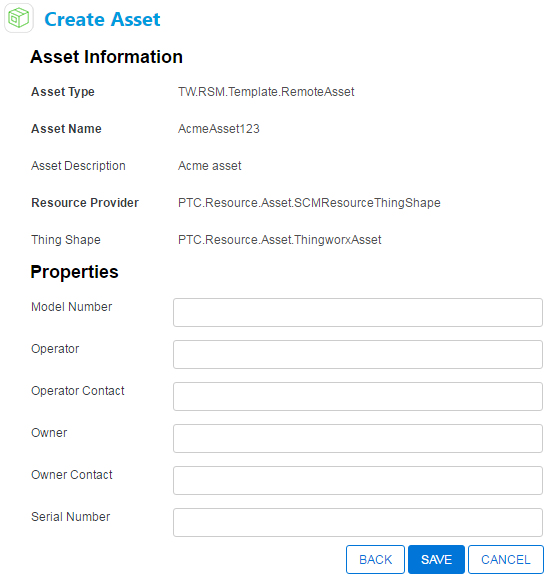
8. The asset information and properties appear. Update the desired properties and click Save.
|
|
If you click Back to return to the previous screen to edit the general asset information, and update the Asset Type or Thing Shape field, the properties list will be regenerated and any property values entered will be lost.
|
| Depending on the asset type selected, the editable properties may change. |
Loading Assets in Bulk
A few things to keep in mind:
• The import type is determined by the file extension (csv, tsv, xls, xlsx). CSV files are assumed to be UTF-8 encoded and use ',' as the record separator and '"' for quote character. TSV files are assumed to be UTF-8 encoded as well and use tab as the record separator.
• The following column headings are supported
◦ name (required thing name for the new asset)
◦ description (optional description of the new asset)
◦ Zero or more property fields based on the flattened list of properties defined on the asset type and optional thing shape.
To load assets in bulk, complete the following steps:
1. Navigate to > .
2. Under Import Configuration, select a thing template from the Asset Type drop-down menu.
3. Select a resource provider from the Resource Provider drop-down menu.
4. (Optional) Add a thing shape.
5. To select a source file, click Browse... and navigate to the file to be imported.
| CSV, TSV, XLS, and XLSX file formats are supported. |
6. Click Validate or Import.
Two services, Validate and Import, are also available to validate and bulk load assets in the PTC.Asset.BulkImporter resource.
| The Import service only supports the creation of assets. |