Graphical Mode Installation
|
|
This procedure represents the Windows graphical mode installation for Platform Analytics. For launch information using the Silent installation mode, see Silent Mode Installation
|
Before Installation
• Make sure all of the prerequisites have been met.
|
|
If you plan to use an existing external instance of RabbitMQ or Apache Flink, instead of installing the components provided with the installer, those servers must be running during the Platform Analytics installation.
|
• Download the appropriate installer files for your operating system.
• Extract the downloaded files to a location on your host system.
Installation Steps
1. Navigate to the extracted Windows installer file, PlatformAnalytics-<n.n.n>-windows-installer.exe, right click the file, and select the Run as Administrator option.
|
|
An advanced option is available if you want to override the default user account during the installation. For more information about launching the installer with this option, see Change the User Account .
|
2. Accept the license agreement and click Next.
3. Select the products you want to install.
Available products include the following:
|
Property Transform Services
|
Click the + icon to expand the option and select any of the following components included with the installer:
|
|||
|
RabbitMQ
|
Installs the RabbitMQ component included with the installer.
|
|||
|
Appache Flink
|
Installs the Flink component included with the installer.
|
|||
|
Property Transform Microserver
|
The microserver component is selected by default and cannot be cleared.
|
|||
|
Descriptive Services
|
Installs the Descriptive Analytics Microservice.
|
|||
4. Specify an installation directory. You can accept the default or provide a different location.
|
|
If the installer detects a previous version of Platform Analytics components, and you want to upgrade, the old installation directory is preselected and you will not be able to change it. For more information, see Upgrade from an Earlier Version.
|
5. Enter ThingWorx connection information, including the following parameters:
|
Parameter
|
Description
|
|---|---|
|
ThingWorx IP Address or Host Name
|
Enter the IP address or host name of your ThingWorx server, which must already be installed and running.
|
|
ThingWorx Port
|
Enter the port for communicating with your ThingWorx server.
|
|
ThingWorx AppKey
|
Enter the value from the Key ID field of the application key you created in ThingWorx.
|
|
Use SSL?
|
Select this check box in order to require the use of SSL when connecting to ThingWorx. By default, the check box is not selected.
|
6. Enter RabbitMQ configuration information. The required information varies depending on the following:
◦ If you are installing the new RabbitMQ instance included with the installer, provide a RabbitMQ Username and Password. The RabbitMQ virtual host is set to the root directory by default: “/”
◦ If you are using an existing external RabbitMQ instance, in addition to the Username and Password, also provide an IP Address or Host Name for the external RabbitMQ, a Port number, and a Virtual Host.
|
|
The RabbitMQ password will be encrypted automatically as part of the installation process.
|
7. Enter Flink configuration information. This step is necessary only if you have opted not to install the instance of Flink included with the installer, but instead plan to use an existing external Flink cluster. If so, provide the external Flink IP Address or Host Name and a Port number.
When you complete this step of the configuration, the installation begins. Depending on your operating system, several windows may open and then close while the process unpacks and installs the necessary libraries and settings.
8. When the installation process is complete, a final page is displayed. Click Finish. An Installation Summary page is displayed with a list of the components that were installed.
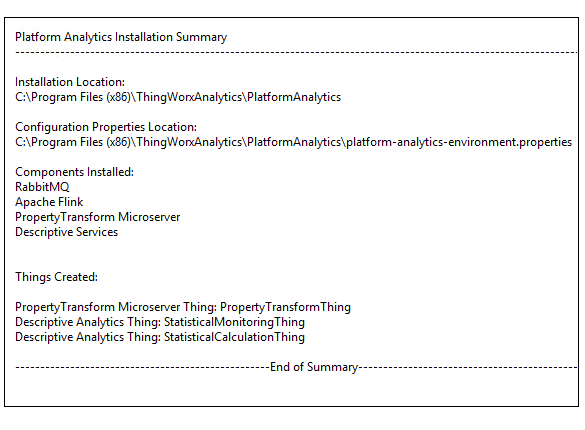
9. Review the Installation Summary page and then click OK to close it.
10. To test the product installations, see:
◦ Verify the Descriptive Analytics Microservice Installation
◦ Verify the Property Transform Microserver Installation