Build an Agent using Java SDK
Prerequisites
Before you create an agent using Java SDK, ensure that you have the following prerequisites set on your system:
• Eclipse
• Maven
• Required Maven packages
Build the agent using Java SDK
Complete the following steps to build an analysis service agent by using Java SDK:
1. Extract the analysis_sdk_sample-src.zip source SDK sample zip to the analysis_sdk_sample-src folder. The following image shows the directory structure after the zip file is extracted:
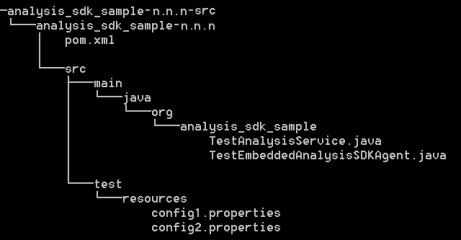
The purpose of different files in the zip is described below:
◦ pom.xml is the Maven file that is used to build the project using Maven.
◦ TestAnalysisServices.java is an example of the agent running in the standalone mode.
◦ TestAnalysisSDKAgent.java is an example of the agent running in the embedded mode.
◦ config1.properties and config2.properties are sample configuration properties.
2. Import the Maven project into Eclipse. Complete the following steps to modify the pom.xml file so that it works in your organization:
a. Update the values of the artifactId and groupId tags.
b. If you want the pom.xml file to be a part of a larger project, update the value of the parent tag. Otherwise, you can remove the parent tag.
c. Ensure that the URL in the repository tag points to the Maven repository of your organization.
d. Update the value of the pluginRepository tag so that it points to the Maven repository of your organization.
e. Run the following command to add the analysissdkclient-<version>-jar-with-dependencies.jar file to your Maven repository so that it can be referenced in the pom.xml file:
mvn install:install-file -Dfile=<full_path>\analysissdkclient-<version>-jar-with-dependencies.jar -Dpackaging=jar -DgroupId=com.ptc.analysis.analysissdkclient -DartifactId=analysissdkclient -Dversion=<version_no> -DgeneratePom=true
f. Remove the <profiles> tag, if not required.
3. Modify TestAnalysisService to communicate with your analysis software. You can either include the SDK of your analysis software or incorporate a particular protocol by using appropriate libraries.
4. Configure the appSettings section of the config.properties file in the Agent .jar file that provides available settings for deployment on the client.
Place the config.properties in the classpath before the analysissdkclient-<version>-jar-with-dependencies.jar, otherwise the default config.properties is used. |
The following table provides information about the mandatory properties. If you want, you can change the values of these properties as per your requirement:
Property | Description | ||
|---|---|---|---|
URI | Specifies the URI of the ThingWorx server where the Analytics Manager framework is running. For example: ws://localhost:8080/Thingworx/WS | ||
UserId | Specifies the ID of the user that is used to establish connection to the server.
| ||
Password | Specifies the password of the user that is provided for connection.
| ||
AppKey | Instead of using a user ID and password for authentication, you can use the key that you have created on the ThingWorx server.
| ||
ConnectorName | Specifies the name of the connector instance that is created for interacting with an analysis provider and is used while configuring the analysis provider on the server side. For example: TW.AnalysisServices.TestSDKConnector | ||
AppImplClass | Specifies the fully qualified name of the class that implements the application interface. This class contains the bridging code between the agent and the analysis provider. This class must be in the classpath provided to the JVM when running the agent.
For example: org.analysis_sdk_sample.TestAnalysisService | ||
UseProxy | Set to true, if a proxy is used to connect to the ThingWorx server. | ||
ProxyHost | Specifies the proxy host used, if the UseProxy property is set to true. | ||
ProxyPort | Specifies the proxy port used, if the UseProxy property is set to true. | ||
AgentWorkDir | Specifies the directory used by the agent to store model files, temporary files, result files, and data files. The default AgentFiles folder is created in the installation directory of the agent. The following subdirectories are created under this directory: • Models • TempFiles • Results • DataFiles | ||
SupportDeployment | Set to true to deploy a new docker-based or jar-based analysis agents.
| ||
DeployerImplClass.1 | Specifies the name of the class that implements a custom deployer agent. | ||
DeployerConnectorName.1 | Specifies the connector on the ThingWorx server that will be used by the custom deployer agent. | ||
ApplicationClassOrJar | Specifies the name of the main class or jar when you run the agent in embedded mode. You must specify this property when the value of UseRedundantAgent is set to true. | ||
AppExecutionThreadpoolSize | Specifies the number of jobs that a client can handle at a time. |
The following table provides information about the optional properties and default values of the agent. If you want, you can change the values of these properties, as per your requirement:
Property | Description | Default Value | ||
|---|---|---|---|---|
AgentId | Specifies a unique string that is used for identification of an agent to the ThingWorx server. If the value is not specified, a unique ID is generated automatically and is reused until a different one is provided using this property. | - | ||
UseRedundantAgent | Used to monitor the primary agent for crashes. If the value is set to true, a secondary agent is launched at startup. This secondary agent monitors the primary agent. If the primary agent crashes, it is restarted automatically. If the secondary agent fails, the primary agent restarts it. | false | ||
GatherClientHealthData | Set the value to true to monitor the health of the client. | false | ||
ClientHealthDataInterval | Specifies the time interval in milliseconds after which the agent SDK polls the system and its clients for health information. | 60000 | ||
ClientInstanceInitCount | Specifies the number of client instances that start when the agent is started. | 1 | ||
ClientInstanceMaxCount | Specifies the maximum number of client instances that this agent can start. Specify a value greater than 0 to provide a fixed maximum value for the number of clients. | -1
| ||
CallTimeout | Specifies the time in milliseconds that a server call waits before failing with a time-out error. Set this value according to the latency of the network. | 90000 | ||
SimulationInterval | Specifies the agent wait time between simulation jobs. If an existing simulation job is running, and a new job comes in before this specified interval, then the agent skips the execution of the job. | -1
| ||
AppExecutionThreadpoolSize | Specifies the number of jobs that a client can handle at a time. | 1 | ||
MaxMessageSize | Specifies the maximum messages transfer limit (in bytes) between the agent and the server per request. | 16384 |
You can add additional properties to the config.properties file and retrieve them using the ClientHelper.getConfig API.
To create a custom config.properties file for your agent, use the config.properties file in the analysissdkclient-<version>-jar-with-dependencies.jar file.
5. To build runtime artifacts, run the mvn package command.
This command copies the dependencies.jar files and the runtime artifacts for this project to the target folder.
6. Modify the logback.xml file in the analysissdkclient-<version>-jar-with-dependencies.jar directory to customize the logging for the agent.
Encrypting the Application Key or User Id and Password
With version 8.4, you must encrypt the application key or user ID and password combination before you run the agent. Use the following commands:
• Encrypt the application key
java -cp analysissdkclient-jar-with-dependencies.jar shaded.com.thingworx.security.cli.SecurityTool <path to sample.conf> encrypt AppKey <appkey>
• Encrypt the user ID and password
java -cp analysissdkclient-jar-with-dependencies.jar shaded.com.thingworx.security.cli.SecurityTool <path to sample.conf> encrypt Userid <userid>
java -cp analysissdkclient-jar-with-dependencies.jar shaded.com.thingworx.security.cli.SecurityTool <path to sample.conf> encrypt Password <password>
The following is an example of the sample.conf file:
{
security {
secret-provider = "shaded.com.thingworx.security.provider.keystore.KeyStoreProvider"
default-encryption-key-length = 256
keystore {
password-file-path = "/ThingworxPlatform"
password-file-name = "keystore-password"
path = "/ThingworxStorage"
name = "keystore.jks"
}
}
}
security {
secret-provider = "shaded.com.thingworx.security.provider.keystore.KeyStoreProvider"
default-encryption-key-length = 256
keystore {
password-file-path = "/ThingworxPlatform"
password-file-name = "keystore-password"
path = "/ThingworxStorage"
name = "keystore.jks"
}
}
}
Running the Agent
Use one of the following methods to run the agent that you created:
• Standalone Mode — Use this mode when you cannot modify the analysis tool. Depending on the version of ThingWorx Analytics Extension that you have installed, use either of the following commands to run the agent:
ThingWorx Analytics Extension Version | Command |
|---|---|
Version 8.4 and later | java -cp analysis_sdk_sample.jar com.ptc.analysis.client.impl.AnalysisSDKAgent mode=null configFile=<path to config.properties> securityConfig=<path to sample.conf> |
Version 8.3 and earlier | java -jar analysissdkclient-<version>-jar-with-dependencies.jar mode=null configFile=<path to your configuration file> |
Ensure that you have set the class path correctly to include your implementation class.
• Embedded Mode — Use this mode when you can modify the analysis tool. In this mode, the application loads the SDK. Include analysissdkclient-<version>-jar-with-dependencies in the class path of your application. Refer to TestEmbeddedAnalysisSDKAgent.java to see how you can load the agent.
SSL Configuration
1. Configure Tomcat to use a self-signed SSL certificate. For information about how to do this, follow the steps at PTC Support Website.
2. Update the URI to use the HTTPS port, usually 8443 on Tomcat.
For example, wss://mymachine:8443/Thingworx/WS. Since the agent code allows communication with sites with self-signed certificates, the communication works automatically.
3. To export the certificate from the key store so that it can be used on the agent host, complete the following steps:
Ensure that you are in the tomcat\conf directory and that keytool is added to PATH.keytool.
a. Execute the keytool -export -keystore tomcat.keystore -alias tomcat -file tomcat.cer command.
The tomcat.cer file is created in the conf directory.
b. Copy the tomcat.cer file to your agent host.
4. To add the certificate to the TrustStore of the JDK that you want to use to run the JAVA agent, complete the following steps:
Ensure that the JAVA_HOME variable is set to point to the JDK that you want to use for running the analysis agent.
a. Copy the contents of cacerts file from the $JAVA_HOME/jre/lib/security directory to jssecacerts in the same directory.
b. Run the cd $JAVA_HOME/jre/lib/security command.
c. Execute the keytool -import -alias adding_certificate_keystore -file path\to\tomcat.cer -keystore jssecacerts command.
The default passphrase for the TrustStore is changeit.
You can use the above JDK to run the agent.