Salesforce
Salesforce is a CRM application built on the Force.com platform.
Connector Release Version
Salesforce connector was delivered in the 8.4.1 release.
Supported Actions
Supported Triggers
• New Lead
• New Case
• New Task
Supported Authorization
OAuth
|
|
Before adding an OAuth connection, ensure that you follow the steps provided in Obtaining Client Id and Client Secrets for Salesforce.
|
Authorize Salesforce
Salesforce authorization has to be done for each Salesforce connector action. To authorize the Salesforce connector, do the following:
1. In the Authorize Salesforce field, select Add new Salesforce login.
2. On the Parameters window, enter the User Domain such as login.salesforce.com, and then click ALLOW.

3. Enter your user name and password, and then click Log In. A verification code is sent on your email id.
4. Enter the Verification Code, and then click Verify.
5. In the Add Authorization window, rename the Authorization Label, and then click ADD.
Click TEST to validate the authorization. |
Each connected app allows five unique approvals per user. When a sixth approval is made, the oldest approval is revoked. For more information, see Manage OAuth Access for Your Connected Apps.
In ThingWorx Flow, we always use the latest APIs that are available with your SalesForce account. |
Output Schema for all the Actions
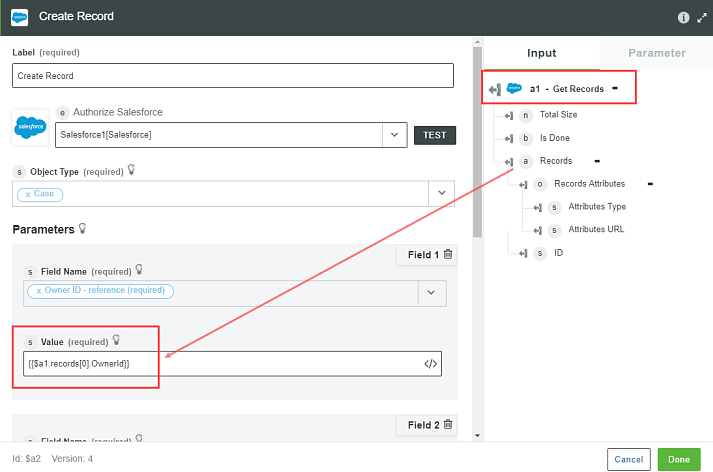
Dynamic injection schema is not supported in Salesforce instead you can map the top-level object as an input to the next action. An example for mapping of the Owner ID from the output of the Get Records action is shown in the figure that follows:
The output in the debug panel is as follows:
{
"totalSize": 2,
"done": true,
"records": [
{
"attributes": {
"type": "Account",
"url": "/services/data/v44.0/sobjects/Account/0011I00000jmFCvQAM"
},
"Id": "############",
"Site": null,
"OwnerId": "************",
...
}
{
"attributes": {
"type": "Account",
"url": "/services/data/v44.0/sobjects/Account/0011I00000jmomyQAA"
},
"Id": "############",
"Site": null,
"OwnerId": "************",
...
}
]
}
Example
Let us say we have a requirement where, whenever a new lead is created for Boston in your Salesforce account, a task is created automatically and assigned to a salesperson.
Add and Configure a Trigger for New Lead in Salesforce
Let us set up a Salesforce trigger that fires off each time a new lead is created for Boston in the Saleforce account:
1. Place the pointer on the Start icon and then click  or double-click the Start icon. A list of triggers appears.
or double-click the Start icon. A list of triggers appears.2. Select the Salesforce trigger. The Salesforce trigger window opens.
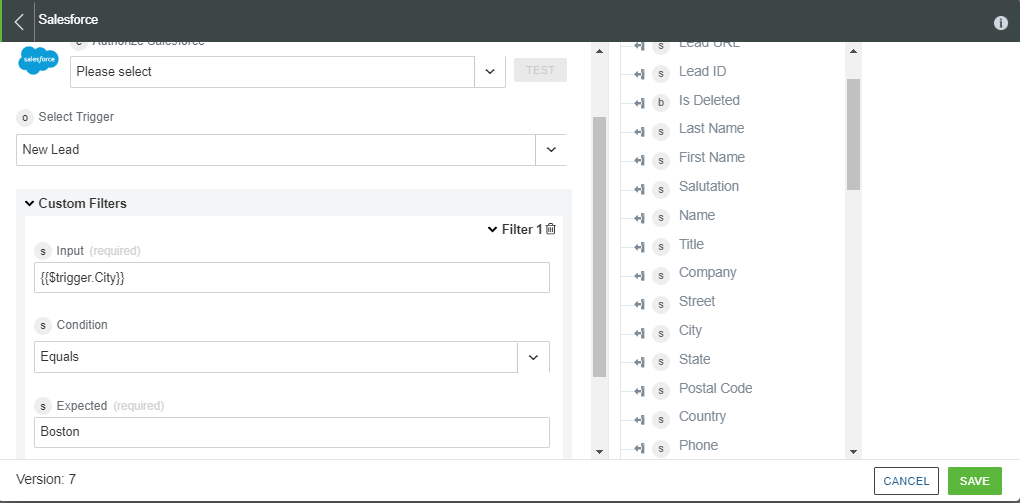
3. Enter the information in the trigger window, and then click SAVE.
Add and Configure the Create Task action in Salesforce
We will now configure the New Task action in Salesforce. Whenever a lead is created in Boston, the task is created automatically and a salesperson is notified.
Complete the following steps to configure the Create Task action in Salesforce:
1. Drag the Create Task action under the Salesforce connector to the canvas, place the pointer on the action, and then click or double-click the action. The Create Task action window opens.
or double-click the action. The Create Task action window opens.2. In the Create Task action window, enter the following information:
a. In the Subject field, enter Potential lead is created in {{$trigger.City}}. Schedule a call..
Here, you need to map City under the Trigger Data section to the Subject field.
b. In the Assign to field, enter the email address of the salesperson who you want to assign the task.
3. Click Done.
