Production and Waste
Production Information
This panel shows the current production and waste information for the equipment. The chart displays total production, good production, and total waste. If you are in work order mode, this information is for the active work order. If you are in product mode, this is the information tracked since the last product change. The ideal production rate per hour and the average production rate per hour for this equipment are also displayed.
|
|
Total Production, Good Product, and Total Waste update every minute.
|
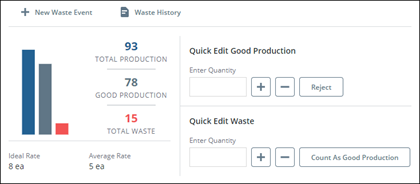
Under Quick Edit Good Production, manually adjust the good production number. Enter a number in the Enter Quantity field, and then click the appropriate button:
• Click + to increase the good production number by the entered quantity.
• Click — to decrease the good production number by the entered quantity.
• Click Reject to remove the entered quantity from the good production number and add it to the total waste number.
Under Quick Edit Waste, manually adjust the total waste number. Enter a number in the Enter Quantity field, and then click the appropriate button:
• Click + to increase the total waste number by the entered quantity.
• Click — to decrease the total waste number by the entered quantity.
• Click Count As Good Production to remove the entered quantity from the total waste number and add it to the good production number.
Click Waste History to open the full Waste display in a new browser tab. The Equipment and Time Frame will be automatically filled based on operator dashboard selections.
Adding a Waste Event
1. Click New Waste Event. The Add New Waste Entry window popup will display the Equipment preset to match the operator dashboard selection.
2. Select the Start Time and End Time for the waste event or enter the duration.
The current timestamp will be used as the End Time if duration is utilized. |
3. Click Save.
4. Click Next or navigate to the Quantity tab.
5. Enter at least one quantity along with associated timestamp, clicking + to add to the list below. Expand the list by clicking  and minimize by clicking
  .
.
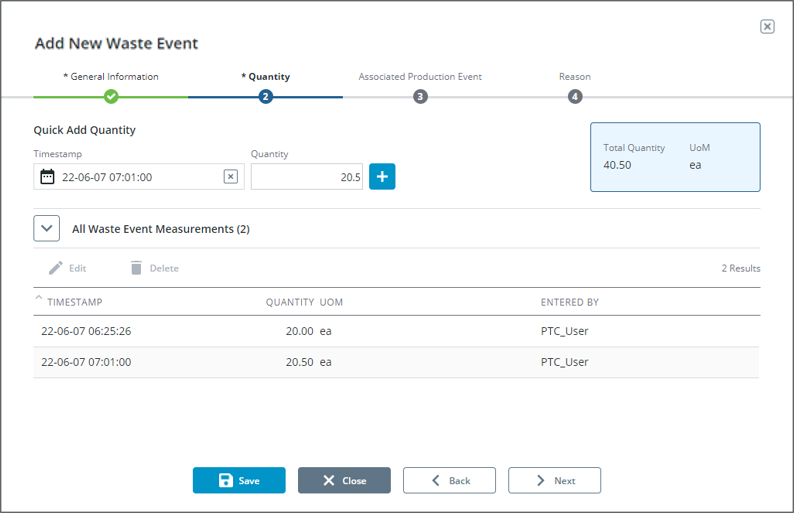
6. Click Save.
7. Existing Waste Event Measurements can be edited or deleted when the list is expanded.
a. To delete, select the appropriate measurement and click Delete. Click Delete again within the confirmation window.
b. To Edit, select the appropriate measurement, and click Edit. Modify the timestamp and quantity as needed and click Save.
8. Click Next or navigate to the Associated Production Event tab.
9. A production event will be automatically assigned to the event along with the product, quantity, and Unit of Measure. A list of other Production Events within the same timeframe populate in a list below. Expand the list by clicking and minimize by clicking .
The “Assign time from production event” check box will take the selected production event's start and end time and apply it to the waste event's start/end. This can result in the invalidation of some quantity measurements if they are out of range. |
a. To select a different Production Event, expand the list, select the appropriate event, and click  .
.
b. The Production Events can be filtered by searching or utilizing the timeframe selector. 
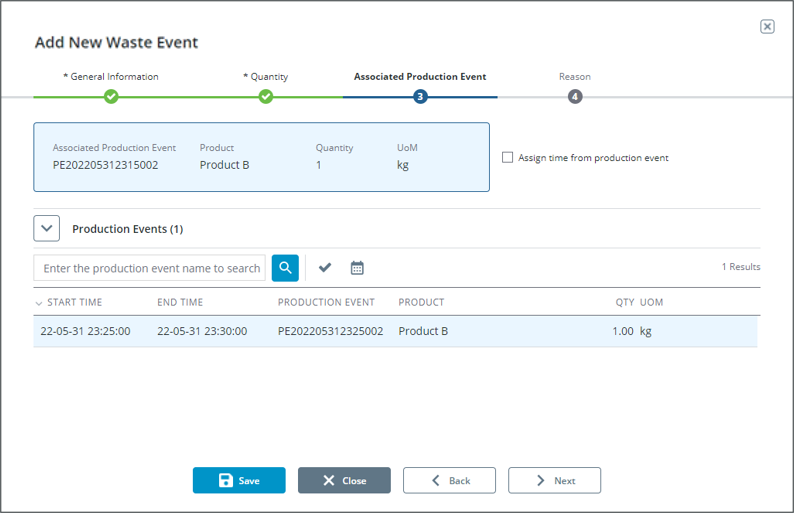
10. Click Save.
11. Click Next or navigate to the Reason tab.
12. (Optional) Select the reason for the waste entry.
◦ A reason tree can be many levels. When a reason is selected, it is added to the Selected Reasons breadcrumb display. The next level of reasons in the reason tree (if any) will appear in the Select Reason pane.
◦ If there are no further reasons, the text No more reasons at this level will display.
◦ Click Up One Level to move up a level in the reason tree.
◦ Click Clear All to clear the selected reasons and return to the top level of the reason tree. It is not required to select reasons down to the final node of the reason tree.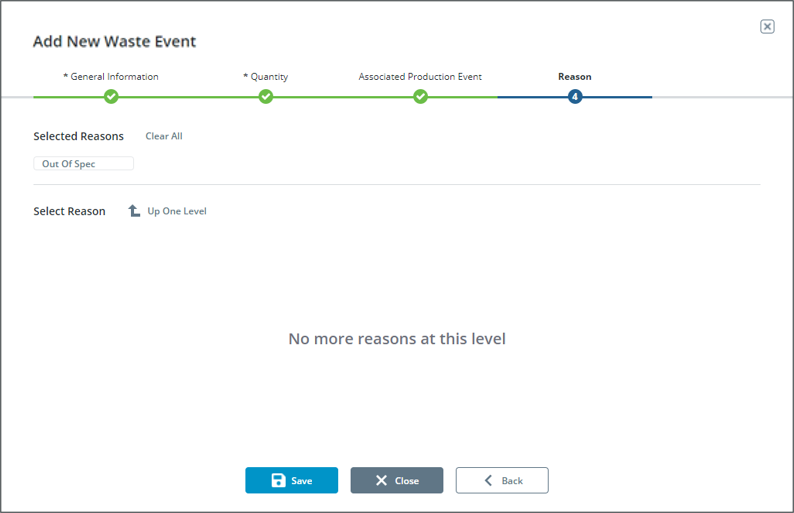
13. Click Save to return to the Operator Dashboard.