Other Downtime Event Actions
Editing
Existing downtime events can be edited to add or update the reason or notes and change the selected start or end times.
1. Select the downtime event from the Downtime Event Display and click Edit. The Edit Downtime window opens to the Reasons tab with the current selections populated.
2. Modify the Reason appropriately. Click Save.
3. Modify the Start Time or End Time by clicking over to the General information Tab. Click Save.
4. Modify or add Notes by clicking over to the Notes Tab.
|
|
Notes can only be modified by the author
|
5. Click Save and Close to return to the Downtime Events Display.
Splitting
An existing downtime event can be split into two separate events. This allows different reasons and notes to be assigned. Downtime events can be split multiple times by repeating the split downtime action.
1. Select the downtime entry from the Downtime Events Display and click Split. The Split Downtime Event window opens.
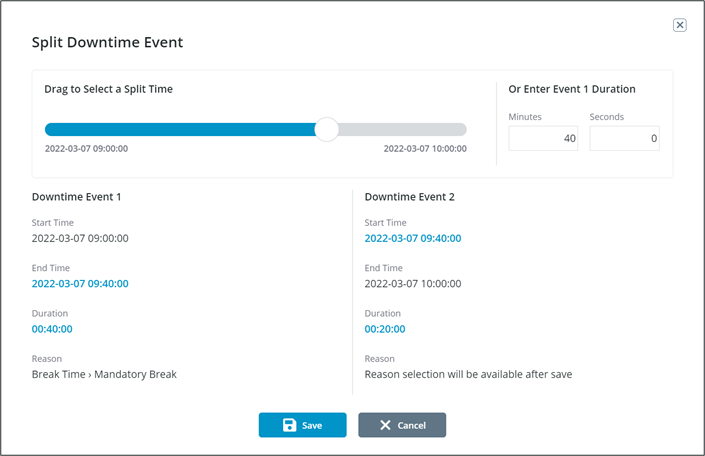
2. Drag the slider to specify the moment of split or enter in the duration of the first event.
Example: If the original duration was from 9:00 – 10:00 and the split should happen at 9:40, either move the slider to 9:40 or enter 40 under Minutes and 0 under Seconds. This will result in two events, one of 40 minutes, and one of 20 minutes. |
3. Click Save. The Edit Downtime Window will open to the Reasons tab. This window is for the second downtime event.
Existing reasons and notes will remain with the first Split of the event only. |
4. Select the reason for the SECOND event and click over to the Notes tab to enter any notes.
5. Click Save and Close to return to the Downtime Events Display.
Event Notes
Notes for an existing downtime event can be viewed, edited, or deleted directly from the Downtime Events Display. New notes can be added as well. Existing downtime events with notes associated will have  in the Notes column of the display.
1. Select the downtime event from the Downtime Events Display and click Notes. The Edit Notes for Downtime window opens.
2. From this display existing notes can be viewed, edited, or deleted. Notes display in a descending, oldest first, order.
Notes can only be modified by the author. |
3. New notes can be added by typing in the Add Note text field and pressing Enter or clicking Add.
4. Click Save and Close to return to the Downtime Events Display.
Deleting
Line managers, process engineers, and administrators can delete downtime events.
1. Select the downtime event from the Downtime Events Display. Click Delete.
2. Click Confirm on the Delete Downtime Confirmation window. Click Cancel to close the window without deleting.
3. The list of Downtime Events will automatically update.

Exporting
An Export of all current Downtime Event results can be exported as a .xlsx file.
1. From the Downtime Events Display click Export.
2. A .xlsx file will automatically download.
3. Open the file to view all downtime event data, including notes.