Edit Work Order
Overview
Select a work order in the grid and click Edit to launch the Edit Work Order pop-up.
General Information

Priority – Enter a number in this field for the work order priority.
Planned Quantity – Shows the quantity planned for the work order for reference.
Status – Work orders can have the following statuses:
• Not Scheduled – Default status of an imported work order.
• Scheduled – The work order is released for execution.
• On-Hold – Work order is placed on hold due to production line issues.
• In Progress – Work order is actively being executed by an operator.
• Complete – The work order has been completed; all serial numbers have been produced.
• Canceled – A work order that has never been started can be canceled. Usually, this is in case of a mistake in the work order.
To set the status to Scheduled, a work order must have a route assigned to it and have a set of serial numbers equal to the planned quantity.
Work Orders can be toggled between Scheduled and Not Scheduled as well as put on hold or cancelled. In Progress and Complete are determined automatically based on production. |
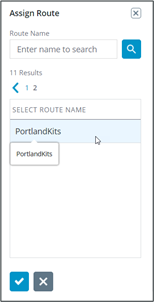
Assigned Route – Use the Assign Route overlay to assign a single route for the work order. Select the route and click  to assign. If the work order has a product assigned, you will only see routes assigned to that product. Additionally, if the work order has a bill of materials assigned, the routes list will be further limited to routes without parts validation or parts validation steps that match the bill of materials.
Routes that are not released can still be assigned to a work order. However, the work order cannot be set to Scheduled status until the route is released.
The note will appear to the operator upon executing the work order. This note can be set to expire using the Note Expiry date time picker. The note will no longer appear past its expiration date. If the expiry field is empty, the note will always appear. |
Serial Numbers
Serial numbers can be added manually, imported from an external system or by uploading a .csv file.
Adding Serial Numbers Manually:
1. Type a serial number into the Add New Serial Number field and click  .
.
2. Click  to edit an added serial number or click
  to delete it.

Importing Serial Numbers From .csv File:
1. Click Import from CSV to open the Import Serial Numbers from CSV pop-up.
2. Click Download Template for an example file. Replace example serial numbers as needed.
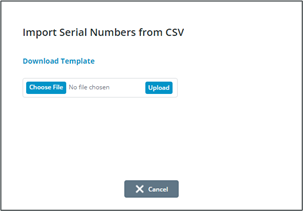

3. Click Choose File and locate your serial number CSV file.
4. Click Upload to complete the import. Any validation messages will appear below the file uploader.
5. Click Close.
The serial numbers will be populated in the display and can be manually edited or deleted.
Importing Serial Numbers From an External System:
1. Click Import from External System to open the Import Serial Numbers from External System pop-up.
Planned Quantity – Shows the expected quantity of serial numbers for the given work order.
Requested Quantity – Shows the quantity that will be requested from the external
2. Click Import to begin the import from the external system. Transaction result messages will appear below the import button.
3. Click Close.
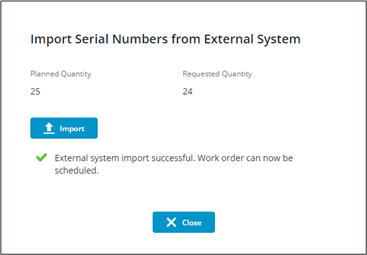
The serial numbers will be populated in the display and can be manually edited or deleted.
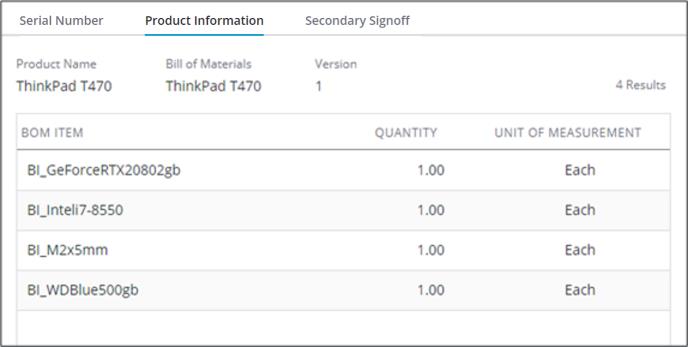
Product Information
This tab shows product and bill of materials information for the work order for reference. If there is no bill of materials assigned to the work order, the grid will be empty.
Secondary Signoff
This tab can utilized to designate a specific step for a specific work order as one that needs a secondary witness to sign off that the step was done accurately and fully.
1. Toggle Secondary signoff required for 1 to more work instruction steps.

2. Click Apply to Serial Numbers.
3. Select/Deselect to only have the serial numbers that should have the secondary witness applied checked.
4. Search through the Steps to locate the desired step for signoff.
5. Click the down arrow to the right of the step to designate the type of signoff required.
This list will be populated by user groups marked as Use as CWC execution secondary signoff group. |
6. Click Save.