Step Types
Adding a Smart Tool Step
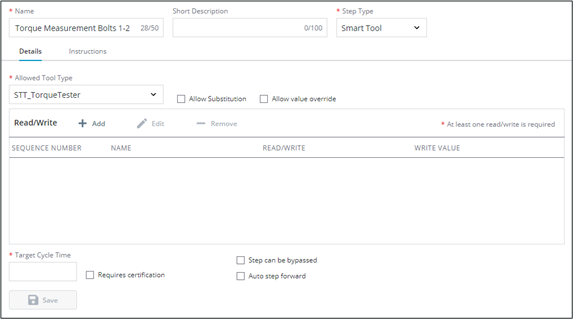
This step type allows the operator to read/write values on a smart tool and record the data in the system. Note that the smart tools and smart tool types that are needed for a step must be configured before the step can be created.
Complete the following information to set up a smart tool step on a work instruction:
1. Select an Allowed Tool Type from the dropdown. Note that smart tool types must already exist for them to appear in this dropdown. You can create them in the Smart Tool configuration display on the smart tool type tab.
2. (Optional) check Allow Substitution to allow the operator to change smart tools at execution.
3. (Optional) check Allow Value Override to allow the operator to manually override smart tool values at execution.
4. Add at least one read/write item to the sequence.
a. Click + Add to launch the Add Smart Tool Read/Write popup.
b. A read sequence item will read a value from the smart tool’s mapped IoT tag. To set up a read sequence item:
a. Select the Read radio button.
b. Enter a sequence number.
c. Enter a name for the sequence item.
d. Select the data format. Boolean, string, and numeric are supported.
c. A write sequence item will send the configured value to the smart tool’s mapped IoT tag. To set up a write sequence item:
a. Select the Write radio button.
b. Enter a sequence number.
c. Enter a name for the sequence item.
d. Select the data format. Boolean, string, and numeric are supported.
e. Add the value to write to the IoT tag. The value must be in the correct data format, with Boolean represented by 1 or 0.
d. Click Confirm.
5. To edit a read/write item, select it in the list and click Edit.
6. To remove a read/write item, select it in the list and click Remove.
7. See General Step Properties for information on additional step configuration and rich editor authoring.
8. Click Save.
A step’s sequence can contain up to 16 read/write items. Multiple items can be processed at the same time by assigning the same sequence number, but the mapped attributes must be unique per read or write action within the sequence number (i.e., a tool cannot read from or write to the same attribute twice within a sequence number). |
Selecting the smart tool and mapping the sequence items to attributes happens in the Route Manager display.
Authoring a smart tool step on a work instruction flagged for parallel execution is identical to one that is not flagged.
Adding a Manual Entry Step
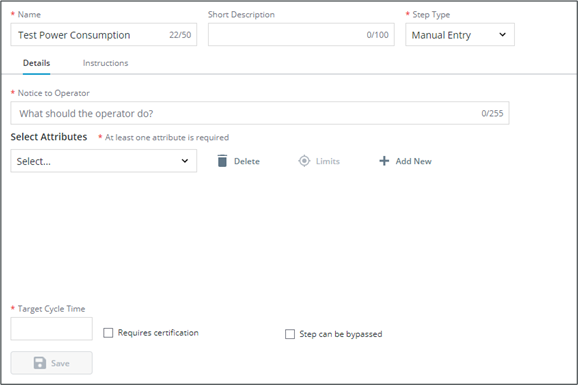
This step type allows an operator to manually enter one or more measured values and record the data on attributes.
Complete the following information to set up a manual entry step on a work instruction that is not flagged for parallel execution:
1. Enter a Notice to Operator to describe what will be measured.
2. Select up to 16 attributes from the dropdown. These attributes will be shown to the operator as fields for data entry. Your selection will be shown as tags below. Clicking the tag’s X will remove individual attributes from the list.
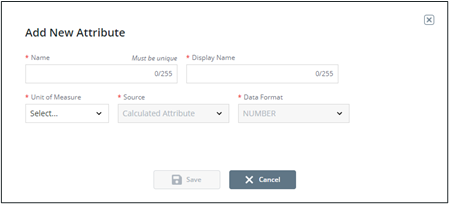
3. To add a new attribute to the work instruction, click + Add New to launch the Add New Attribute pop-up.
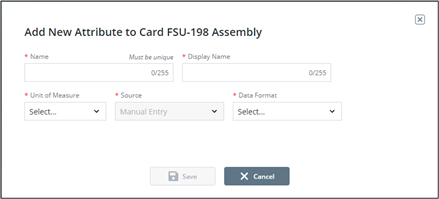
a. Add a unique name for your attribute.
b. Add a display name for your attribute.
c. Select a unit of measure from the dropdown.
d. Select the data format for your attribute. Boolean, string, and numeric are supported.
e. Click Save.
4. See General Step Properties for information on additional step configuration and rich editor authoring.
5. Click Save.
Once the manual entry step is saved, it can be added to the Instructions along with limits.
1. Select the appropriate location for the attribute within the Instruction panel.
2. Select the appropriate attribute to be added and click  . The Add Limit Placeholder To Instruction display will appear.
. The Add Limit Placeholder To Instruction display will appear.
3. Select the Limit to be added. A placeholder will appear in the instructions. Do not edit the brackets around the text.
To view the attribute within the limits display, sect and attribute and click Limits. This will open the Limits configuration display in a new tab. |
The system will use the highest priority limit available during execution.
Authoring a manual entry step on a work instruction flagged for parallel execution is very similar to one that is not flagged, with the following differences:
• You can toggle Measure each parallel position to configure attribute groups to collect data for each serial number. An attribute group is used as a container for individual attributes for each parallel execution position, which will be created automatically. This allows the operator to specify separate values for each field and serial number.
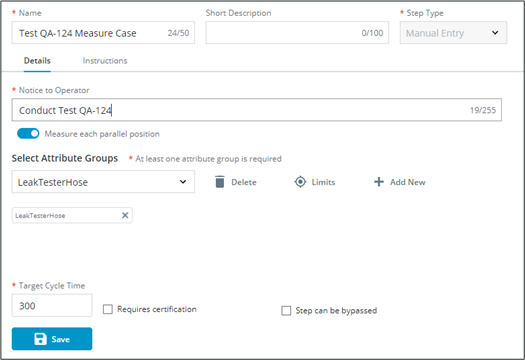
◦ In this mode, click Add New to launch the Add New Attribute Group pop-up.
◦ Limits can be configured for attribute groups by clicking Limits.
◦ Attribute groups can be deleted by clicking Delete.
• When Measure each parallel position is off, entered data will be saved on the configured attributes. The operator will enter data once for all serial numbers.
Adding a Verification Step
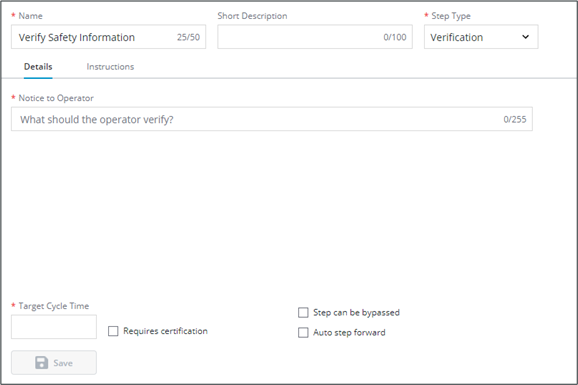
This step describes what task or value an operator must verify before proceeding. The operator is required to select a checkbox to confirm the verification has been performed.
Complete the following information to set up a verification step:
1. Enter a Notice to Operator to describe what will be verified.
2. See General Step Properties for information on additional step configuration and rich editor authoring.
3. Click Save.
Authoring a verification step on a work instruction flagged for parallel execution is identical to one that is not flagged.
Adding a List Step
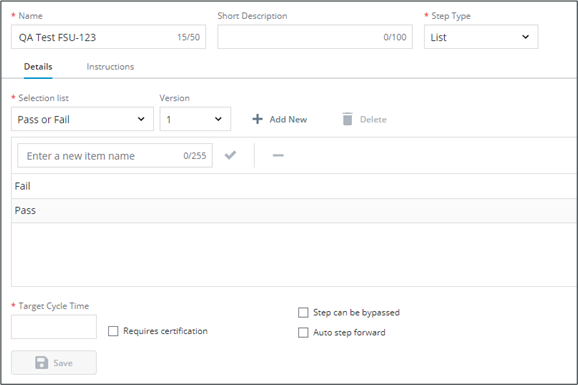
This step allows an operator to select a value from a list.
Complete the following information to set up a list step:
1. Select an existing list from the Selection List dropdown or click Add new to create a new list.
2. Add a list item by typing a new list item name into the text entry below. Click  or press ENTER.
3. Remove a list item by selecting it in the list below and clicking  .
.
4. See General Step Properties for information on additional step configuration and rich editor authoring.
5. Click Save.
In execution, the operator will see this list as a dropdown.
Any list created in any step will become available in the Selection List dropdown for all work instructions. Once the work instruction is approved, future modifications to the list on other steps or work instructions will create new list versions. The initial version is maintained on the original step.
Authoring a list step on a work instruction flagged for parallel execution is identical to one that is not flagged.
Adding a Calculation Step
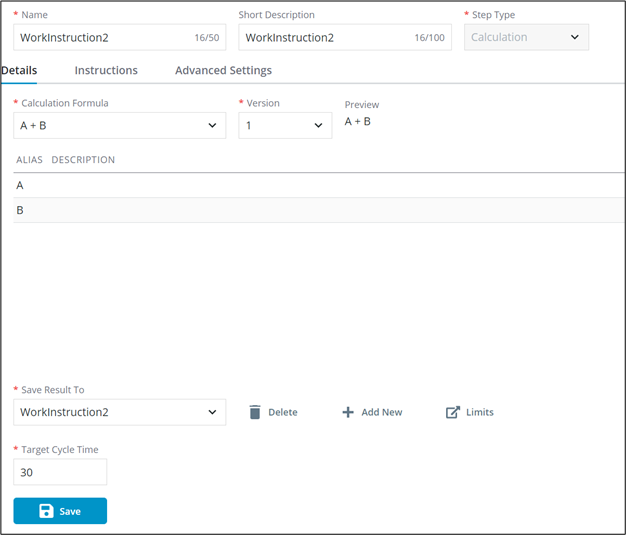
This step type uses data collected from the previous steps to calculate a value.
Calculation formulas are configured in the Calculation Configuration display. |
Complete the following information to set up a calculation step on work instructions not flagged for parallel execution:
1. Select a formula from the Calculation Formula dropdown.
2. Select a Version of the calculation formula. You will be able to preview the calculation formula. Formula inputs are previewed below in a grid.
3. Assign an attribute to save the calculated value in the Save Result To dropdown. Or click Add New to launch the Add New Attribute pop-up.
◦ Add a unique name for your attribute.
◦ Add a display name for your attribute.
◦ Select a unit of measure from the dropdown.
◦ Click Save.
A new calculation version will require a new attribute; attributes may not be used from past calculation versions. The previous attribute will be hidden, but not deleted and thus the name cannot be reused. |
4. See General Step Properties for information on additional step configuration and rich editor authoring.
5. Click Save.
Once the calculation step is saved, it can be added to the Instructions along with limits.
1. Select the appropriate location for the attribute within the Instruction panel.
2. Select the appropriate attribute to be added and click  . The Add Limit Placeholder To Instruction display will appear.
. The Add Limit Placeholder To Instruction display will appear.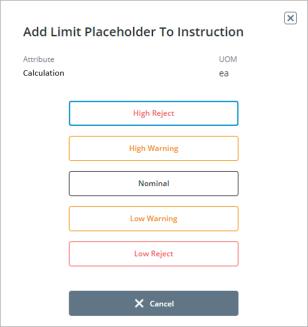
3. Select the Limit to be added. A placeholder will appear in the instructions. Do not edit the brackets around the text.
To view the attribute within the limits display, sect and attribute and click Limits. This will open the Limits configuration display in a new tab. |
The calculation step type is not available for instructions flagged for parallel execution. Instructions with a calculation step cannot be added to a route sequence on a work cell.
Adding an Instructional Step
This step type provides instructions that an operator must execute.
Complete the following information to set up an instructional step:
1. Enter a Notice to Operator to describe the instructions.
2. See General Step Properties for information on additional step configuration and rich editor authoring.
3. Click Save.
Authoring an instructional step on a work instruction flagged for parallel execution is identical to one that is not flagged.
Adding a Parts Validation Step
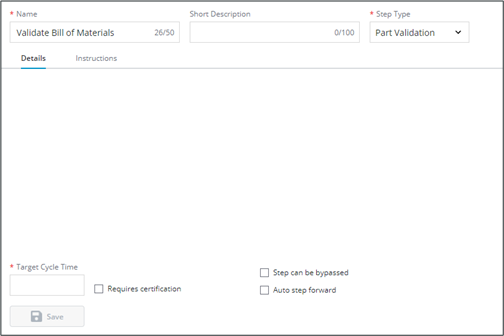
This step type allows the operator to verify parts used during assembly.
Bills of material must be imported into the database ahead of time, as described in the Configuration Guide. |
Complete the following information to set up a parts validation step:
1. See General Step Properties for information on additional step configuration and rich editor authoring.
2. Click Save.
Parts validation step types are not available for instructions flagged for parallel execution.
Setup for parts validation against a bill of materials happens in the Route Manager display. |