Add New Work Instruction
General
Click + in the action toolbar to create a new work instruction. The Add New Work Instruction display will load.
The navigation band across the top of the display indicates your current step in the process.
At any time, clicking All Work Instructions in the breadcrumb trail or clicking Cancel will return to the work instruction list. All unsaved information will be lost.
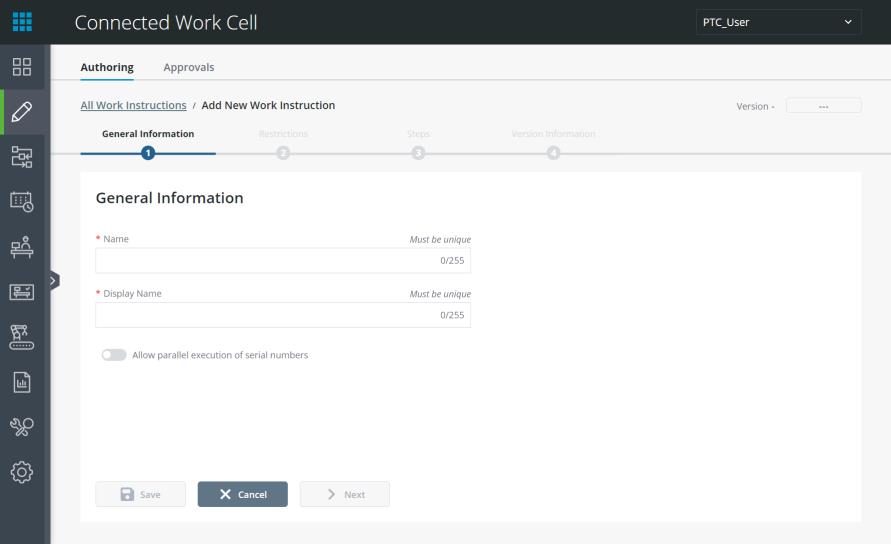
Step One: General Information
1. Enter a unique name for the work instruction.
2. Enter a unique display name for the work instruction.
3. If the work instruction will be designed to work on parallel execution stations, toggle Allow parallel execution of serial numbers. Parallel execution allows the operator to run multiple serial numbers simultaneously.
When a work instruction is flagged for parallel execution, parts validation and calculation step types will not be available. |
4. Click Save to save the instruction and stay on Step One or click Next to save the instruction and move to Step Two.
Once saved, Step Two: Restrictions, Step Three: Steps and Step Four: Version Information can be navigated to and configured. |
Step Two: Restrictions
Restrictions are an optional configuration to limit which stations and work cells may run a work instruction, as well as assign products and product types the work instruction will assemble. When no restrictions are set, the work instruction will be available to run on any station and/or to assemble any product.
Adding a Station or Work Cell Restriction:
1. Click Station Assignment to open the advanced equipment selection pop-up.
2. Search for and select one or more stations or work cells by adding them to the selection list on the right side of the advanced equipment selection pop-up.
3. Click Confirm.
4. If no products need to be set, click Save to save the instruction and stay on Step Two or click Next to save the instruction and move to Step Three. Otherwise, continue on.
Selections will be shown as tags in the Restricted to Station/Work Cell section. Clicking the X next to the tag name will remove individual stations or work cells from the restriction list.
To modify the selection, click Station Assignment again.
Adding a Product Restriction:
1. Click Product Assignment to open the advanced product selection pop-up.
2. Search for and select one or more products by adding them to the selection list on the right side of the products section.
3. Click Confirm.
4. Click Save to save the instruction and stay on Step Two or click Next to save the instruction and move to Step Three.
Selections will be shown as tags in the Assigned to Products section. Clicking the X next to the tag name will remove individual products from the restriction list.
To modify the selection, click Product Assignment again.
Step Three: Adding a Step
This step is where the actual work instructions are defined. Work instructions consist of one or more steps that the operator will follow in sequence to assemble a product.
The Steps authoring display features a left pane listing the work instruction’s steps in sequence order along with an action toolbar. The right pane allows the creation or modification of steps within the instructions.
Adding a Step
1. Click + in the left pane action toolbar to load a new step configuration on the right pane.
2. Enter a name for the step. Names must be unique within a work instruction.
3. (Optional) Enter a short description for the step.
4. Select a step type from the dropdown. This will load the step type’s unique configuration in the Details tab below.
The following Step types are available:
Step Type | Description | Available for Parallel Execution | Additional Configuration in Routing |
Maps and records values from a smart tool | YES | YES | |
Operator enters values manually | YES | NO | |
Operator verifies a condition | YES | NO | |
Operator picks a value from a prepopulated list | YES | NO | |
Automatically calculates and validates a result based on values from prior smart tool, manual entry, or calculation steps | NO | YES | |
Provides the operator with instructions to follow | YES | NO | |
Operator validates part numbers against a bill of materials | NO | YES |
Details
• On the Details tab, each step type has specific required fields marked with an asterisk (*). All fields will display once a Step Type has been selected.
• The Target Cycle Time field must be a number greater than zero (0). This indicates how long the execution is estimated to take in seconds.
Instructions
• The Instructions tab allows for rich content that supports text formatting, links, and image embedding to provide operator instructions.

◦ Attributes – Attributes can be added to the work instruction by clicking + Add Attribute. Once added, they will populate in the list below and can added to the work instruction in the appropriate place using  . For more information on Attribute and limit placeholders, see the Adding Attributes to Work Instructions section below.
Attributes are not available for parallel instructions |
◦ Limits – Clicking Limits will open the Characteristics Configuration screen in a new tab.
◦ Instructions – Under instructions, a .docx file can be uploaded. Text can be edited within the rich text editor as needed after upload.

• Click Preview at the bottom of the display to preview the step at execution in a new window.
• Select the product by clicking the Product selection box to the top left to the new window. The Select Product window display.

• Search for and select the appropriate product and click Confirm. The work instruction is displayed as an operator would see it.
Advanced Settings
There are five options located within the Advanced Settings Tab.
• Steps can be bypassed
◦ Step can be bypassed is used to allow an operator to skip this specific step.
Step bypass is not available on instructional type steps. |
• Requires Certification
◦ Requires certification can be enabled and the user can click Select to open the Select Certificate display. From the display a certificate can be chosen and a user utilizing the work instruction must have that certificate to complete the instructions.
Certificates are created and associated within the Certificate Management display. See the Core UI User Guide for more information. Certification is not available on instructional type steps. |
• Execution on Condition
◦ Execution on Condition can be enabled to designate a step as only necessary when either a work order change or a product change occurs.
▪ Product Change or Work Order Change can be selected via the dropdown once box is checked.
It is not possible to have a work instruction in which all steps are conditional |
• Auto Step Forward
◦ Auto step forward is used to allow the execution to progress automatically to the next step if the step’s completion condition has been fulfilled:
▪ Values recorded in the step are compared to predefined limits for the attribute’s control characteristic. If the recorded value is within the defined limits, the step will be completed and will move forward.
▪ Verification and list step types will auto step forward upon the operator providing input.
Auto step forward is not available on instructional or manual entry type steps. |
• Message on Reject
◦ For calculation steps only, Message on reject can be used to type a message that will be shown to the operator when the calculated value is not within limits.
Adding Attributes to Work Instructions
1. Click Add Attribute above the left pane.
2. Enter the appropriate information for the attribute and click Save.
3. The attributes will display in the attribute pane.
4. Place your cursor in the editor pane at the desired location for the limit.
5. Select the appropriate attribute.
6. Click to launch the Add Limit Placeholder to Document popup.

7. Select the appropriate limit button to use that limit.
8. The editor will update with a unique text placeholder for the limit.
◦ Format: {{{UIDOfControlCharacteristic_AbbreviationOfLimit}}}
This placeholder text should be kept intact while editing. Otherwise, the placeholder will not be dynamically replaced in execution. This includes formatting the text via the toolbar, any text formatting must be done to the entire placeholder including the curly braces. |

9. Repeat steps 5-9 for all applicable limit placeholders within the document.
10. Click Save.
Step Four: Version Information
The Version Information tab contains all data in relation to version of the work instruction. When adding a new work instruction, the version will be 1 and the Approved at and Approved by fields will be marked with -. The Version Comments field is for any relevant comments about this version. These will be displayed to anyone who views version history in the future.

Within View Mode, Version Information can be viewed from the Version Information tab. This tab will also include all comments associated with the current version.
