RTPPM Upgrade Installer
Pre Upgrade Activities
|
|
It is recommended to take a snapshot of the server before beginning the upgrade process as a best practice.
|
|
|
It is advised that timer (PTC.SCA.SCO.MnfgCommonModelsTimer )Thing and scheduler (PTC.SCA.SCO.MnfgCommonAttributeReadScheduler) Thing are not modified. This may result in incorrect production count.
|
If required to disable timer and scheduler, note down the GMT time (<TurnOFF>) at the time of disabling them in YYYY-MM--DD HH:MM:SS format.
Follow the steps mentioned in the Enabling Timer/Scheduler to enable the timer and scheduler.
Upgrade Installation
1. Before beginning, ensure that the timeout setting has been updated within Apache Tomcat. If it has not, click here for instructions.
2. You need to disable the KPI Engine timer. Navigate to the General Information tab in the PTC.SCA.SCO.KPIEngineTimerThing thing in the Composer and clear the Automatically Enable Timer on Startup checkbox.
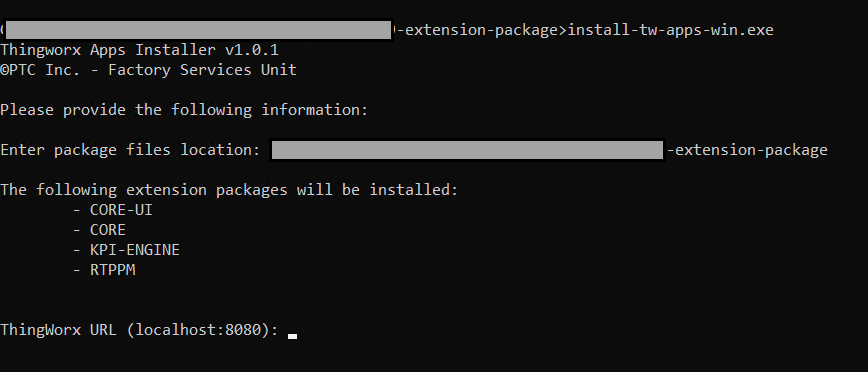
3. Unzip the installation package.
4. Identify the folder containing the installer files: install-tw-apps-win.exe and install-tw-apps-linux.
5. Launch the installer file for your operating system to run the installer.
6. A question will display asking for the package files location (The location is the same as the folder identified in step 4). Enter the file location and press Enter.
7. A message will appear displaying the extensions found in the file location. Confirm the files found match what should be installed. Ensure that at least the CORE, CORE-UI, KPI-ENGINE, and RTPPM extension packages are present.
8. Enter the required data for the questions that appear in the UI. Refer to the table below to see the questions, default values, and any extra information you may require to answer the questions.
If you have entered your own names during the original installation, rather than accepting the default names, be sure to enter those same names during the upgrade process. |
Installation Questions | Default Value | Notes |
|---|---|---|
ThingWorx url: | Localhost: <port> | The URL of your ThingWorx instance. Note that the port number MUST be included. |
Does ThingWorx use TLS: | N | Does the browser instance of ThingWorx use HTTPS? Y or N. |
ThingWorx admin user name: | Administrator | A user that is in the Administrator user group. |
ThingWorx password: | N/A | No text will display while entering password. |
MSSQL Database server name: | localhost | Hostname of the server where the database is installed. |
MSSQL Database port: | <port> | Communication port to on the server where the database is installed. |
MSSQL Database name: | <databasename> | The database chosen must: • Already exist in the SQL Server. • Have no data populated. • Not be used by Manufacturing Apps, DPM, or any other ThingWorx extension. |
MSSQL Database username: | N/A | The username used to login to the MSSQL database |
MSSQL Database password: | N/A | No text will display while entering password. |
Core Database Thing name: | PTCFSU.CoreSQLThing | Thing containing logic to interact with the database. |
Core Database ThingTemplate name: | PTCFSU.CoreSQLThingTemplate | Thing Template containing logic to interact with the database. |
Core Database Project name: | PTCFSU.DefaultProject | Project to which the Thing and Thing Template belong. |
KPI Engine Database ThingTemplateName: | PTCFSU.KPIEngineSQLThing | Thing Template containing logic to interact with the database. |
KPI Engine Database ThingName | PTCFSU.KPIEngineSQLThingTemplate | Thing containing logic to interact with the database. |
KPI Engine Project name: | PTCFSU.DefaultProject | Project to which the Thing and Thing Template belong. |
9. Once completed, a confirmation message will display Your configuration is: ... followed by the configuration discovered by the program, including which extensions will be updated and which will be unchanged. For the extensions that are being updated, the current version (version currently installed) and the new version (version to which you are upgrading) are listed.
Enter Y if correct and to begin the installation or N if incorrect and to repeat the questions.
If no value is entered for the confirmation and ENTER is pressed, the questions will repeat by default. |
10. The program will begin running. Depending on the version that you have upgraded from, the installer will ask to restart ThingWorx Platform one or more times.. Confirm the restart when prompted.
11. When the program runs successfully the message ThingWorx Applications installation completed will display.
If any errors occur they will display in red or yellow. Check the ThingWorx Application and Script logs for more details and refer to Installation Troubleshooting for more information on errors.
12. To enable the KPI Engine timer if not already enabled, complete the following steps:
a. In the ThingWorx Composer navigate to PTC.SCA.SCO.KPIEngineTimerThing.
b. In the General Information tab, select the Automatically Enable Timer on Startup checkbox.
c. Click Save.
d. In the Properties and Alerts tab, check that the Enabled property is selected.
e. In the Subscriptions tab, navigate to the RefreshCache subscription. Ensure Enabled checkbox is selected.
Enabling Timer and Scheduler
Following steps to be performed for enabling Timer and Scheduler.
1. Enable the PTC.SCA.SCO.MnfgCommonModelsTimerThing timer. Note down the GMT time at the point of enabling the timer. Note this as the <Turn ON time> to be used in step 2.
2. Monitor the ValueStream Table in ThingWorx database by using following query. Proceed to next step only after all records are processed and the query returns 0 record.
select * from thingworx.value_stream WHERE property_name = 'ProductionByTagAndTime_ProductionEventTag' and time BETWEEN '<Turn OFF time>' AND '<Turn ON Time>'.
3. Once all records are processed, enable PTC.SCA.SCO.MnfgCommonAttributeReadSchedulerThing scheduler.
4. Wait for two minutes before proceeding to step 5.
5. Execute the following query to verify correct production count values.
select * from productionevent order by starttime desc