Migration Upgrade of ThingWorx Utilities
|
|
Migration Upgrade of ThingWorx Utilities is not supported from version 9.4.x and later.
|
To determine your upgrade path, refer to the upgrade table.
To upgrade to a new version of ThingWorx Utilities, perform the following steps:
1. Export ThingWorx Utilities data.
|
|
Before exporting the data, it is recommended that you do the following:
• Purge all old and unwanted deployment records. This reduces the amount of data and the time taken to transfer the data to the new version.
• Ensure there are no active deployments before starting the upgrade to the new version. This reduces the possibility of time-outs or deployment failures during the upgrade.
|
1. Log onto ThingWorx Composer.
2. On the left navigation pane, click  , and select Export.
, and select Export.3. In the Export Option list, select To ThingWorx Storage.
4. Select the Include Data check box, and then click Export.
5. Once the export completes successfully, a directory is created in /ThingworxStorage/exports. Create a ZIP file of the exports directory.
2. Ensure that the ThingWorx <n.n.n> platform is installed.
3. Import the ThingWorx Utilities Core <n.n.n> extension and the ThingWorx Software Content Management <n.n.n> extension. For more information, see Importing the ThingWorx Utilities Extensions.
|
|
While importing the ThingWorx Utilities Core extension for ThingWorx Utilities 9.0.0, you might see this warning:
Import requires platform restart. One or more warnings occurred.
You can continue with the upgrade.
|
4. Import ThingWorx Utilities data:
1. Navigate to the ZIP file that you created in step 1, and extract the contents of the file to the newly installed ThingWorx Utilities <n.n.n> /ThingworxStorage/exports directory.
2. Log into ThingWorx Composer.
3. In the left navigation pane, click , and select Import.
, and select Import.4. Import the extracted files from the ThingWorx Utilities <n.n.n> /ThingworxStorage/exports directory.
5. For a non-HA environment, after the imports have completed successfully, restart the ThingWorx server.
If you upgraded ThingWorx Utilities on a High Available Clustered ThingWorx platform, you must restart all nodes. For more informations, see Managing ThingWorx Extensions in ThingWorx HA in the ThingWorx Platform Help Center.
This enables ThingWorx Software Content Management to work properly.
6. If you upgrade ThingWorx Utilities 9.2.x and later for PostgreSQL, or from ThingWorx Utilities 9.4.x and later for MSSQL and from AzureSQL 9.5.x, and you want to migrate data from TW.RSM.SFW.SoftwareManager.Campaign or the DeliveryTarget to isolated database tables, perform the following steps:
a. Click TW.SCM.SFW.SCMUtilities resource in ThingWorx Composer.
b. Search for MigrateDataToIsolatedDB service. You can make use of Migration category.
c. Click Execute.
7. This service runs asynchronously in the background. Check the information level log for completion.
8. To avoid duplication of existing migrated entries on a successful run, a consecutive service execution will be aborted if forceMigration is not set to true. By default, forceMigration is false.
9. After a successful run, verify that the data is visible on SCM Track Deployments page and purge the old data from TW.RSM.SFW.SoftwareManager.Campaign/DeliveryTarget.
|
|
It is recommended to perform the In-Place upgrade of ThingWorx Utilities from 9.2.x and later for PostgreSQL and from 9.4.x and later for MSSQL as the data in the ThingWorx Software Content Management database does not migrate after a migration upgrade.
|
Adding Indexes Manually
|
|
The steps to add an index manually are applicable for ThingWorx Utilities 9.3.16 and 9.3.19.
|
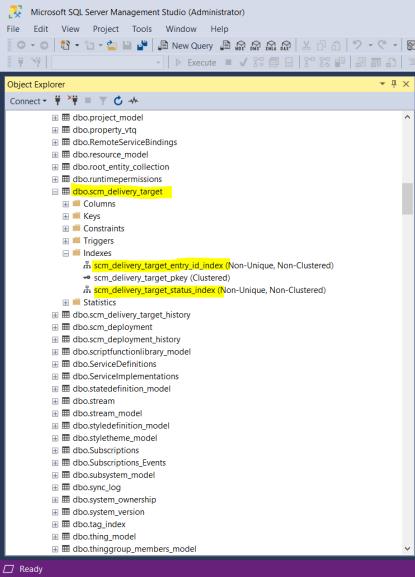
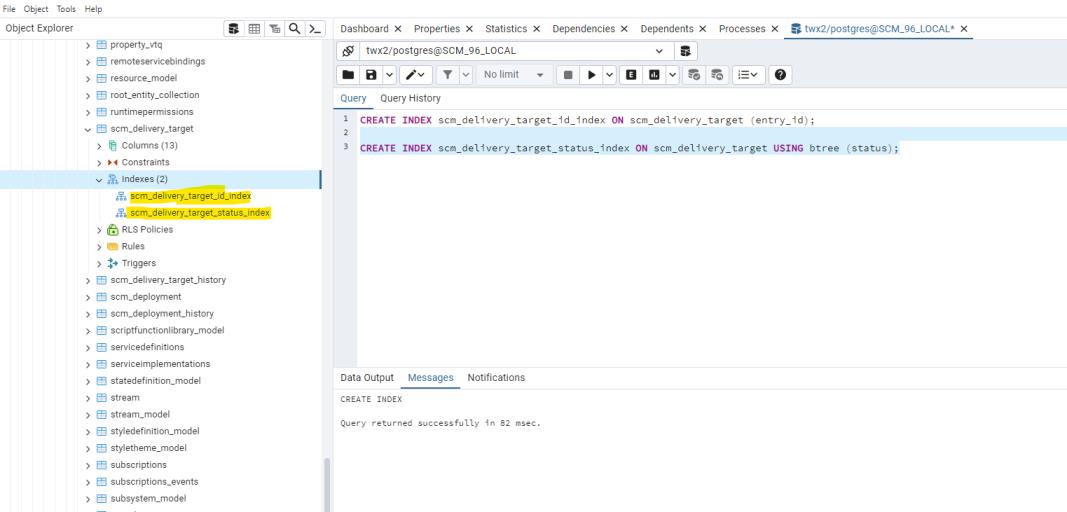
To create an index in PostgreSQL, perform the following steps:
1. Run the following script:
CREATE INDEX scm_delivery_target_id_index ON scm_delivery_target (entry_id);
CREATE INDEX scm_delivery_target_status_index ON scm_delivery_target USING btree (status);
2. On successful execution of the script, the indexes will be generated as follows:
In case if the database is MSSQL, perform the following steps:
1. Run the following script
CREATE NONCLUSTERED INDEX [scm_delivery_target_id_index] ON [scm_delivery_target]
(
 [entry_id] ASC
) WITH (PAD_INDEX = OFF, STATISTICS_NORECOMPUTE = OFF, SORT_IN_TEMPDB = OFF, DROP_EXISTING = OFF, ONLINE = OFF, ALLOW_ROW_LOCKS = ON, ALLOW_PAGE_LOCKS = ON) ON [PRIMARY]

CREATE NONCLUSTERED INDEX [scm_delivery_target_status_index] ON [scm_delivery_target]
(
 [status] ASC
) WITH (PAD_INDEX = OFF, STATISTICS_NORECOMPUTE = OFF, SORT_IN_TEMPDB = OFF, DROP_EXISTING = OFF, ONLINE = OFF, ALLOW_ROW_LOCKS = ON, ALLOW_PAGE_LOCKS = ON) ON [PRIMARY]
2. On successful execution of the script, the indexes will be generated as follows: