Create a Deployment
Complete the following steps to deploy a published package:
1. Verify that the package you want to deploy is displayed in the Package Information field. This field displays the most recently created package or the last selected package. If you need to deploy a different package, click  and select the appropriate package from Find Packages For Deployment.
 and select the appropriate package from Find Packages For Deployment.
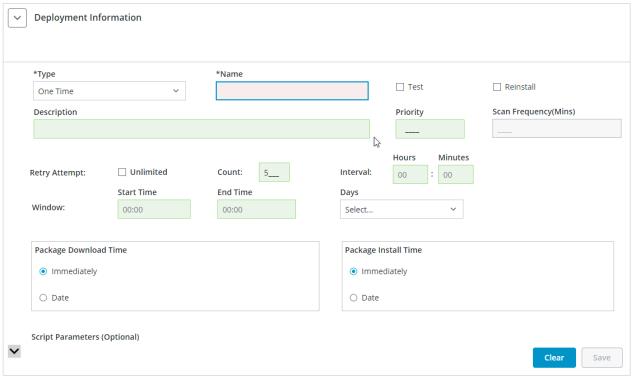
2. Navigate to Deployment Information and select the type of deployment. By default, the deployment type isOne Time. Enter a name for the deployment in the Deployment Name field.
3. Once you have filled in the mandatory criteria in the Deployment Information and Asset Information fields, click  .
.
 .
.The deployment activates only if the mandatory criteria have been fulfilled. |
One-Time Deployment
One-time deployment typically refers to deploying a package for a single instance or event. It also means the deployment is not intended to be regularly updated or modified after the installation.

Perform the following steps for One-Time deployment:
1. Select One Time deployment from the Type list in Deployment Information.
2. Enter a Name for the deployment.
3. If you select the Test checkbox, the package deployment will be marked as a test.
4. If you select the Reinstall checkbox, the package, which has already been deployed, will be reinstalled.
It is entirely optional to select the Test or Reinstall checkbox. If you have not checked any of them, the package will proceed further for actual deployment. |
5. Add a brief description in the Deployment Description field. This is an optional step.
6. Set a Priority for the deployment. This is an optional setting. If the Priority is not set, the deployment is based on the time it is created.
Priority can be set in the range of 1 to 1000, where 1 is the highest priority. The Scan Frequency (Mins) field is not applicable for One-Time deployment. |
7. Select the Unlimited check box. if you want unlimited retry attempts for a deployment. If you want the deployment to be auto-retried for a finite number of times, enter the count in the Count field. By default, it is set to 5. For information about configuring this option, see Configuration Parameters for Auto-Retry.
When you select the Unlimited check box, the Count field will be hidden. |
8. Interval: If you want deployment to be auto-retried after a specific time interval, you can enter the hours and minutes in the Hours and Minutes field of the interval. The interval is in 24-hour format.
9. Window: If you want a deployment to be auto-retried during a time window and only on specific days, then you can use this window option. You can specify the window using the start time, end time, and Days fields.
The start and end times are in 24-hour format according to the ThingWorx Platform time zone. |
10. Deployment Start Time for instruction-based packages. This is the time when the deployment starts. Select one of the following options:
◦ Immediately — Select to start the deployment immediately.
◦ Date — Select to specify the date and time the deployment must start.
11. The Package Download Time and Package Install Time fields get activated for file-based packages. Select one of the following options:
◦ Immediately — Select to start the deployment immediately.
◦ Date — Select to specify the date and time the deployment must start.
12. If you have selected a file-based package for deployment, you can set a Parameter Name and Parameter Value in the Script Parameters section. Click  to save the script parameter.
Click Save to save the Deployment Information.
This is an optional step. |
The Clear button resets all input fields to their original state.
Perpetual Deployment
Perpetual deployment allows the addition of a new asset belonging to a defined criteria without the requirement of creating a new deployment. The deployment will be carried out in asynchronous mode.

Perform the following steps for Perpetual deployment:
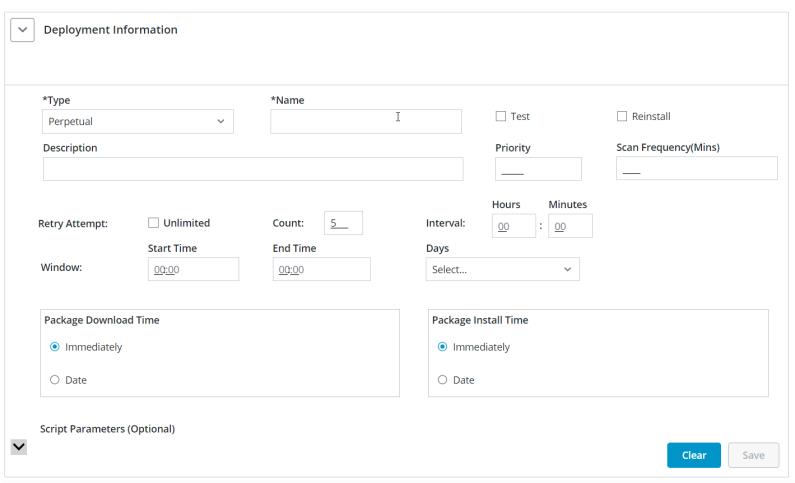
1. In the Deployment Information field select Perpetual deployment in the Type field.
2. Enter the Name of the deployment.
3. If you select the Reinstall checkbox, the package that has already been deployed will be reinstalled.
Test is not applicable for Perpetual Deployment. Selecting the Reinstall checkbox is entirely optional. If you have not selected the checkbox, the package will proceed further for actual deployment. |
4. Add a brief description in the Deployment Description field. This is an optional step.
5. Set a Priority and Scan Frequency (Mins) for the deployment.
Priority can be set in the range of 1 to 1000, where 1 is the highest priority. Scan frequency typically refers to the rate at which a scanning process is performed. The system will scan for assets matching the defined criteria based on the defined time duration. Any new assets found during the scanning will be added to the deployment list. The Scan Frequency values range from 1 min to 1440 min (24 hours). The scan frequency will add the package to the deployment list until the scheduled expiration of the package. |
6. Set a Priority and Scan Frequency for the deployment.
Priority can be set in the range of 1 to 1000, where 1 is the highest priority. Scan frequency typically refers to the rate at which a scanning process is performed. The system will scan for assets matching the defined criteria based on the defined time duration. Any new assets found during the scanning will be added to the deployment list. The Scan Frequency values range from 1 min to 1440 min (24 hours). The scan frequency will add the package to the deployment list until the scheduled expiration of the package. |
7. If you want unlimited retry attempts for a deployment, select the Unlimited check box. If you want the deployment to be auto-retried for a finite number of times, enter the count in the Count field. By default, it is set to 5. For information about configuring this option, see Configuration Parameters for Auto-Retry.
When you select the Unlimited check box, the Count field will be hidden. |
8. Interval: If you want deployment to be auto-retried after a specific time interval, you can enter the hours and minutes in the Hours and Minutes field of the interval. The interval is in 24-hour format.
9. Window: This window option allows you to auto-retry a deployment during a time window and only on specific days. You can specify the window using the start time, end time and Days fields.
The start and end times are in 24-hour format according to the ThingWorx Platform time zone |
10. Deployment Start Time for instruction-based packages. This is the time when the deployment starts. Select one of the following options:
◦ Immediately — Select to start the deployment immediately.
◦ Date — Select to specify the date and time the deployment must start.
11. The Package Download Time and Package Install Time fields get activated for file-based packages. Select one of the following options:
◦ Immediately — Select to start the deployment immediately.
◦ Date — Select to specify the date and time the deployment must start.
The Perpetual Deployment will be completed when the package expires, or the user cancels the deployment. |
12. If you have selected a file-based package for deployment, you can set a Parameter Name and Parameter Value in the Script Parameters section. Click  to save the script parameter.
This is an optional step. |
13. Click Save to save the Deployment Information.
The Clear button resets all input fields to their original state.