Install Java, Apache Tomcat, and ThingWorx
In the steps below, replace xx or xxx with the build number that you are using.
|
|
Copying and pasting the commands in this procedure can cause formatting issues. If necessary, copy and paste into a text editor to minimize formatting issues.
|
1. Refer to the ThingWorx System Requirements for version requirements.
2. Download and install the JavaRPM file.
◦ 9.0: Java
3. Run the Java installer:
|
|
For some JDK 8 builds (not supported in ThingWorx 9.2 and later), the file name will be similar to jdk1.8.0_xxx-amd64. The examples below use jdk-11.x.x, but replace with the version you are using if necessary.
|
sudo rpm -i jdk-11.x.x_linux-x64_bin.rpm
4. Create the folder and move the JDK:
$ sudo mkdir -p /usr/lib/jvm
$ sudo mv /usr/java/jdk-11.x.x/ /usr/lib/jvm/
$ sudo mv /usr/java/jdk-11.x.x/ /usr/lib/jvm/
5. Set the Java alternatives:
$ sudo alternatives --install /usr/bin/java java /usr/lib/jvm/jdk-11.x.x/bin/java 1
$ sudo alternatives --install /usr/bin/keytool keytool /usr/lib/jvm/jdk-11.x.x/bin/keytool 1
$ sudo alternatives --install /usr/bin/keytool keytool /usr/lib/jvm/jdk-11.x.x/bin/keytool 1
6. Change access permissions:
$ sudo chmod a+x /usr/bin/java
$ sudo chmod a+x /usr/bin/keytool
$ sudo chmod a+x /usr/bin/keytool
If you receive an error, use the following command:
$ sudo chmod -f a+x /usr/bin/keytool
7. Change Owner:
$ sudo chown -R root:root /usr/lib/jvm/jdk-11.x.x/
8. Configure master links:
$ sudo alternatives --config java
Select the option that contains /usr/lib/jvm/jdk-11.x.x/bin/java
$ sudo rm /usr/java/latest
$ sudo ln -s /usr/lib/jvm/jdk-11.x.x /usr/java/latest
$ sudo ln -s /usr/lib/jvm/jdk-11.x.x/bin/keytool /usr/bin/keytool
$ sudo ln -s /usr/lib/jvm/jdk-11.x.x /usr/java/latest
$ sudo ln -s /usr/lib/jvm/jdk-11.x.x/bin/keytool /usr/bin/keytool
If you receive a File Exists error, ignore and continue.
$ sudo alternatives --config keytool
9. Verify the Java version. Your version may not be the version in the example that follows:
$ java -version
java version "11.0.9" 2020-10-20 LTS
Java(TM) SE Runtime Environment 18.9 (build 11.0.9+7-LTS)
Java HotSpot(TM) 64-Bit Server VM 18.9 (build 11.0.9+7-LTS, mixed mode)
java version "11.0.9" 2020-10-20 LTS
Java(TM) SE Runtime Environment 18.9 (build 11.0.9+7-LTS)
Java HotSpot(TM) 64-Bit Server VM 18.9 (build 11.0.9+7-LTS, mixed mode)
10. Install Tomcat. Download the Tomcat installer. The steps in this process use Tomcat 9.0.xx, where xx is replaced with the version you are using.
$ wget https://archive.apache.org/dist/tomcat/tomcat-9/v9.0.xx/bin/apache-tomcat-9.0.xx.tar.gz
|
|
Best practice includes verifying the integrity of the Tomcat file by using the signatures or checksums for each release. Refer to Apache’s documentation for more information.
|
11. Extract the contents:
$ tar -xf apache-tomcat-9.0.xx.tar.gz
12. Move Tomcat to /usr/share/tomcat9.0:
$ sudo mkdir -p /usr/share/tomcat9.0
$ sudo mv apache-tomcat-9.0.xx /usr/share/tomcat9.0/9.0.xx
$ sudo mv apache-tomcat-9.0.xx /usr/share/tomcat9.0/9.0.xx
13. Define environment variables in the /etc/environment file (as root user):
export JAVA_HOME=/usr/lib/jvm/jdk-11.x.x_xxx
export CATALINA_HOME=/usr/share/tomcat9.0/9.0.xx
export CATALINA_HOME=/usr/share/tomcat9.0/9.0.xx
14. Execute the following (as root user):
source /etc/environment
15. Change folder to /usr/share/tomcat9.0/9.0.xx:
$ cd /usr/share/tomcat9.0/9.0.xx
16. Add user and group to the system:
$ sudo groupadd -r tomcat9.0
$ sudo useradd -r -d /usr/share/tomcat9.0 -g tomcat9.0 -s /bin/false tomcat9.0
$ sudo chown -R tomcat9.0:tomcat9.0 /usr/share/tomcat9.0
$ sudo useradd -r -d /usr/share/tomcat9.0 -g tomcat9.0 -s /bin/false tomcat9.0
$ sudo chown -R tomcat9.0:tomcat9.0 /usr/share/tomcat9.0
17. Change owner and access permissions of bin/, lib/, and webapps/:
$ sudo chown -Rh tomcat9.0:tomcat9.0 bin/ lib/ webapps/
$ sudo chmod 775 bin/ lib/ webapps/
$ sudo chmod 775 bin/ lib/ webapps/
18. Change owner and access permissions of usr/share/tomcat9.0/9.0.xx:
$ sudo chown -R tomcat9.0:tomcat9.0 /usr/share/tomcat9.0/9.0.xx
$ sudo chmod -R 775 /usr/share/tomcat9.0/9.0.xx
$ sudo chmod -R 775 /usr/share/tomcat9.0/9.0.xx
19. Change owner and access permissions of conf/:
$ sudo chown -Rh root:tomcat9.0 conf/
$ sudo chmod -R 640 conf
$ sudo chown -R tomcat9.0:tomcat9.0 /usr/share/tomcat9.0/9.0.xx
$ sudo chmod -R 777 /usr/share/tomcat9.0/9.0.xx
$ sudo chmod -R 640 conf
$ sudo chown -R tomcat9.0:tomcat9.0 /usr/share/tomcat9.0/9.0.xx
$ sudo chmod -R 777 /usr/share/tomcat9.0/9.0.xx
Permissions and ownership should be revisited for a production system to increase security on an operating system level.
20. Change access permissions of logs/, temp/, and work/:
$ sudo chown -R tomcat9.0:tomcat9.0 logs/ temp/ work/
$ sudo chmod 760 logs/ temp/ work/
$ sudo chmod 760 logs/ temp/ work/
21. Create self-signed certificate:
$ /usr/lib/jvm/jdk-11.x.x_xxx/jre/bin/keytool -genkey -alias tomcat9.0 -keyalg RSA
22. Follow the instructions to complete the certificate creation process:
◦ Set the keystore password.
◦ Follow the prompts to set up your security certificate.
◦ Set the tomcat9.0 user password to be the same as the keystore password.
$ sudo cp ~/.keystore /usr/share/tomcat9.0/9.0.xx/conf/
$ sudo chown root:tomcat9.0 /usr/share/tomcat9.0/9.0.xx/conf/.keystore
$ sudo chmod 640 /usr/share/tomcat9.0/9.0.xx/conf/.keystore
$ sudo chown root:tomcat9.0 /usr/share/tomcat9.0/9.0.xx/conf/.keystore
$ sudo chmod 640 /usr/share/tomcat9.0/9.0.xx/conf/.keystore
23. Uncomment the Manager element in context.xml to prevent sessions from persisting across restarts. Open /usr/share/tomcat9.0/9.0.xx/conf/context.xml in a text editor (as root) and remove the ‘<!—‘ before ‘<Manager pathname="" />’ and the ‘-->’ after.
24. Save the file.
25. Define an Apache Manager user in tomcat-users.xml. Open /usr/share/tomcat9.0/9.0.xx/conf/tomcat-users.xml in a text editor (as root). Just above the final line (</tomcat-users>) add the following line:
<user username="<Tomcat username> " password="<Tomcat password> " roles="manager,manager-gui"/>
26. Save the file.
|
|
The roles included are for ease of testing. They can be removed if security is a concern.
|
27. Set up Tomcat as a service to start on boot. First, build JSVC if it is not already installed on your system (as root):
$ sudo yum install gcc
$ cd /usr/share/tomcat9.0/9.0.xx/bin/
$ sudo tar xvfz commons-daemon-native.tar.gz
$ cd commons-daemon-*-native-src/unix
$ sudo ./configure --with-java=$JAVA_HOME
$ sudo yum install make
$ sudo make
$ sudo cp jsvc ../..
$ sudo chmod 777 /usr/share/tomcat9.0/9.x.xx/bin/jsvc
$ cd /usr/share/tomcat9.0/9.0.xx/bin/
$ sudo tar xvfz commons-daemon-native.tar.gz
$ cd commons-daemon-*-native-src/unix
$ sudo ./configure --with-java=$JAVA_HOME
$ sudo yum install make
$ sudo make
$ sudo cp jsvc ../..
$ sudo chmod 777 /usr/share/tomcat9.0/9.x.xx/bin/jsvc
28. Create the Tomcat service file:
$ sudo touch /usr/lib/systemd/system/tomcat.service
29. Open /usr/lib/systemd/system/tomcat.service in a text editor (as root) and paste in the following:
|
|
In the example below, set values for -Xms and -Xmx to 75% of the available OS memory (for example, 12GB for a 16GB RAM system). Refer to JVM Tuning for additional information.
|
[Unit]
Description=Apache Tomcat Web Application Container
After=network.target
[Service]
Type=forking
PIDFile=/var/run/tomcat.pid
Environment=CATALINA_PID=/var/run/tomcat.pid
Environment=JAVA_HOME=/usr/lib/jvm/jdk-11.x.x_xxx
Environment=CATALINA_HOME=/usr/share/tomcat9.0/9.0.xx
Environment=CATALINA_BASE=/usr/share/tomcat9.0/9.0.xx
Environment=CATALINA_OPTS=
ExecStart=/usr/share/tomcat9.0/9.0.xx/bin/jsvc \
-Dcatalina.home=${CATALINA_HOME} \
-Dcatalina.base=${CATALINA_BASE} \
-Djava.awt.headless=true -Djava.net.preferIPv4Stack=true -Dserver -XX:+UseNUMA \
-XX:+UseG1GC -Dfile.encoding=UTF-8 -Dlog4j2.formatMsgNoLookups=true\
-Xms<75% of available OS memory> \
-Xmx<75% of available OS memory> \
-Djava.library.path=${CATALINA_BASE}/webapps/Thingworx/WEB-INF/extensions \
-cp ${CATALINA_HOME}/bin/commons-daemon.jar:${CATALINA_HOME}/bin/bootstrap.jar:${CATALINA_HOME}/bin/tomcat-juli.jar \
-user tomcat9.0 \
-java-home ${JAVA_HOME} \
-pidfile /var/run/tomcat.pid \
-errfile ${CATALINA_HOME}/logs/catalina.out \
-outfile ${CATALINA_HOME}/logs/catalina.out \
$CATALINA_OPTS \
org.apache.catalina.startup.Bootstrap
[Install]
WantedBy=multi-user.target
30. If you are installing the ThingWorx Platform for the first time, the Java option -Duser.timezone=UTC should be added to the ExecStart block above, immediately following the line that begins with -Djava.library.path. The UTC timezone does not recognize daylight savings time. Setting this option prevents overwriting data when the daylight savings time changes occur.
31. Create a new file in the Tomcat usr/share/tomcat9.0/9.0.xx/bin file named setenv.sh and add the following content to the file:
CATALINA_OPTS="$CATALINA_OPTS -Djava.library.path=/usr/share/tomcat9.0/9.0.xx/webapps/Thingworx/WEB-INF/extensions"
32. Set Tomcat to run on system start up:
$ sudo systemctl daemon-reload
$ sudo systemctl enable tomcat.service
$ sudo systemctl enable tomcat.service
|
|
If you get any permission errors when running the commands above, execute the following (as root):
ausearch -c '(jsvc)' --raw | audit2allow -M my-jsvc
semodule -i my-jsvc.pp /sbin/restorecon -v /usr/share/tomcat9.0/9.x.xx/bin/jsvc |
This will allow the user to control the Tomcat service with the following commands:
sudo systemctl start tomcat
sudo systemctl stop tomcat
sudo systemctl restart tomcat
sudo systemctl status tomcat
sudo systemctl stop tomcat
sudo systemctl restart tomcat
sudo systemctl status tomcat
33. In the location of the Tomcat installation, open CATALINA_HOME/conf/web.xmlto replace the default error page (default is stacktrace). Place the following within the web-app tag (after the welcome-file-list tag ):
<error-page><exception-type>java.lang.Throwable</exception-type><location>/error.jsp</location></error-page>
A well-configured web application will override this default in CATALINA_HOME/webapps/APP_NAME/WEB-INF/web.xml so it will not cause problems.
34. In the location of the Tomcat installation, open CATALINA_HOME/conf/server.xml. Add the following inside the <Host> </Host> tags:
<Valve className="org.apache.catalina.valves.ErrorReportValve" showReport="false" showServerInfo="false" />
|
|
For security reasons, it is critical that you disable the AJP connector, if not already done so by default, by performing the following step.
|
35. In the location of the Tomcat installation, open conf/server.xml and search for the following line. If found, comment it out and save the file:
<Connector port ="8009" protocol="AJP/1.3" redirectPort="8443"/>
|
|
In Apache Tomcat 9.0 and later, the rejectIllegalHeader attribute defaults to true. Manually modifying the conf/web.xml file to set this attribute to false is not recommended or supported by PTC.
|
36. Remove all Tomcat example webapps (docs, examples, host-manager, manager, ROOT) located in /<path_to_tomcat>/webapps/. Removing these apps prevents unnecessary access to Tomcat, specifically in the context that can allow users to view other users' cookies.
37. PTC strongly recommends the use of TLS when running ThingWorx. For detailed instructions on setting up TLS, refer to this technical support article.
38. If your application requires a specific cipher suite, refer to the following documentation for configuration information:
Configuring Ulimit Settings
Running the Tomcat application server processes as the "root" user compromises the overall system security and violates industry best practices. To avoid this, PTC recommends that you modify the /etc/security/limits.d/80-nofiles.conf file to include the settings specific to the user who will run application servers.
Configuration File Example
The following configuration is an example of the default Redhat OS configuration located at /etc/security/limits.d/80-nofiles.conf with the needed changes. In the following example, thingworx is the name of the user for the app server.
thingworx soft nofile 30720
thingworx hard nofile 30720
To commit this change, log out and then log into your system.
Installing ThingWorx
1. Create /ThingworxStorage , /ThingworxBackupStorage, and /ThingworxPlatform directories.
$ sudo mkdir /ThingworxStorage /ThingworxBackupStorage /ThingworxPlatform
2. Change owner and access permissions of /ThingworxPlatform, /ThingworxStorage and /ThingworxBackupStorage. Without these permissions, the server will fail to start.
$ sudo chown tomcat9.0:tomcat9.0 /ThingworxStorage /ThingworxBackupStorage /ThingworxPlatform
$ sudo chmod 775 /ThingworxStorage /ThingworxBackupStorage /ThingworxPlatform
$ sudo chmod 777 /tmp
$ sudo chmod 775 /ThingworxStorage /ThingworxBackupStorage /ThingworxPlatform
$ sudo chmod 777 /tmp
3. Obtain the appropriate Thingworx.war file for the database you are using. The latest ThingWorx downloads are posted at support.ptc.com under Download Software > Order or Download Software Updates > ThingWorx Foundation > Release X.X > ThingWorx PostgreSQL, ThingWorx Mssql, ThingWorx H2, or ThingWorx AzureSql > Most Recent Version > ThingWorx-Platform-<database type>-<version>.
4. Move the Thingworx.war to $CATALINA_HOME/webapps.
$ sudo mv Thingworx.war $CATALINA_HOME/webapps
$ sudo chown tomcat9.0:tomcat9.0 $CATALINA_HOME/webapps/Thingworx.war
$ sudo chmod 775 $CATALINA_HOME/webapps/Thingworx.war
$ sudo chown tomcat9.0:tomcat9.0 $CATALINA_HOME/webapps/Thingworx.war
$ sudo chmod 775 $CATALINA_HOME/webapps/Thingworx.war
5. Place the platform-settings.json in the ThingworxPlatform folder.
|
|
If you are using H2, you must create the platform-settings.json file, as it is not included in the download.
|
6. If you are using H2 as a database, perform this step. If you are not using H2 as a database, go to the next step. Add a username and password for H2 in the platform-settings.json file. See platform-settings.json Configuration Details for more information.
|
|
ThingWorx connections to the H2 database require a username and password defined by the user, or the server will not start. This design fully mitigates any potential vulnerability represented by CVE-2018-10054.
|
},
"PersistenceProviderPackageConfigs":{
"H2PersistenceProviderPackage":{
"ConnectionInformation":
{
"password": "<addsecurepassword>",
"username": "twadmin"
}
},
"PersistenceProviderPackageConfigs":{
"H2PersistenceProviderPackage":{
"ConnectionInformation":
{
"password": "<addsecurepassword>",
"username": "twadmin"
}
},
7. Configure the Administrator password.
Add the following AdministratorUserSettings section (in PlatformSettingsConfig) to your platform-settings.json file with a password that is at least 14 characters long. Refer to platform-settings.json Configuration Details for more information on placement. Refer to Passwords for additional information on setting passwords.
|
|
Do not copy and paste the sample below, as it may cause bad formatting in your platform-settings.json. Instead, click here and copy from the file.
|
{
"PlatformSettingsConfig": {
"AdministratorUserSettings": {
"InitialPassword": "changeme"
}
}
}
|
|
If Tomcat fails to start and reports the error message: Check the InitialPassword setting in the AdministratorUserPassword section in platform-settings.json..., check the following:
• The password setting exists in platform-settings.json.
• The password is valid (14 or more characters by default).
• The platform-settings.json file is formatted correctly. Bad formatting could lead to errors.
|
8. If you are installing ThingWorx 5.0.1 and newer, configure Content Security Policy (CSP).
a. Add "EnableContentSecurityPolicyFilter": false, to platform-settings.json under BasicSettings as follows.
{
"PlatformSettingsConfig": {
"BasicSettings": {
"BackupStorage": "/ThingworxBackupStorage",
"DatabaseLogRetentionPolicy": 7,
"DatabaseWriteRetryAttempts": 10,
"EnableBackup": true,
"EnableClusteredMode": false,
"EnableContentSecurityPolicyFilter": false,
"EnableSystemLogging": false,
"EnableSSO": false,
"FileRepositoryRoot": "/ThingworxStorage",
"FileTransferLockType" : "LOCAL"
"HTTPRequestHeaderMaxLength": 2000,
"HTTPRequestParameterMaxLength": 2000,
"InternalAesCryptographicKeyLength": 128,
"MetricsLoggingFrequency": 30,
"MetricsLoggingLevel": "WARN",
"MetricsReportingEnabled": true,
"NonceKeyTimeout": 15,
"SessionUpdateDelay": 60,
"Storage": "/ThingworxStorage",
"ScriptTimeout": 30,
"MaxSearchItems": 100000
},
|
|
CSP will be disabled in the new installation if the above flag is not added or is specifically set to false. Setting the flag to true will enable CSP. For more information about CSP, see Content Security Policy.
|
9. If you are using Azure PostgreSQL Flexible Server, open the platform-settings.json file and add the following Azure PostgreSQL Flexible Server persistence provider parameters:
"PostgresPersistenceProviderPackage": {
"ConnectionInformation": {
"jdbcUrl": "jdbc:postgresql://<server name>:<port>/<database name>",
"password": "<password>",
"username": "<username>",
"sslMode": "require",
"sslRootCert": "<certificate path>"
}
}
"ConnectionInformation": {
"jdbcUrl": "jdbc:postgresql://<server name>:<port>/<database name>",
"password": "<password>",
"username": "<username>",
"sslMode": "require",
"sslRootCert": "<certificate path>"
}
}
For more information about different SSL modes, see PostgreSQL Documentation.
|
|
sslRootCert is required for verify-ca and verify-full SSL modes. For more information about secure communication with Azure PostgreSQL Flex Server and to download the certificate, see Encrypted connectivity using TLS/SSL in Azure Database for PostgreSQL — Flexible Server.
|
10. Enable extension import. By default, extension import is disabled for all users.
Add the following to the platform-settings.json file under PlatformSettingsConfig. Update the following ExtensionPackageImportPolicy parameters to true to allow extensions to be imported. Refer to Importing Extensions for best practices on configuration.
"ExtensionPackageImportPolicy": {
"importEnabled": <true or false>,
"allowJarResources": <true or false>,
"allowJavascriptResources": <true or false>,
"allowCSSResources": <true or false>,
"allowJSONResources": <true or false>,
"allowWebAppResources": <true or false>,
"allowEntities": <true or false>,
"allowExtensibleEntities": <true or false>
},
11. If you are not using H2 for your database, go to Database Installation and Configuration to set up your database. Return to the next step after your database is configured. If you are using H2, proceed to the next step.
12. Configure licensing:
◦ Open the platform-settings.json file and add the following to the PlatformSettingsConfig section. Refer to platform-settings.json Configuration Details for more information on placement.
|
|
If you are performing a disconnected installation (no internet access), you do not need to edit the platform-settings.json file. Refer to Licensing for ThingWorx Platform for disconnected sites, and skip this step.
|
{
"PersistenceProviderPackageConfigs": {
"PostgresPersistenceProviderPackage": {
"ConnectionInformation": {
"jdbcUrl": "jdbc:postgresql://localhost:5432/thingworx",
"password": "<password>",
"username": "<username>"
}
}
},
"PlatformSettingsConfig": {
"LicensingConnectionSettings": {
"username":"<PTC_support_portal_username>",
"password":"<PTC_support_portal_password>"
}
}
}
|
|
If the settings are filled out incorrectly or if the server cannot connect, a License Request text file (licenseRequestFile.txt) is created in the ThingworxPlatform folder. In this scenario, a license must be created manually. If the license is not created, ThingWorx will start in limited mode. Limited mode does not allow you to persist licensed entities to the database. Licensed entities are Things, mashups, masters, gadgets, users, and persistence providers.
For more information on obtaining a ThingWorx disconnected site license through our License Management site, refer to Licensing for ThingWorx Platform for disconnected sites (no connection to PTC Support portal). In this situation, if the license file is manually generated, it must be renamed to license_capability_response.bin and placed in the ThingworxPlatform folder.
|
13. Encrypt the license server password by following the steps in Encrypting Passwords.
14. If you are using Azure SQL as your database, follow these steps to download the JDBC driver. Skip this step if you are not using Azure SQL.
a. Go to the Azure portal and navigate to your ThingWorx database.
b. Select Connection strings.
c. Select the JDBC tab.
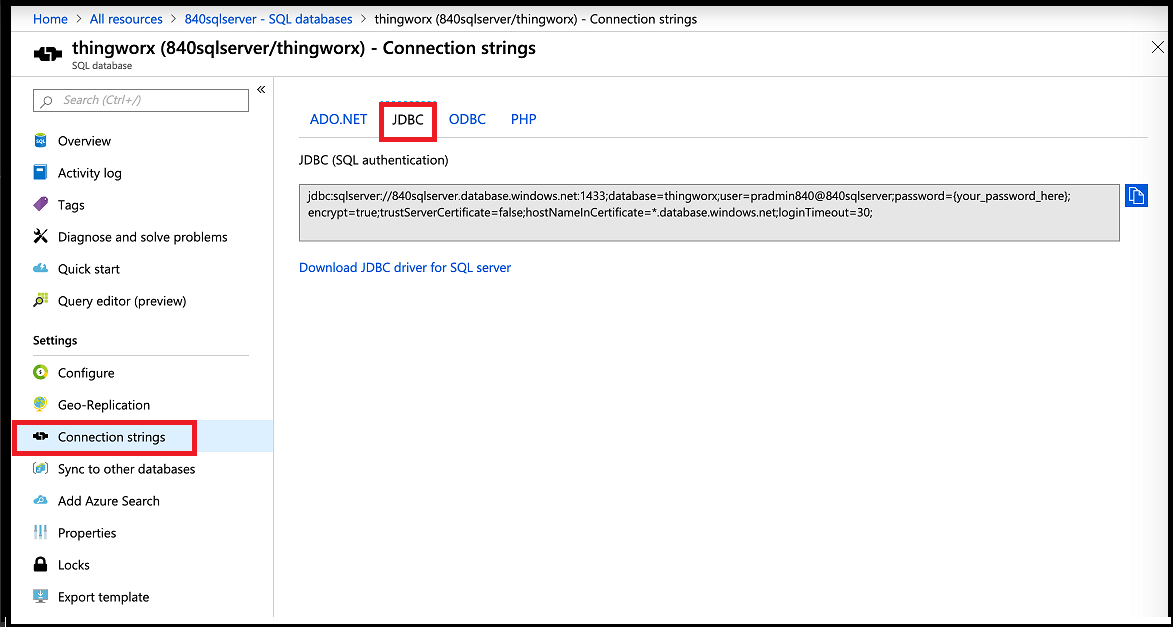
d. Select Download Microsoft JDBC Driver for SQL Server.
e. Select Microsoft JDBC Driver 6.0 for SQL Server.
f. Extract and copy the downloaded binary in your ThingWorx VM to your Tomcat lib directory.
15. Start Tomcat.
$ sudo systemctl start tomcat
Verify that a license file (successful_license_capability_response.bin) is created in the ThingworxPlatform folder.
16. To launch ThingWorx, go to http://<servername>:<port>/Thingworx in a Web browser.
17. Change the default password:
a. In Composer, select Administrator >.
b. In the Change Password window, enter Current Password, New Password, and Confirm Password.
The password, which should not be easily guessed or a known, common password, is recommended to be at least 14 characters in length and should include a mix of uppercase and lowercase letters, numbers, and special characters. |
c. Delete the initial password from the platform-settings.json file.
18. Select Done.
19. (OPTIONAL STEP) To determine the status of your license, open the Monitoring>Subsystem>Licensing Subsystem Settings in Composer to confirm the list of features (licensed entities) included with the license. If there are no licensed entities present, you are in limited mode.