透過叢集 Windchill 環境配置 ThingWorx Navigate
您可以透過叢集 Windchill 環境使用 ThingWorx Navigate。使用負載平衡器的 URL 將 ThingWorx Navigate 連線至 Windchill。使用的 URL 取決於下列條件:
• ThingWorx Navigate 組態 - 單一登入或 Windchill 驗證
• Windchill 基本組態 - HTTP 或 HTTPS 通訊協定
此主題包含叢集環境與 ThingWorx Navigate 組態範例的基本重新整理程式。
|
|
在 ThingWorx Navigate 組態中使用 Windchill 叢集時,您必須考慮某些安全性因素。請確保在生產中使用叢集組態之前審核下面的詳細資訊。
|
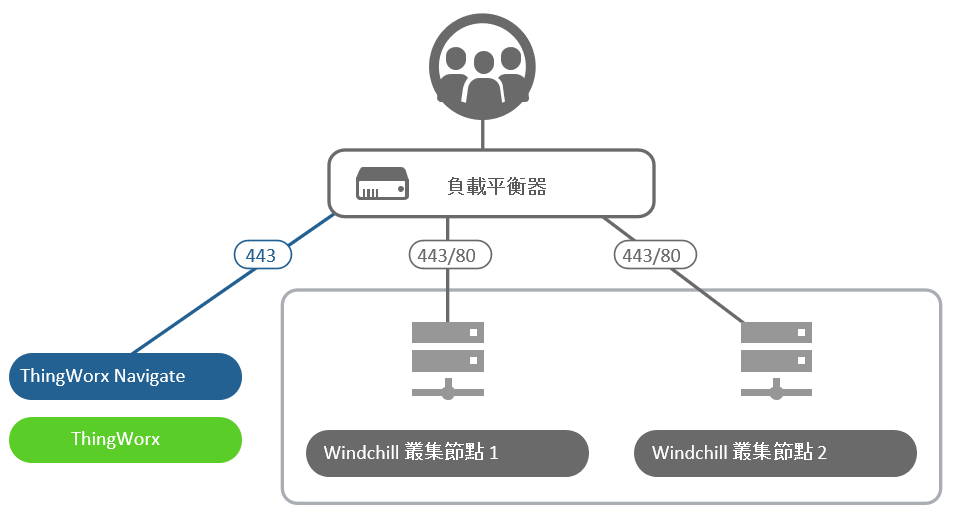
透過 Windchill 叢集配置的 ThingWorx Navigate 圖表

Windchill 叢集:概觀
使用叢集的主要優點是能夠提升效能、可擴充性及可靠性。叢集中包括這些元件:
• 連線至單一資料庫實例的兩個或多個應用程式層級主機,前端為負載平衡路由器。
• 負載平衡路由器 - 接受來自用戶端的請求,包括 Windchill 使用者與 ThingWorx Navigate 使用者。負載平衡器在其中一個 Windchill 實例中分佈請求。如果伺服器當機或流量高,使用者受到的影響較小。
對於網路的其他部份,此路由器會顯示為單一 Windchill 伺服器。它有其自己的主機名稱,並始終應使用 HTTPS 通訊協定。
對於叢集的詳細資訊,請參閱 Windchill 說明中心的安裝與配置叢集 Windchill 環境。
在下面的部份中,將為您介紹四個有關如何為每個 Windchill 驗證組態配置 ThingWorx Navigate 叢集的範例。我們建議單一登入 ThingWorx Navigate;它是最安全的組態。其他組態需要其他設定與安全性考量,以確保配置端對端解決方案。
以使用 HTTPS 與 OAuth 配置的 Windchill 叢集進行 ThingWorx Navigate 單一登入 (建議)
這是最安全的設定。有關您的組態詳細資訊,請遵循:
• ThingWorx Navigate 驗證類型 - SSO
• 負載平衡器通訊協定 - HTTPS
• Windchill 伺服器 - HTTPS 與 OAuth 已配置。SAML 驗證可選用。
由於 Windchill 為 HTTPS,因此負載平衡器未發生 SSL 憑證終止。
在 ThingWorx Composer 中核對這些位置之負載平衡器的 URL:
針對 ptc-windchill-integration-connector,「基礎 URL」為 [https]://[LB-host]:[port]/[windchill-web-app]/oauth
針對 ptc-windchill-integration-connector-proxy:
• 「基礎 URL」- [https]://[LB-host]
• 「測試連線 URL」- [https]://[LB-host]:[port]/[windchill-web-app]/oauth/servlet/WindchillAuthGW/wt.httpgw.HTTPServer/echo
以使用 HTTP 與 OAuth 配置的 Windchill 叢集進行 ThingWorx Navigate 單一登入
有關您的組態詳細資訊,請遵循:
• ThingWorx Navigate 驗證類型 - SSO
• 負載平衡器通訊協定 - HTTPS
• Windchill 伺服器 - HTTP 與 OAuth 已配置。SAML 驗證可選用。
由於 Windchill 為 HTTP,因此負載平衡器發生 SSL 憑證終止。
在 ThingWorx Composer 中核對負載平衡器的 URL。
針對 ptc-windchill-integration-connector,「基礎 URL」為 [https]://[LB-host]:[port]/[windchill-web-app]/oauth。
針對 ptc-windchill-integration-connector-proxy:
• 「基礎 URL」- [https]://[LB-host]
• 「測試連線 URL」- [https]://[LB-host]:[port]/[windchill-web-app]/oauth/servlet/WindchillAuthGW/wt.httpgw.HTTPServer/echo
ThingWorx Navigate 採用 Windchill 驗證,以及使用 HTTP 配置的 Windchill 叢集
不建議採用此替代組態,您應該只能將它用於示範及概念證明目的。組態連線 ThingWorx Navigate 與 Windchill 而無需 SSO 或 SSL。相反地,配置「受信任的主機」內容。 trustedAuth 是後續安裝的手動設定。 使用受信任的主機時即會開啟 ThingWorx 與 Windchill 之間的連線,以允許來自識別的受信任主機的 IP 位址的全部通訊。這新增了中間人 (MIM) 攻擊的風險。敏感資訊將透過此連線顯示。 此外,雖然您的系統可能位於防火牆後,亦存在從內部攻擊與網路組態錯誤的風險。如果攻擊者破壞其中一個網路邊界,則可以直接檢視共用的非加密資訊。這樣就會將風險引入現有 Windchill 產品與 ThingWorx Navigate 組態。 您必須負責決定是否希望接受使用此安裝程式的風險。PTC 不建議使用此組態,並且 PTC 不會對使用「受信任的主機」選項配置系統的任何安全漏洞或攻擊負責。 |
有關您的組態詳細資訊,請遵循:
• ThingWorx Navigate 驗證類型 - Windchill 驗證
• 負載平衡器通訊協定 - HTTPS
• Windchill 伺服器 - HTTP 和 trustedHost 内容已配置。配置此內容的指示如下。
由於 Windchill 為 HTTP,因此負載平衡器發生 SSL 憑證終止。
• 從 Windchill 擷取資料以及在 Windchill 與 ThingWorx Navigate 之間建立連線的其他步驟。
在「ThingWorx Navigate 組態」工具中,在 Windchill 欄位中提供此 URL:
https://<loadbalancer_host>:port>/Windchill
此外,還需要對 Windchill 端執行一些手動步驟。我們需要將 ThingWorx 伺服器及負載平衡器的 IP 位址建立為受信任的主機。這樣一來,我們使用負載平衡器保護到 Windchill 的 ThingWorx Navigate 連線。
這也可以防止不受信任的用戶端主機透過負載平衡器達到 Windchill /trustedAuth/ URL 模式,以改善安全性。
請在 Windchill 端執行下列步驟:
1. 停止 Windchill 方法伺服器。
2. 轉至 WT_HOME/codebase/WEB-INF/web.xml,然後在文字編輯器中開啟它。
3. 找到 TrustedSSLAuthFilter 與 TrustedAuthFilter 部份,然後將參數 clientHostHeader (如下) 新增至這兩個部份。例如:
<filter>
<description>Filter allowing a trusted SSL certificate to specify the remote user for the request</description>
<filter-name>TrustedSSLAuthFilter</filter-name>
<filter-class>wt.httpgw.filter.TrustedAuthFilter</filter-class>
<init-param>
<param-name>trustTrustedHosts</param-name>
<param-value>false</param-value>
</init-param>
<init-param>
<param-name>clientHostHeader</param-name>
<param-value>X-Forwarded-For</param-value>
</init-param>
</filter>
<filter>
<description>Filter allowing a trusted client to specify the remote user for the request</description>
<filter-name>TrustedAuthFilter</filter-name>
<filter-class>wt.httpgw.filter.TrustedAuthFilter</filter-class>
<init-param>
<param-name>clientHostHeader</param-name>
<param-value>X-Forwarded-For</param-value>
</init-param>
</filter>
4. 將參數 TrustedHostFilter 新增至同一檔案。例如:
<filter>
<description>Filter allowing a trusted client to specify the remote user for the request</description>
<filter-name>TrustedHostFilter</filter-name>
<filter-class>wt.servlet.TrustedHostFilter</filter-class>
</filter>
<filter-mapping>
<filter-name>TrustedHostFilter</filter-name>
<url-pattern>/trustedAuth/*</url-pattern>
</filter-mapping>
5. 儲存並關閉 web.xml。
6. 現在,於指令提示視窗中開啟 Windchill shell。
7. 如果尚未新增 wt.auth.trustedHosts,則向 xconf.properties 新增以下內容:
<Property name="wt.auth.trustedHosts" overridable="true"
targetFile="codebase/wt.properties"
value="<TWXHost_IP> <LBHost_IP>">
targetFile="codebase/wt.properties"
value="<TWXHost_IP> <LBHost_IP>">
TWXHost 為 ThingWorx 主機名稱,LBHost 為負載平衡器主機名稱。
8. 執行 xconfmanager -p。
9. 如果 wt.properties 檔案中未設定 wt.auth.trustedHosts,請使用下列 xconfmanager 指令設定内容:或者,直接在 wtproperties 中新增:
xconfmanager --set wt.auth.trustedHosts==<TWXHost_IP> <LBHost_IP> -t codebase/wt.properties -p
TWXHost 為 ThingWorx 主機名稱,LBHost 為負載平衡器主機名稱。
10. 啟動 Windchill 方法伺服器。
Windchill 現已配置 trustedHost 内容。
我們需要使用 Windchill 中的 trustedAuth 選項,這需要對連接器和連接器 Proxy 設定進行某些更新:
1. 在 ThingWorx Composer 中開啟 ptc-windchill-connector。
2. 按一下「組態」,然後在「基礎 URL」旁邊,輸入下列 URL:
[https]://[LB-host]:[port]/[windchill-web-app]/trustedAuth
3. 按一下「儲存」。
4. 開啟 ptc-windchill-connector-proxy,然後按一下「組態」。
5. 在「測試連線 URL」旁邊輸入此 URL:
[https]://[LB-host]:[port]/[windchill-web-app]/trustedAuth/servlet/WindchillAuthGW/wt.httpgw.HTTPServer/echo
6. 按一下「儲存」。
您 Windchill 叢集組態現已完成。