Managing Connectors
Use CONNECTORS dashboard to create and manage connectors, from any connection type to connect to the third-party systems.
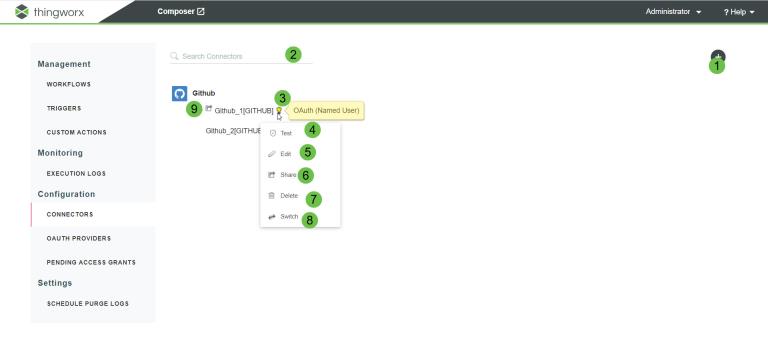
CONNECTORS Dashboard
Under Configuration, click CONNECTORS to display all connectors that you have created, grouped by third-party name alphabetically. You have access to all connectors that are created by you. You cannot see any connector that has been created by another user, even if it is shared with you.
Click  next to a connector name to access various actions that are available for the connector. You can manage connectors in one of the following ways:
next to a connector name to access various actions that are available for the connector. You can manage connectors in one of the following ways:• Test, edit, share, delete, or switch any connector in the ThingWorx Flow system from the ThingWorx Flowdashboard.
• View and remove connectors used in a specific workflow from the Workflow settings page.
The following table provides a description of the actions that are available for users on the Connectors dashboard page:
Legend | Description |
|---|---|
1 | Create a connector. For more information, see Creating connectors. |
2 | Search connectors by name. |
3 | Hover over  to display the connector type. For example: OAuth (Named User) or Windchill Basic. to display the connector type. For example: OAuth (Named User) or Windchill Basic.For more information, see Connector types. |
4 | Test the connector against the external system to check if it is valid. |
5 | Edit the connector. |
6 | • Share—Share a connector so that other users can use it in new triggers or actions, or configure existing triggers or actions to use the connector. Shared connectors are denoted by  . .Other users can use this shared connector in existing triggers and actions, including using this connector to lookup data from the external system. However, other users cannot view or edit details of the connector. • Stop Sharing—Stop sharing the connector so that other users cannot use it in new triggers and actions or configure existing triggers and actions to use the connector. If you try to execute a workflow with a shared connector that is no longer shared with you, the workflow execution fails. |
7 | Delete the connector. You cannot delete connectors that are used in any workflow. If you want to delete a connector that is used in any workflow, you must remove the connector from the workflow. For more information about deleting a connector from the workflow, see Workflow settings. |
8 | Switches the authorization type for the selected connector. For example, you can switch the connector type from Basic to OAuth (Named User). The connector name remains the same. When you switch from one connector type to another, as per the connector type, you must provide correct credentials and grant access to appropriate scopes. Any existing workflows that use this connector automatically start using the new switched connector. This option is displayed only if the third-party service supports more than one connector type. For example, to switch from Windchill Basic to Windchill OAuth (Named User), do the following: 1. Click next to the Windchill Basic connector name, and click Switch.2. In the Switch Connector window, select Windchill OAuth (Named User). 3. Enter the correct credentials and grant access to the appropriate scopes. 4. Click ADD. You cannot modify the value of the Connector Label field. |
9 | Indicates that you have shared the connector with other users. |