Creating Connectors
Creating Connectors
Use one of the following options to create a connector:
From the ThingWorx Flow dashboard
To create a connector from the ThingWorx Flow dashboard, do the following:
1. On the ThingWorx Flow dashboard, click , and click  .
.
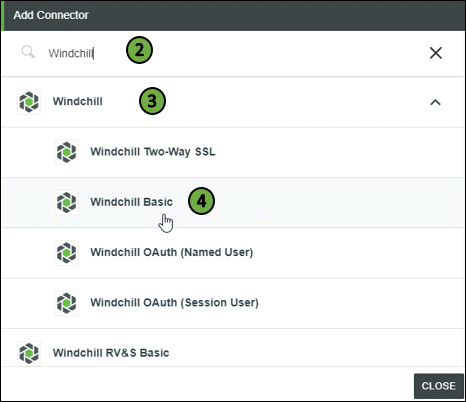
.2. In the Add Connector window, search for the connector that you want to add, or click  to filter connectors by their supported types.
to filter connectors by their supported types.3. Select the connector that you want to add to display the supported connector types.
4. Select the connector type that you want to add.
For example, to select the Windchill Basic connector type, in the Search field, search for Windchill, click  , and select Windchill Basic.
, and select Windchill Basic.The following image demonstrates steps 2, 3, and 4:
5. As per the connector type that you selected, enter your credentials or grant appropriate accesses to log in to the third-party system in the next pop-up, and click ADD.
Once the connector is added, you can use it in any action or trigger.
From the Workflow Editor
To create a connector from the Workflow Editor, do the following:
1. Drag any action under the connector to the canvas, place the pointer on the action, and then click  or double-click the action.
or double-click the action.2. For Connector Type, select the connector type that you want to create.
3. Under Connector Name, in the drop-down list, select one of the following relevant options:
▪ Add New
▪ Add new login – Named User
▪ Add new login – Session User
For example, to select the Windchill Basic connector type, for Connector Type, select Windchill Basic, and in the Windchill Basic list, select Add New.
4. As per the connector type that you selected, enter your credentials or grant appropriate accesses to log in to the third-party system in the next pop-up, and click ADD.
Once the connector is added, you can use it in any action or trigger.