Step 4. Create Security Entities for the Connector
The Azure IoT Hub Connector requires a user and application key to access the ThingWorx Platform. In addition, running the services that grant visibility and permissions to a Connector requires that you specify a user, user group, and organization. The steps below explain how to create these entities, using ThingWorx Composer:
Creating a User for the Connector
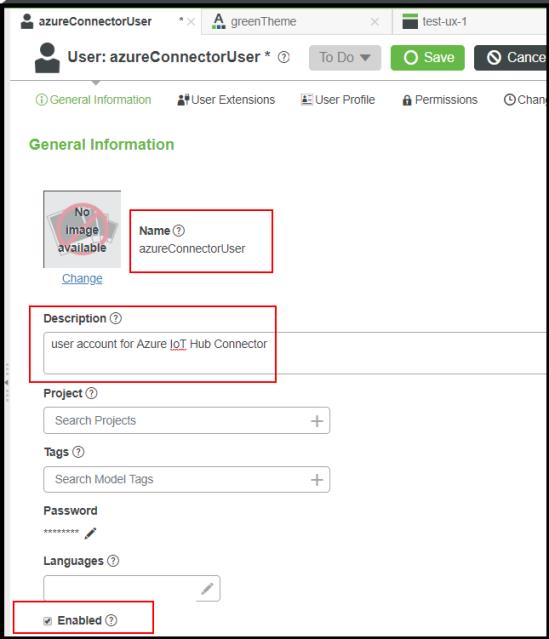
1. Log in to ThingWorx Composer, and use the navigation panel on the left to expand Security and then select Users.
2. In the Users page, select +New, and enter the following information for the Connector user:
◦ Name — For example, azureConnectorUser.
◦ Description — For example, user account for the Connector.
◦ Make sure the check box next to Enabled is checked.
3. Click Save. The User page looks similar to this:
Creating a User Group for the Connector
1. From the navigation panel in ThingWorx Composer, click  to go back to the Browse list, and under Security, select User Groups.
2. In the User Groups page, click +New.
3. In the General Information page, type a Name for the group. For example, azureConnectorUserGroup, and click Save.
4. Click Manage Members, and under Available Members on the Manage Members page, select the check box next to the name of the user you just created. Using the example, you would select the azureConnectorUser. Then, click the right-facing arrow to add this user to the azureConnectorUserGroup. The end result should look similar to the following screen:

5. Click Save.
Creating an Organization for the Connector
1. From the navigation panel, click to go back to the Browse list, and under Security, select Organizations.
2. In the Organizations page, click +New.
3. In the General Information page, type a Name for the organization. For example, azureConnectorOrganization, and click Save.
4. Click Organization and in the Organization page, click Unit1.
5. In the Unit 1 page, go to the Members field and click the plus icon to display a list of user groups and users that you can add to the organization. For example:
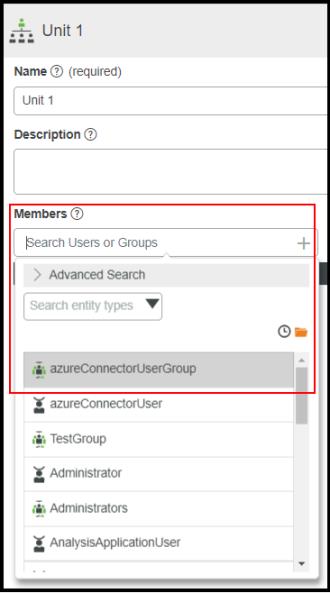
6. Select the user group that you created for the Connector. In the example above, it is the azureeConnectorUserGroup. The list of Members displays your addition.
7. To save, click the  icon. The Unit 1 screen closes and returns you to the Organization page.
icon. The Unit 1 screen closes and returns you to the Organization page.Next, create an application key for the Connector.
Creating an application key for the Connector
Follow these steps to configure an application key for the Connector in ThingWorx Composer:
1. Select > , and click +New.
2. Enter the appropriate values:
a. Name — A name for the application key. For example, azureIotConnectorAppKey
b. User Name Reference — The name of the user account that you just created for the Connector. This entry associates that user account with the application key. You can select from a list by clicking the plus icon in this field, which displays the following:
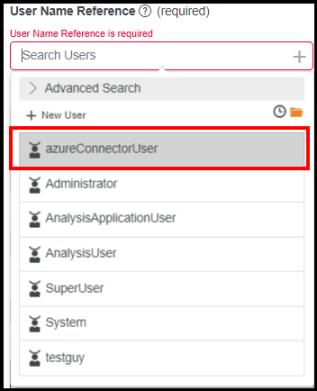
In the example above, the azureConnectorUser is selected. The permissions and visibility assigned to this user account affect what the Azure IoT Hub Connector can do on the platform. For example, write new values to remote properties for Azure IoT Things.
c. Expiration Date — A date in the future for the application key to expire, based on your company policies. The default value is one day.
3. Click Save to generate the application key.
4. In a secure location, record the application key. You need it to configure the Connector.
5. The user requires some basic permissions to allow the Azure IoT Hub Connector to connect to the platform and operate. You need to set this up before starting the Connector. For details refer to
Step 9. Run the Service to Grant Permissions and Visibility to the Connector.
6. Do not log out of Composer. You need to create entities for the Azure IoT items.